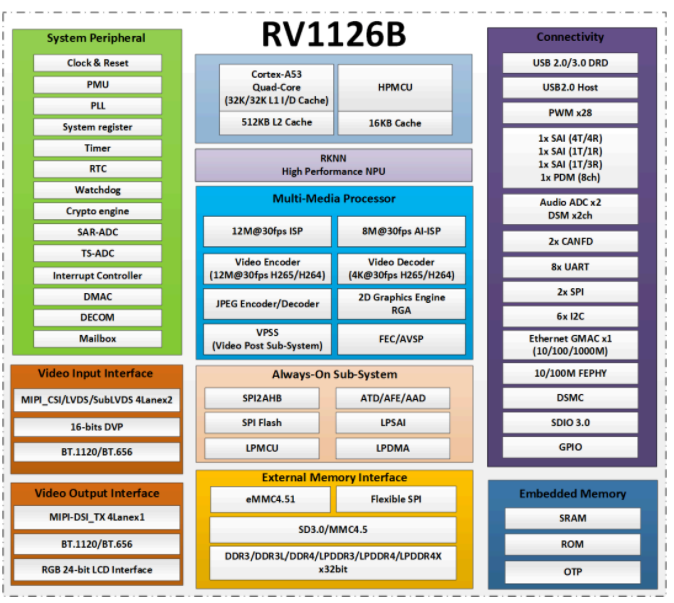
 瑞芯微(EASY EAI)RV1126B 人體關鍵點識別

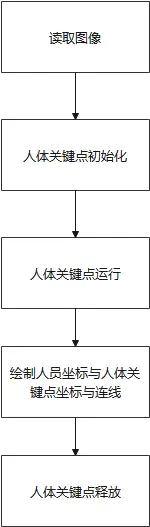
1. 人體關鍵點識別簡介
人體關鍵點識別是一種基于深度學習的對人進行檢測定位與姿勢估計的模型,廣泛應用于體育分析、動物行為監測和機器人等領域,幫助機器實時解讀物理動作。本算法具有運行效率高、實時性強的特點。
本人員檢測算法在數據集表現如下所示:

基于EASY-EAI-Nano-TB(RV1126B)硬件主板的運行效率:

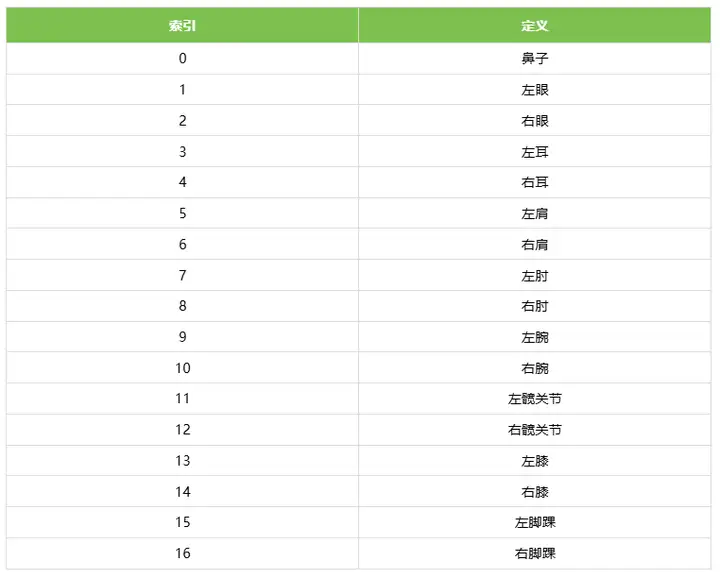
17個人體關鍵點索引定義:
2. 快速上手
2.1 開發環境準備
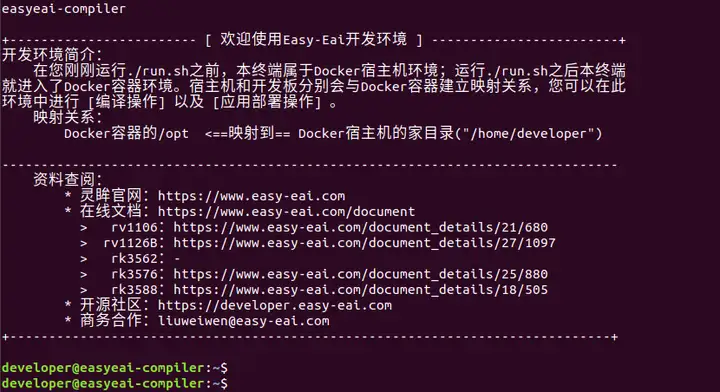
如果您初次閱讀此文檔,請閱讀《入門指南/開發環境準備/Easy-Eai編譯環境準備與更新》,并按照其相關的操作,進行編譯環境的部署。
在PC端Ubuntu系統中執行run腳本,進入EASY-EAI編譯環境,具體如下所示。
cd ~/develop_environment ./run.sh 2204
2.2 源碼下載
在EASY-EAI編譯環境下創建存放源碼倉庫的管理目錄:
cd /opt mkdir EASY-EAI-Toolkit cd EASY-EAI-Toolkit
通過git工具,在管理目錄內克隆遠程倉庫
git clone https://github.com/EASY-EAI/EASY-EAI-Toolkit-1126B.git

注:
* 此處可能會因網絡原因造成卡頓,請耐心等待。
* 如果實在要在gitHub網頁上下載,也要把整個倉庫下載下來,不能單獨下載本實例對應的目錄。
2.3 模型部署
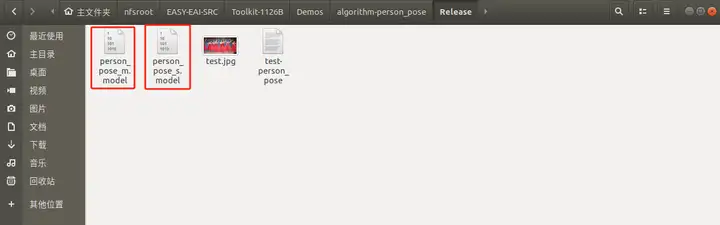
要完成算法Demo的執行,需要先下載人體關鍵點檢測算法模型。
百度網盤鏈接為:https://pan.baidu.com/s/13BsL5MZ4NQ8jDDe-5WLXDw?pwd=1234(提取碼:1234 )。

同時需要把下載的人體關鍵點檢測算法模型復制粘貼到Release/目錄:
2.4 例程編譯
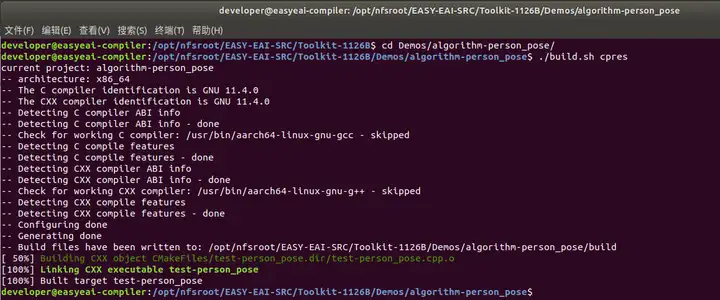
進入到對應的例程目錄執行編譯操作,具體命令如下所示:
cd EASY-EAI-Toolkit-1126B/Demos/algorithm-person_pose/ ./build.sh cpres
注:
* 由于依賴庫部署在板卡上,因此交叉編譯過程中必須保持/mnt掛載。
* 若build.sh腳本帶有cpres參數,則會把Release/目錄下的所有資源都拷貝到開發板上。
2.5 例程運行及效果
通過串口調試或ssh調試,進入板卡后臺,定位到例程部署的位置,如下所示:
cd /userdata/Demo/algorithm-person_pose/

運行例程命令如下所示:
sudo ./test-person_pose person_pose_m.model test.jpg

在EASY-EAI編譯環境可以取回測試圖片:
cp /mnt/userdata/Demo/algorithm-person_pose/result.jpg .

結果圖片如下所示:
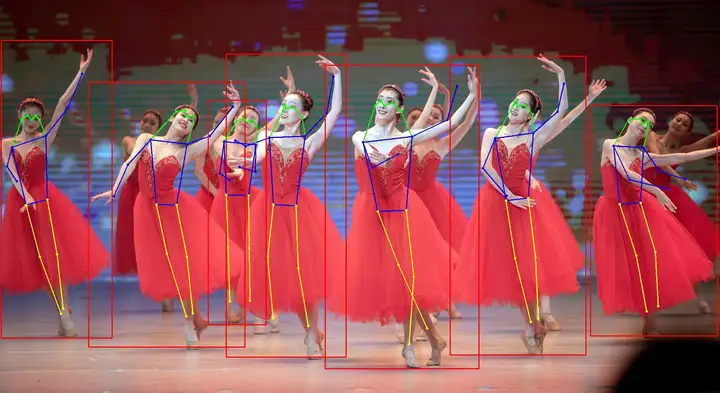
API的詳細說明,以及API的調用(本例程源碼),詳細信息見下方說明。
3. 人體關鍵點檢測API說明
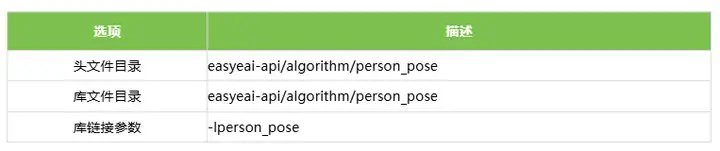
3.1 引用方式
為方便客戶在本地工程中直接調用我們的EASY EAI api庫,此處列出工程中需要鏈接的庫以及頭文件等,方便用戶直接添加。
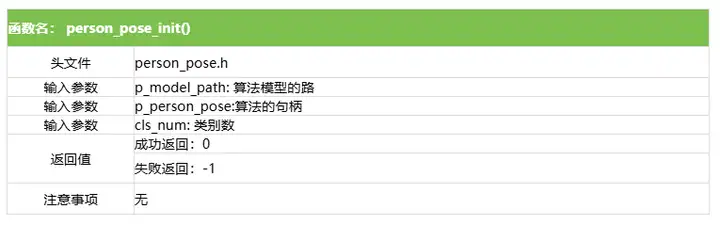
3.2 人體關鍵點識別初始化函數
人體關鍵點識別初始化函數原型如下所示。
int person_pose_init(const char *c, person_pose_context_t *p_person_pose, int cls_num)
具體介紹如下所示。
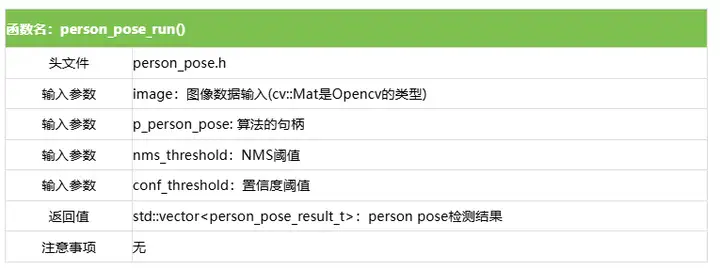
3.3 人體關鍵點識別運行函數
人體關鍵點識別運行函數person_pose_run原型如下所示。
std::vector person_pose_run(cv::Mat image, person_pose_context_t *p_person_pose, float nms_threshold, float conf_threshold);
具體介紹如下所示。
3.4 人體關鍵點識別釋放函數
人體關鍵點識別釋放函數原型如下所示。
int person_pose_release(person_pose_context_t* p_person_pose)
具體介紹如下所示。

4. 人體關鍵識別算法例程
例程目錄為Demos/algorithm-person_pose/test-person_pose.cpp,操作流程如下。
參考例程如下所示。
#include #include #include #include #include "person_pose.h" #include // 畫線 cv::Mat draw_line(cv::Mat image, float *key1, float *key2, cv::Scalar color) { if (key1[2] > 0.1 && key2[2] > 0.1) { cv::Point pt1(key1[0], key1[1]); cv::Point pt2(key2[0], key2[1]); cv::circle(image, pt1, 2, color, 2); cv::circle(image, pt2, 2, color, 2); cv::line(image, pt1, pt2, color, 2); } return image; } // 繪制結果: // 0鼻子, 1左眼, 2右眼,3左耳,4右耳,5左肩,6右肩,7左肘,8右肘,9左腕,10右腕,11左髖關節,12右髖關節,13左膝,14右膝,15左腳踝,16右腳踝 cv::Mat draw_image(cv::Mat image, std::vector results) { long unsigned int i =0; for (i = 0; i < results.size(); i++) { // 繪制臉部 image = draw_line(image, results[i].keypoints[0], results[i].keypoints[1], CV_RGB(0, 255, 0)); image = draw_line(image, results[i].keypoints[0], results[i].keypoints[2], CV_RGB(0, 255, 0)); image = draw_line(image, results[i].keypoints[1], results[i].keypoints[3], CV_RGB(0, 255, 0)); image = draw_line(image, results[i].keypoints[2], results[i].keypoints[4], CV_RGB(0, 255, 0)); image = draw_line(image, results[i].keypoints[3], results[i].keypoints[5], CV_RGB(0, 255, 0)); image = draw_line(image, results[i].keypoints[4], results[i].keypoints[6], CV_RGB(0, 255, 0)); // 繪制上半身 image = draw_line(image, results[i].keypoints[5], results[i].keypoints[6], CV_RGB(0, 0, 255)); image = draw_line(image, results[i].keypoints[5], results[i].keypoints[7], CV_RGB(0, 0, 255)); image = draw_line(image, results[i].keypoints[7], results[i].keypoints[9], CV_RGB(0, 0, 255)); image = draw_line(image, results[i].keypoints[6], results[i].keypoints[8], CV_RGB(0, 0, 255)); image = draw_line(image, results[i].keypoints[8], results[i].keypoints[10], CV_RGB(0, 0, 255)); image = draw_line(image, results[i].keypoints[5], results[i].keypoints[11], CV_RGB(0, 0, 255)); image = draw_line(image, results[i].keypoints[6], results[i].keypoints[12], CV_RGB(0, 0, 255)); image = draw_line(image, results[i].keypoints[11], results[i].keypoints[12], CV_RGB(0, 0, 255)); // 繪制下半身 image = draw_line(image, results[i].keypoints[11], results[i].keypoints[13], CV_RGB(255, 255, 0)); image = draw_line(image, results[i].keypoints[13], results[i].keypoints[15], CV_RGB(255, 255, 0)); image = draw_line(image, results[i].keypoints[12], results[i].keypoints[14], CV_RGB(255, 255, 0)); image = draw_line(image, results[i].keypoints[14], results[i].keypoints[16], CV_RGB(255, 255, 0)); cv::Rect rect(results[i].left, results[i].top, (results[i].right - results[i].left), (results[i].bottom - results[i].top)); cv::rectangle(image, rect, CV_RGB(255, 0, 0), 2); } return image; } /// 主函數 int main(int argc, char **argv) { if (argc != 3) { printf("%s \n", argv[0]); return -1; } const char *p_model_path = argv[1]; const char *p_img_path = argv[2]; printf("Model path = %s, image path = %s\n\n", p_model_path, p_img_path); cv::Mat image = cv::imread(p_img_path); printf("Image size = (%d, %d)\n", image.rows, image.cols); int ret; person_pose_context_t yolo11_pose; memset(&yolo11_pose, 0, sizeof(yolo11_pose)); person_pose_init(p_model_path, &yolo11_pose, 1); double start_time = static_cast(cv::getTickCount()); std::vector results = person_pose_run(image, &yolo11_pose, 0.35, 0.35); double end_time = static_cast(cv::getTickCount()); double time_elapsed = (end_time - start_time) / cv::getTickFrequency() * 1000; std::cout << "person pose run time: " << time_elapsed << " ms" << std::endl; // 繪制結果 image = draw_image(image, results); cv::imwrite("result.jpg", image); printf("Detect size = %ld\n", results.size()); ret = person_pose_release(&yolo11_pose); return ret; }
-
Linux
+關注
關注
88文章
11784瀏覽量
219268 -
瑞芯微
+關注
關注
27文章
803瀏覽量
54509 -
EASY-EAI靈眸科技
+關注
關注
4文章
67瀏覽量
3687 -
RV1126B
+關注
關注
0文章
57瀏覽量
207
發布評論請先 登錄
瑞芯微全新AI視覺芯片RV1126B:多場景智能終端方案介紹

瑞芯微(EASY EAI)RV1126B 音頻輸入

瑞芯微(EASY EAI)RV1126B PWM使用
如何用瑞芯微RV1126B核心板贏得AI紅利?
【EASY EAI Nano-TB(RV1126B)開發板試用】+初識篇
【EASY EAI Nano-TB(RV1126B)開發板試用】命令行功能測試-shell腳本進行IO控制-燈閃
【EASY EAI Nano-TB(RV1126B)開發板試用】命令行功能測試-shell腳本進行IO控制-紅綠燈項目
【EASY EAI Nano-TB(RV1126B)開發板試用】命令行功能測試-shell腳本進行IO控制-紅綠燈按鈕項目
請問各位大佬,如何解決,瑞芯微 RV1126B 使用 mpp 自帶工具 調試時,內核直接報錯崩潰!
【EASY EAI Nano-TB(RV1126B)開發板試用】+1、開箱上電
【EASY EAI Nano-TB(RV1126B)開發板試用】介紹、系統安裝
RV1126系列選型指南:從RV1126到RV1126B,一文看懂升級差異

【免費試用】EASY EAI Nano-TB(RV1126B)開發套件評測

瑞芯微RV1126B特性概述
替代升級實錘!實測RV1126B,CPU性能吊打RV1126


 工商網監
工商網監
評論