") 國(guó)產(chǎn)Cortex-A55實(shí)驗(yàn)箱:輕松上手,人工智能環(huán)境搭建教程
國(guó)產(chǎn)Cortex-A55實(shí)驗(yàn)箱:輕松上手,人工智能環(huán)境搭建教程

操作步驟
1、實(shí)驗(yàn)箱(或者電腦)需要聯(lián)網(wǎng)
2、拷貝文件
拷貝 Miniconda3-latest-Linux-aarch64.sh 到開(kāi)發(fā)板(電腦上的Ubuntu安裝使用Miniconda3-latest-Linux-x86_64.sh)
3、運(yùn)行安裝文件
運(yùn)行安裝 Miniconda3-latest-Linux-aarch64.sh(電腦上的Ubuntu安裝使用Miniconda3-latest-Linux-x86_64.sh)
./Miniconda3-latest-Linux-aarch64.sh
回車(一直回車到提示輸入“yes”)->yes->回車->yes
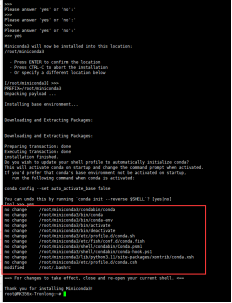
4、更新環(huán)境變量
source /home/tronlong/.bashrc
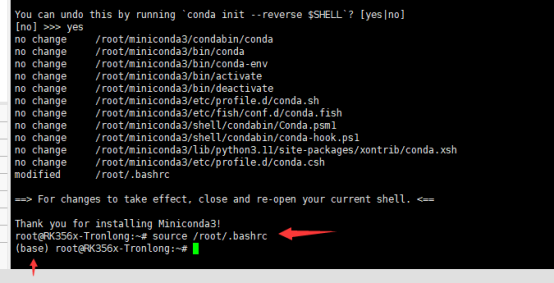
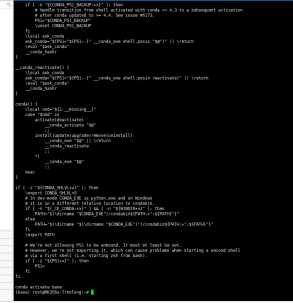
5、更新環(huán)境
/home/tronlong/miniconda3/condabin/conda shell.bash hook
6、創(chuàng)建虛擬環(huán)境
創(chuàng)建python虛擬環(huán)境,虛擬環(huán)境名字為:rk3568-python
conda create -n rk3568-python python==3.11
7、進(jìn)入虛擬環(huán)境
8、安裝opencv-python
pip install opencv-python -
i https://pypi.tuna.tsinghua.edu.cn/simple
9、更新軟件源和軟件
sudo apt update
sudo apt upgrade
sudo apt-get dist-upgrade
10、安裝setuptools
pip install launchpadlib
pip install setuptools==45.2
11、安裝jupyter和jupyterlab
pip install -i
https://pypi.tuna.tsinghua.edu.cn/simple jupyter
pip install -i
https://pypi.tuna.tsinghua.edu.cn/simple jupyterlab
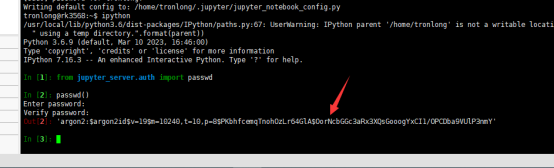
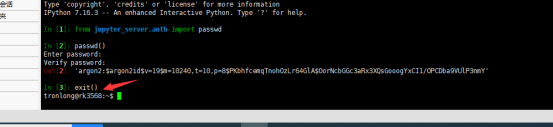
12、獲取生成碼
jupyter notebook --generate-config
ipython
from jupyter_server.auth import passwd
passwd()
輸密碼:tronlong
exit()
拷貝生成的碼
13、添加內(nèi)容
在jupyter_notebook_config.py添加內(nèi)容
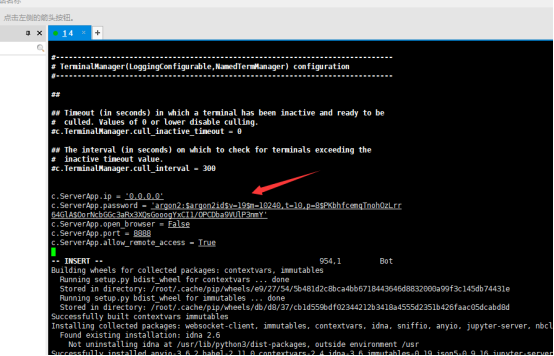
根據(jù)實(shí)際生成的碼進(jìn)行修改
c.ServerApp.ip = '0.0.0.0'
c.ServerApp.password = 'argon2:$argon2id$v=19$m=10240,t=10,p=8$jEef4LFNODvFiXh4XFNwhw$yRwwFOFOWtVp1/cN/cwXMJl3zQubclPkhhHBEsswo6k'
c.ServerApp.open_browser = False
c.ServerApp.port = 8888
c.ServerApp.allow_remote_access = True
添加后保存退出
14、安裝nodejs npm
sync
sudo apt install nodejs npm
15、安裝SSH
sudo apt install openssh-server
16、檢查安裝
jupyter lab --allow-root
然后打開(kāi)次連接,第一次進(jìn)入需要輸入密碼,密碼為第12步驟輸入的密碼
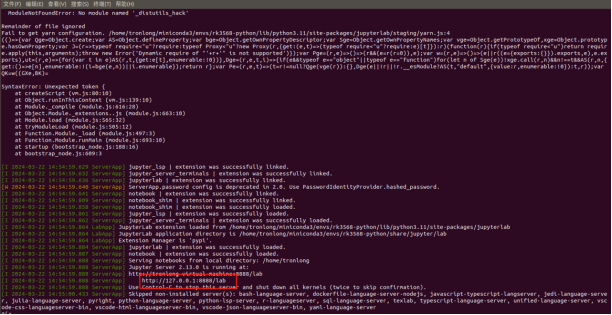
然后就可以看到如下界面,則證明安裝成功。
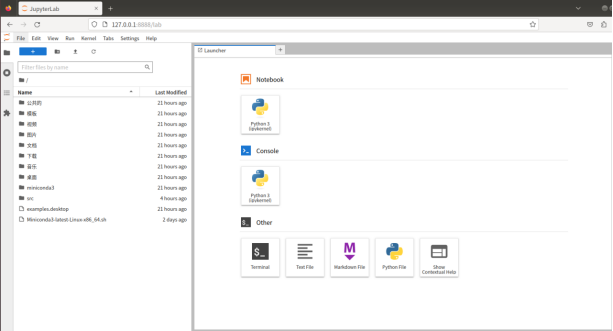
關(guān)閉:關(guān)掉網(wǎng)頁(yè),然后終端ctrl+c,輸入y,回車。
17、安裝插件
pip install scikit-build -i
https://pypi.tuna.tsinghua.edu.cn/simple
pip install cmake -i
https://pypi.tuna.tsinghua.edu.cn/simple
pip install Cython -i
https://pypi.tuna.tsinghua.edu.cn/simple
pip install pycocotools -i
https://pypi.tuna.tsinghua.edu.cn/simple
pip install opencv-python -i
https://pypi.tuna.tsinghua.edu.cn/simple
pip install cv -i
https://pypi.tuna.tsinghua.edu.cn/simple
pip install opencv-python-headless -i
https://pypi.tuna.tsinghua.edu.cn/simple
pip install pyserial -i
https://pypi.tuna.tsinghua.edu.cn/simple
pip install absl-py
pip install pygame
pip install baidu-aip
pip install torch -i
https://pypi.tuna.tsinghua.edu.cn/simple
pip install rospkg、pip install catkin-tools
pip install Adafruit_BBIO
pip install Adafruit_SSD1306
pip install Pillow
pip install chardet
pip install matplotlib
pip uninstall setuptools
pip install setuptools==45.2
pip install demjson
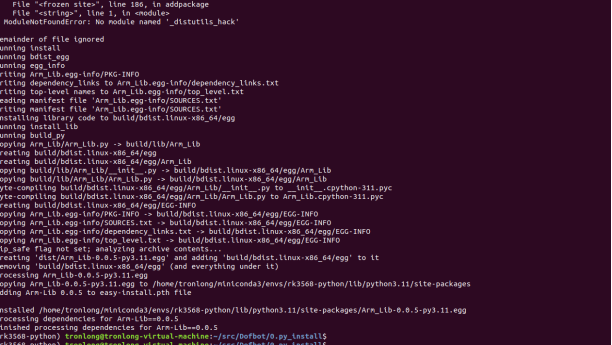
18、安裝arm_lib庫(kù)
將src拷貝到開(kāi)發(fā)板(或者電腦ubuntu)中
cd src/Dofbot/0.py_install
然后安裝arm_lib庫(kù):
python setup.py install
安裝完畢后如下顯示:
-
嵌入式
+關(guān)注
關(guān)注
5198文章
20442瀏覽量
333964 -
人工智能
+關(guān)注
關(guān)注
1817文章
50094瀏覽量
265263 -
實(shí)驗(yàn)箱
+關(guān)注
關(guān)注
0文章
70瀏覽量
9604
發(fā)布評(píng)論請(qǐng)先 登錄
Cortex-A55和Cortex-A73處理器的區(qū)別
創(chuàng)龍教儀基于瑞芯微3568的ARM Cortex A-55教學(xué)實(shí)驗(yàn)箱 適用于人工智能 傳感器 物聯(lián)網(wǎng)等領(lǐng)域
Cortex-A55 處理器到底什么來(lái)頭?創(chuàng)龍教儀一文帶您了解
挖到寶了!比鄰星人工智能綜合實(shí)驗(yàn)箱,高校新工科的寶藏神器!
挖到寶了!人工智能綜合實(shí)驗(yàn)箱,高校新工科的寶藏神器
什么是ARM Cortex-A55?
國(guó)產(chǎn)高性能RK3568四核 | Cortex-A55核心板
Cortex-A55和Cortex-A73處理器的區(qū)別
基于“中國(guó)芯”RK3568 ARM Cortex-A55教學(xué)實(shí)驗(yàn)箱強(qiáng)勢(shì)首發(fā)

為什么更推薦Cortex-A55教學(xué)實(shí)驗(yàn)箱?我來(lái)告訴您!
干貨!國(guó)產(chǎn)Cortex-A55人工智能實(shí)驗(yàn)箱機(jī)械臂積木搬運(yùn)實(shí)驗(yàn)案例
干貨!國(guó)產(chǎn)Cortex-A55人工智能實(shí)驗(yàn)箱機(jī)械臂跳舞實(shí)驗(yàn)案例
國(guó)產(chǎn)Cortex-A55高性能人工智能實(shí)驗(yàn)箱機(jī)械臂姿態(tài)識(shí)別案例
智能目標(biāo)顏色識(shí)別抓取丨國(guó)產(chǎn)Cortex-A55人工智能實(shí)驗(yàn)箱機(jī)械臂案例分享
智能機(jī)械臂人臉識(shí)別特效丨國(guó)產(chǎn)Cortex-A55人工智能實(shí)驗(yàn)箱案例分享


 工商網(wǎng)監(jiān)
評(píng)論