 【RTT大賽作品連載】AB32VG1評估板到貨控制彩燈測試

上次發布了一篇文章(【RTT大賽作品連載】AB32VG1評估板到貨點燈測試-電子發燒友網 (elecfans.com)),解決很多愛好者從在RT-ThreadStudio新建項目到對應開發配置及下載等各部分環節的問題!得到了很多愛好者的認可!

哈哈,先曬點贊的!

重要的是幫好多愛好者解決了實際問題!
接下來看看在如何AB32VG1評估板控制彩燈!
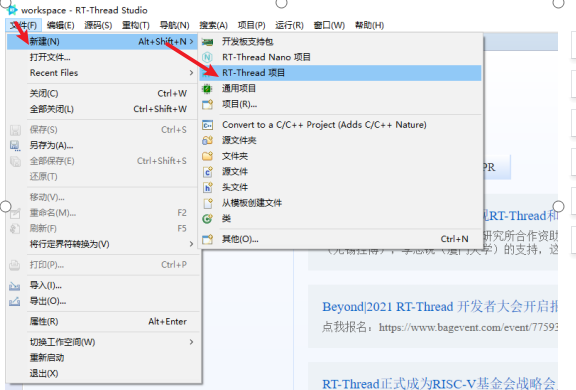
在RT-ThreadStudio新建項目到對應開發配置及下載及驗證測試!!!
還是詳細點!!!用截圖-》
新建項目!
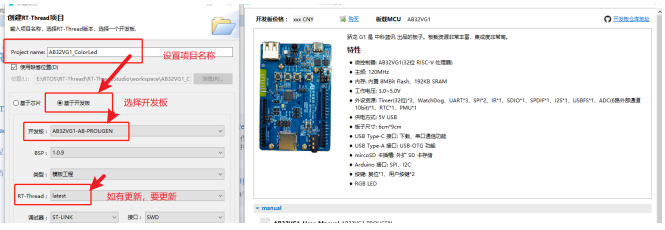
點完成,新建就好了!
接下來是這次會用的軟件包設置!!!
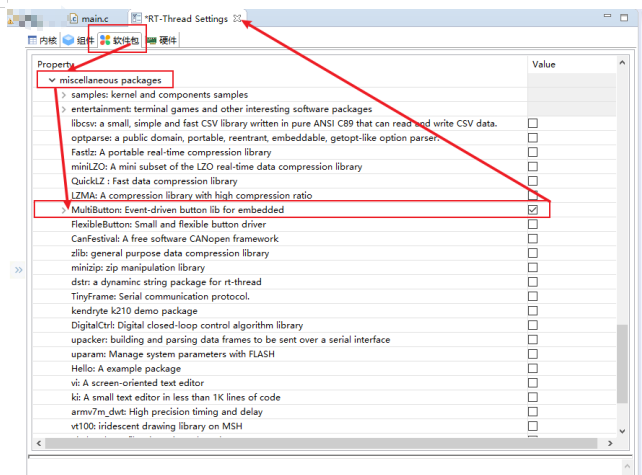
設置好后點關閉,會提示保存設置選項,點保存即可!
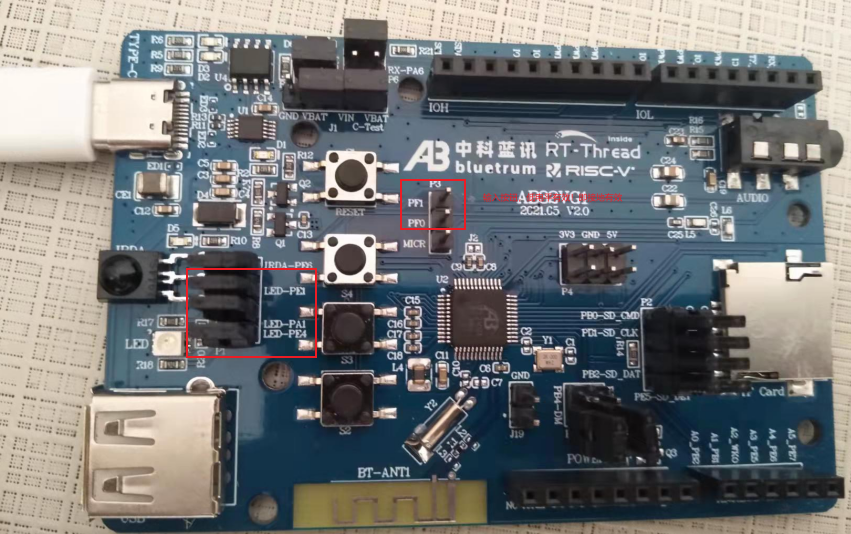
接下來會用到這幾IO!如圖
軟件代碼內容暫時直接寫在main函數文件里!!!
如圖
具體內容如下:
#include
#include "board.h"
#include
#define BUTTON_PIN_0 rt_pin_get("PF.0")//control timeDelay
#define BUTTON_PIN_1 rt_pin_get("PF.1")//control colorLed mode
uint32_t delayTime = 1;
uint32_t state = 0;
uint32_t cnt_0 = 1;
static struct button btn_0;
static struct button btn_1;
static uint8_t button_read_pin_0(void)
{
return rt_pin_read(BUTTON_PIN_0);
}
static uint8_t button_read_pin_1(void)
{
return rt_pin_read(BUTTON_PIN_1);
}
static void button_0_callback(void* btn)
{
uint32_t btn_event_val;
btn_event_val = get_button_event((struct button*)btn);
switch (btn_event_val)
{
case SINGLE_CLICK:
cnt_0++;
delayTime = cnt_0 * 200;
if (cnt_0 == 10)
{
cnt_0 = 1;
}
rt_kprintf("button 0 single click\ndelayTime=%d\n", delayTime);
break;
case DOUBLE_CLICK:
if (cnt_0 > 1)
{
cnt_0--;
}
delayTime = cnt_0 * 200;
rt_kprintf("button 0 double click\ndelayTime=%d\n", delayTime);
break;
case LONG_PRESS_START:
rt_kprintf("button 0 long press start\n");
break;
case LONG_PRESS_HOLD:
rt_kprintf("button 0 long press hold\n");
break;
}
}
static void button_1_callback(void* btn)
{
uint32_t btn_event_val;
btn_event_val = get_button_event((struct button*)btn);
switch (btn_event_val)
{
case SINGLE_CLICK:
state = !state;
if (state == 0) {
rt_kprintf("one color\n");
}
else {
rt_kprintf("more color\n");
}
rt_kprintf("button 1 single click\n");
break;
case DOUBLE_CLICK:
rt_kprintf("more color\n");
rt_kprintf("button 1 single click\n");
default:
break;
}
}
static void btn_thread_entry(void* p)
{
while (1)
{
/* 5ms */
rt_thread_delay(RT_TICK_PER_SECOND / 200);
button_ticks();
}
}
static int multi_button_test(void)
{
rt_thread_t thread = RT_NULL;
/* Create background ticks thread */
thread = rt_thread_create("btn", btn_thread_entry, RT_NULL, 1024, 10, 10);
if (thread == RT_NULL)
{
return RT_ERROR;
}
rt_thread_startup(thread);
/* low level drive */
rt_pin_mode(BUTTON_PIN_0, PIN_MODE_INPUT_PULLUP);
button_init(&btn_0, button_read_pin_0, PIN_LOW);
button_attach(&btn_0, SINGLE_CLICK, button_0_callback);
button_attach(&btn_0, DOUBLE_CLICK, button_0_callback);
button_attach(&btn_0, LONG_PRESS_START, button_0_callback);
button_attach(&btn_0, LONG_PRESS_HOLD, button_0_callback);
button_start(&btn_0);
rt_pin_mode(BUTTON_PIN_1, PIN_MODE_INPUT_PULLUP);
button_init(&btn_1, button_read_pin_1, PIN_LOW);
button_attach(&btn_1, SINGLE_CLICK, button_1_callback);
button_attach(&btn_1, DOUBLE_CLICK, button_1_callback);
button_attach(&btn_1, LONG_PRESS_START, button_1_callback);
button_attach(&btn_1, LONG_PRESS_HOLD, button_1_callback);
button_start(&btn_1);
return RT_EOK;
}
INIT_APP_EXPORT(multi_button_test);
int main(void)
{
uint32_t cnt = 0;
rt_kprintf("Hello, world11\n");
uint8_t pin = rt_pin_get("PE.1");
rt_pin_mode(pin, PIN_MODE_OUTPUT);
uint8_t pin1 = rt_pin_get("PE.4");
rt_pin_mode(pin1, PIN_MODE_OUTPUT);
uint8_t pin2 = rt_pin_get("PA.1");
rt_pin_mode(pin2, PIN_MODE_OUTPUT);
while (1)
{
if (cnt % 8 == 0)
{
rt_pin_write(pin, PIN_LOW);
rt_pin_write(pin1, PIN_HIGH);
rt_pin_write(pin2, PIN_HIGH);
}
if (cnt % 8 == 1)
{
rt_pin_write(pin, PIN_HIGH);
rt_pin_write(pin1, PIN_LOW);
rt_pin_write(pin2, PIN_HIGH);
}
if (cnt % 8 == 2)
{
rt_pin_write(pin, PIN_HIGH);
rt_pin_write(pin1, PIN_HIGH);
rt_pin_write(pin2, PIN_LOW);
}
if (cnt % 8 == 3)
{
rt_pin_write(pin, PIN_LOW);
rt_pin_write(pin1, PIN_LOW);
rt_pin_write(pin2, PIN_HIGH);
}
if (cnt % 8 == 4)
{
rt_pin_write(pin, PIN_HIGH);
rt_pin_write(pin1, PIN_LOW);
rt_pin_write(pin2, PIN_LOW);
}
if (cnt % 8 == 5)
{
rt_pin_write(pin, PIN_LOW);
rt_pin_write(pin1, PIN_HIGH);
rt_pin_write(pin2, PIN_LOW);
}
if (cnt % 8 == 6)
{
rt_pin_write(pin, PIN_LOW);
rt_pin_write(pin1, PIN_LOW);
rt_pin_write(pin2, PIN_LOW);
}
if (cnt % 8 == 7)
{
rt_pin_write(pin, PIN_HIGH);
rt_pin_write(pin1, PIN_HIGH);
rt_pin_write(pin2, PIN_HIGH);
}
if (state == 1)
cnt++;
rt_thread_mdelay(delayTime);
}
}
編譯好,下載驗證如下!
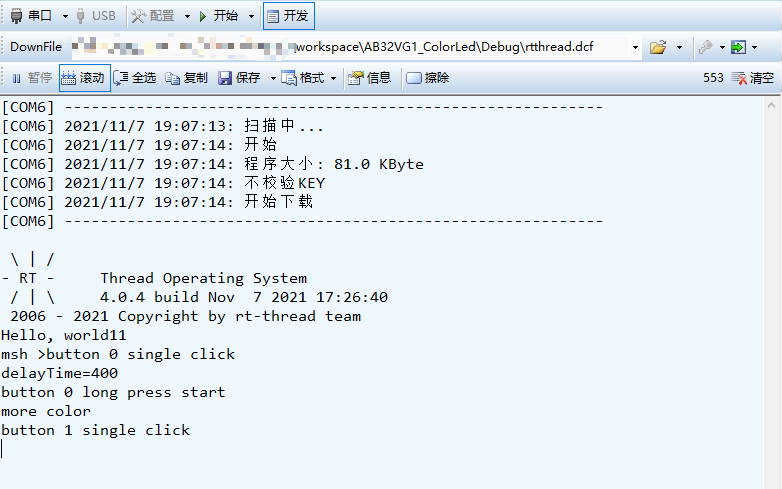
驗證OK!
其實還可以在此基礎上,讓ColorLed'更好玩,喜歡的愛好者可以試試讓它更炫酷!!!
最后,看到上一篇閱讀量破2100了(【RTT大賽作品連載】AB32VG1評估板到貨點燈測試-電子發燒友網 (elecfans.com))
很高興!!!大家一起加油!!!
-
led
+關注
關注
243文章
24594瀏覽量
690788 -
RTOS
+關注
關注
25文章
866瀏覽量
122970 -
開發板
+關注
關注
26文章
6289瀏覽量
118037 -
RT-Thread
+關注
關注
32文章
1613瀏覽量
44818 -
中科藍訊
+關注
關注
10文章
66瀏覽量
10661
發布評論請先 登錄
Renesas MCB - RA8T1:電機控制評估CPU板的深度解析
EVAL - M1 - 101T評估板:電機控制應用的理想選擇
EVAL-M1-IM241評估板:電機驅動應用的理想之選
EiceDRIVER? 1EDI3035AS/1EDI3038AS 評估板:深入解析與應用指南
安路DR1M90評估板:從基礎外設到通信模塊測試指南
STEVAL-3601CV1評估板技術解析與應用指南
[投票評選]2025電子發燒友開發板測評大賽--最受歡迎開發板
【精選資料】開發板測評大賽作品合集!

【作品合集】合眾HZ-T536開發板測評
【創龍TL3562-MiniEVM開發板試用體驗】評估板功能測試(一)
Analog Devices Inc. EV-ADF4030SD1Z評估板數據手冊


 工商網監
工商網監
評論