") ?使用旭日X3派實現(xiàn)手勢檢測
?使用旭日X3派實現(xiàn)手勢檢測

作者阿#杰
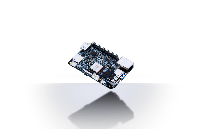
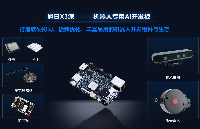
本篇博客通過旭日X3搭載手勢識別算法,實現(xiàn)實時檢測,同時測試其運行性能。
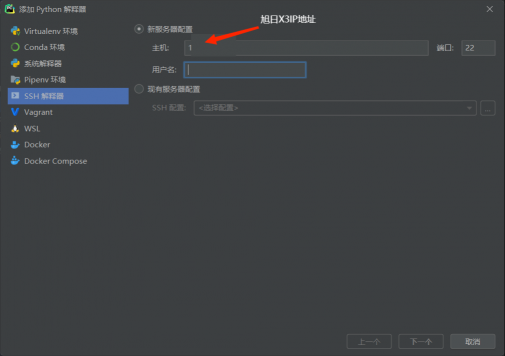
針對旭日X3上并沒有很好的python IDE編譯環(huán)境的問題,本篇博客通過SSH遠(yuǎn)程連接的方式,可以在不給旭日X3內(nèi)存壓力的同時, 提供一個更好的代碼編寫環(huán)境, 同時通過SSH的方式給旭日X3配置對應(yīng)的環(huán)境 ,起到方便快捷的作用。
一、準(zhǔn)備工作
首先在電腦上安裝配有pycharm專業(yè)版(專業(yè)版可以使用ssh遠(yuǎn)程登陸,學(xué)生使用教育郵箱申請pycharm專業(yè)版)。
Pycharm是一款用于Python編程的集成開發(fā)環(huán)境(IDE)。它可以幫助您編寫,測試和調(diào)試代碼,并具有諸如代碼提示,自動完成和錯誤檢測等功能,以幫助您更快地編寫高質(zhì)量的代碼。
本次主要使用通過SSH遠(yuǎn)程連接旭日X3,以便于傳輸代碼到x3派上,實現(xiàn)python的遠(yuǎn)程操作。
其次,本次工作用到Meidapipe功能包,MediaPipe 是一款由 Google Research 開發(fā)并開源的多媒體機(jī)器學(xué)習(xí)模型應(yīng)用框架,可以直接調(diào)用其API完成目標(biāo)檢測、人臉檢測以及關(guān)鍵點檢測等。
Meidapipe是一個針對深度學(xué)習(xí)模型的高效執(zhí)行庫,由PyTorch設(shè)計而成,提供了高級API,用于加速預(yù)測和推理的過程。它為模型執(zhí)行提供了優(yōu)化和并行化的功能,并且支持多個GPU和分布式訓(xùn)練。
同時,Meidapipe還支持模型壓縮和部署,使模型在嵌入式設(shè)備和移動設(shè)備上的執(zhí)行更加高效和靈活。
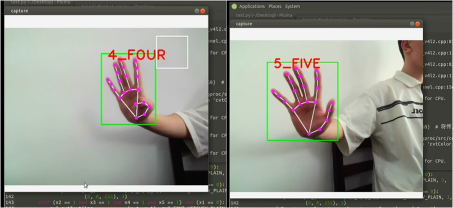
項目完成的效果展示:
二、部署過程
在x3派上安裝pip3及導(dǎo)入Meidapipe包:
sudo apt install python3-pip


pip3 install mediapipe -i https://mirrors.cloud.tencent.com/pypi/simple
確定旭日X3中攝像頭端口:
首先不插usb攝像頭輸入
ls /dev/video*
然后插上usb攝像頭再輸入ls /dev/video*
多出的端口號即為攝像頭端口。
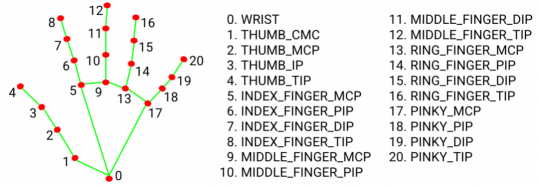
創(chuàng)建手部類對象
初始化手部對象
hands是檢測手部關(guān)鍵點的函數(shù),其中有4個輸入?yún)?shù)量可以選擇
1、static_image_mode:默認(rèn)為False,如果設(shè)置為false, 就是把輸入看作一個視頻流,在檢測到手之后對手加了一個目標(biāo)跟蹤(目標(biāo)檢測+跟蹤),無需調(diào)用另一次檢測,直到失去對任何手的跟蹤為止。
如果設(shè)置為True,則手部檢測將在每個輸入圖像上運行(目標(biāo)檢測),非常適合處理一批靜態(tài)的,可能不相關(guān)的圖像。(如果檢測的是圖片就要設(shè)置成True)
2、max_num_hands:可以檢測到的手的數(shù)量最大值,默認(rèn)是2
3、min_detection_confidence: 手部檢測的最小置信度值,大于這個數(shù)值被認(rèn)為是成功的檢測。默認(rèn)為0.5
4、min_tracking_confidence:目標(biāo)蹤模型的最小置信度值,大于這個數(shù)值將被視為已成功跟蹤的手部,默認(rèn)為0.5,如果static_image_mode設(shè)置為true,則忽略此操作。
class HandDetector:
  """
  使用mediapipe庫查找手。導(dǎo)出地標(biāo)像素格式。添加了額外的功能。
  如查找方式,許多手指向上或兩個手指之間的距離。而且提供找到的手的邊界框信息。
  """


  def __init__(self, mode=False, maxHands=2, detectionCon=0.5, minTrackCon=0.5):
    """
    :param mode: 在靜態(tài)模式下,對每個圖像進(jìn)行檢測
    :param maxHands: 要檢測的最大手?jǐn)?shù)
    :param detectionCon: 最小檢測置信度
    :param minTrackCon: 最小跟蹤置信度
    """
    self.mode = mode
    self.maxHands = maxHands
    self.modelComplex = False
    self.detectionCon = detectionCon
    self.minTrackCon = minTrackCon
     # 初始化手部識別模型
    self.mpHands = mp.solutions.hands
    self.hands = self.mpHands.Hands(self.mode, self.maxHands, self.modelComplex,
                self.detectionCon, self.minTrackCon)
    self.mpDraw = mp.solutions.drawing_utils # 初始化繪圖器
    self.tipIds = [4, 8, 12, 16, 20] # 指尖列表
    self.fingers = []
    self.lmList = []
創(chuàng)建發(fā)現(xiàn)手部并在圖像中繪制函數(shù),返回繪制后的圖像。
def findHands(self, img, draw=True):
  """
  從圖像(BRG)中找到手部。
  :param img: 用于查找手的圖像。
  :param draw: 在圖像上繪制輸出的標(biāo)志。
  :return: 帶或不帶圖形的圖像
  """
  imgRGB = cv2.cvtColor(img, cv2.COLOR_BGR2RGB) # 將傳入的圖像由BGR模式轉(zhuǎn)標(biāo)準(zhǔn)的Opencv模式——RGB模式,
  self.results = self.hands.process(imgRGB)


  if self.results.multi_hand_landmarks:
    for handLms in self.results.multi_hand_landmarks:
      if draw:
        self.mpDraw.draw_landmarks(img, handLms,
                      self.mpHands.HAND_CONNECTIONS)
  return img
創(chuàng)建發(fā)現(xiàn)手部坐標(biāo)函數(shù),并返回手部坐標(biāo)列表。
def findPosition(self, img, handNo=0, draw=True):
  """
  查找單手的地標(biāo)并將其放入列表中像素格式。還可以返回手部周圍的邊界框。
  :param img: 要查找的主圖像
  :param handNo: 如果檢測到多只手,則為手部id
  :param draw: 在圖像上繪制輸出的標(biāo)志。(默認(rèn)繪制矩形框)
  :return: 像素格式的手部關(guān)節(jié)位置列表;手部邊界框
  """


  xList = []
  yList = []
  bbox = []
  bboxInfo = []
  self.lmList = []
  if self.results.multi_hand_landmarks:
    myHand = self.results.multi_hand_landmarks[handNo]
    for id, lm in enumerate(myHand.landmark):
      h, w, c = img.shape
      px, py = int(lm.x * w), int(lm.y * h)
      xList.append(px)
      yList.append(py)
      self.lmList.append([px, py])
      if draw:
        cv2.circle(img, (px, py), 5, (255, 0, 255), cv2.FILLED)
    xmin, xmax = min(xList), max(xList)
    ymin, ymax = min(yList), max(yList)
    boxW, boxH = xmax - xmin, ymax - ymin
    bbox = xmin, ymin, boxW, boxH
    cx, cy = bbox[0] + (bbox[2] // 2),
         bbox[1] + (bbox[3] // 2)
    bboxInfo = {"id": id, "bbox": bbox, "center": (cx, cy)}


    if draw:
      cv2.rectangle(img, (bbox[0] - 20, bbox[1] - 20),
             (bbox[0] + bbox[2] + 20, bbox[1] + bbox[3] + 20),
             (0, 255, 0), 2)


  return self.lmList, bboxInfo
判斷展開手指數(shù)量,同時區(qū)分左右手。
def fingersUp(self):
  """
  查找列表中打開并返回的手指數(shù)。會分別考慮左手和右手
  :return:豎起手指的列表
  """
  if self.results.multi_hand_landmarks:
    myHandType = self.handType()
    fingers = []
    # Thumb
    if myHandType == "Right":
      if self.lmList[self.tipIds[0]][0] > self.lmList[self.tipIds[0] - 1][0]:
        fingers.append(1)
      else:
        fingers.append(0)
    else:
      if self.lmList[self.tipIds[0]][0] < self.lmList[self.tipIds[0] - 1][0]:
 ? ? ? ? ? ? ? ?fingers.append(1)
 ? ? ? ? ? ?else:
 ? ? ? ? ? ? ? ?fingers.append(0)
 ? ? ? ?# 4 Fingers
 ? ? ? ?for id in range(1, 5):
 ? ? ? ? ? ?if self.lmList[self.tipIds[id]][1] < self.lmList[self.tipIds[id] - 2][1]:
 ? ? ? ? ? ? ? ?fingers.append(1)
 ? ? ? ? ? ?else:
 ? ? ? ? ? ? ? ?fingers.append(0)
 ? ?return fingers
判斷識別到的是左手 or 右手。
def handType(self):
  """
  檢查傳入的手部是左還是右
  :return: "Right" 或 "Left"
  """
  if self.results.multi_hand_landmarks:
    if self.lmList[17][0] < self.lmList[5][0]:
 ? ? ? ? ? ?return "Right"
 ? ? ? ?else:
 ? ? ? ? ? ?return "Left"
以上為手部檢測類中方法的創(chuàng)建實現(xiàn),通過調(diào)用類的方式來實現(xiàn)相應(yīng)的功能。
創(chuàng)建Main類,用于具體實現(xiàn)功能
攝像頭初始化
class Main:
  def __init__(self):
    self.camera = cv2.VideoCapture(1, cv2.CAP_DSHOW)
    self.camera.set(3, 1280)
    self.camera.set(4, 720)
調(diào)用手部類,并將相關(guān)信息顯示在實時畫面中
def Gesture_recognition(self):
  while True:
    self.detector = HandDetector()
    frame, img = self.camera.read()
    img = self.detector.findHands(img)
    lmList, bbox = self.detector.findPosition(img)


    if lmList:
      x_1, y_1 = bbox["bbox"][0], bbox["bbox"][1]
      x1, x2, x3, x4, x5 = self.detector.fingersUp()


      if (x2 == 1 and x3 == 1) and (x4 == 0 and x5 == 0 and x1 == 0):
        cv2.putText(img, "2_TWO", (x_1, y_1), cv2.FONT_HERSHEY_PLAIN, 3,
              (0, 0, 255), 3)
      elif (x2 == 1 and x3 == 1 and x4 == 1) and (x1 == 0 and x5 == 0):
        cv2.putText(img, "3_THREE", (x_1, y_1), cv2.FONT_HERSHEY_PLAIN, 3,
              (0, 0, 255), 3)
      elif (x2 == 1 and x3 == 1 and x4 == 1 and x5 == 1) and (x1 == 0):
        cv2.putText(img, "4_FOUR", (x_1, y_1), cv2.FONT_HERSHEY_PLAIN, 3,
              (0, 0, 255), 3)
      elif x1 == 1 and x2 == 1 and x3 == 1 and x4 == 1 and x5 == 1:
        cv2.putText(img, "5_FIVE", (x_1, y_1), cv2.FONT_HERSHEY_PLAIN, 3,
              (0, 0, 255), 3)
      elif x2 == 1 and (x1 == 0, x3 == 0, x4 == 0, x5 == 0):
        cv2.putText(img, "1_ONE", (x_1, y_1), cv2.FONT_HERSHEY_PLAIN, 3,
              (0, 0, 255), 3)
      elif x1 and (x2 == 0, x3 == 0, x4 == 0, x5 == 0):
        cv2.putText(img, "GOOD!", (x_1, y_1), cv2.FONT_HERSHEY_PLAIN, 3,
              (0, 0, 255), 3)
    cv2.imshow("camera", img)
    if cv2.getWindowProperty('camera', cv2.WND_PROP_VISIBLE) < 1:
 ? ? ? ? ? ?break
 ? ? ? ?cv2.waitKey(1)
程序入口:執(zhí)行相關(guān)功能。
if __name__ == '__main__':
  Solution = Main()
  Solution.Gesture_recognition()
完整代碼展示
import cv2
import mediapipe as mp


class HandDetector:
  """
  使用mediapipe庫查找手。導(dǎo)出地標(biāo)像素格式。添加了額外的功能。
  如查找方式,許多手指向上或兩個手指之間的距離。而且提供找到的手的邊界框信息。
  """


  def __init__(self, mode=False, maxHands=2, detectionCon=0.5, minTrackCon=0.5):
    """
    :param mode: 在靜態(tài)模式下,對每個圖像進(jìn)行檢測
    :param maxHands: 要檢測的最大手?jǐn)?shù)
    :param detectionCon: 最小檢測置信度
    :param minTrackCon: 最小跟蹤置信度
    """
    self.mode = mode
    self.maxHands = maxHands
    self.modelComplex = False
    self.detectionCon = detectionCon
    self.minTrackCon = minTrackCon


    # 初始化手部識別模型
    self.mpHands = mp.solutions.hands
    self.hands = self.mpHands.Hands(self.mode, self.maxHands, self.modelComplex,
                    self.detectionCon, self.minTrackCon)
    self.mpDraw = mp.solutions.drawing_utils # 初始化繪圖器
    self.tipIds = [4, 8, 12, 16, 20] # 指尖列表
    self.fingers = []
    self.lmList = []


  def findHands(self, img, draw=True):
    """
    從圖像(BRG)中找到手部。
    :param img: 用于查找手的圖像。
    :param draw: 在圖像上繪制輸出的標(biāo)志。
     帶或不帶圖形的圖像
    """
    imgRGB = cv2.cvtColor(img, cv2.COLOR_BGR2RGB) # 將傳入的圖像由BGR模式轉(zhuǎn)標(biāo)準(zhǔn)的Opencv模式——RGB模式,
    self.results = self.hands.process(imgRGB)


    if self.results.multi_hand_landmarks:
      for handLms in self.results.multi_hand_landmarks:
        if draw:
          self.mpDraw.draw_landmarks(img, handLms,
                        self.mpHands.HAND_CONNECTIONS)
    return img


  def findPosition(self, img, handNo=0, draw=True):
    """
    查找單手的地標(biāo)并將其放入列表中像素格式。還可以返回手部周圍的邊界框。
    :param img: 要查找的主圖像
    :param handNo: 如果檢測到多只手,則為手部id
    :param draw: 在圖像上繪制輸出的標(biāo)志。(默認(rèn)繪制矩形框)
     像素格式的手部關(guān)節(jié)位置列表;手部邊界框
    """


    xList = []
    yList = []
    bbox = []
    bboxInfo = []
    self.lmList = []
    if self.results.multi_hand_landmarks:
      myHand = self.results.multi_hand_landmarks[handNo]
      for id, lm in enumerate(myHand.landmark):
        h, w, c = img.shape
        px, py = int(lm.x * w), int(lm.y * h)
        xList.append(px)
        yList.append(py)
        self.lmList.append([px, py])
        if draw:
          cv2.circle(img, (px, py), 5, (255, 0, 255), cv2.FILLED)
      xmin, xmax = min(xList), max(xList)
      ymin, ymax = min(yList), max(yList)
      boxW, boxH = xmax - xmin, ymax - ymin
      bbox = xmin, ymin, boxW, boxH
      cx, cy = bbox[0] + (bbox[2] // 2),
           bbox[1] + (bbox[3] // 2)
      bboxInfo = {"id": id, "bbox": bbox, "center": (cx, cy)}


      if draw:
        cv2.rectangle(img, (bbox[0] - 20, bbox[1] - 20),
               (bbox[0] + bbox[2] + 20, bbox[1] + bbox[3] + 20),
               (0, 255, 0), 2)


    return self.lmList, bboxInfo


  def fingersUp(self):
    """
    查找列表中打開并返回的手指數(shù)。會分別考慮左手和右手
    :return:豎起手指的列表
    """
    if self.results.multi_hand_landmarks:
      myHandType = self.handType()
      fingers = []
      # Thumb
      if myHandType == "Right":
        if self.lmList[self.tipIds[0]][0] > self.lmList[self.tipIds[0] - 1][0]:
          fingers.append(1)
        else:
          fingers.append(0)
      else:
        if self.lmList[self.tipIds[0]][0] < self.lmList[self.tipIds[0] - 1][0]:
 ? ? ? ? ? ? ? ? ? ?fingers.append(1)
 ? ? ? ? ? ? ? ?else:
 ? ? ? ? ? ? ? ? ? ?fingers.append(0)
 ? ? ? ? ? ?# 4 Fingers
 ? ? ? ? ? ?for id in range(1, 5):
 ? ? ? ? ? ? ? ?if self.lmList[self.tipIds[id]][1] < self.lmList[self.tipIds[id] - 2][1]:
 ? ? ? ? ? ? ? ? ? ?fingers.append(1)
 ? ? ? ? ? ? ? ?else:
 ? ? ? ? ? ? ? ? ? ?fingers.append(0)
 ? ? ? ?return fingers


 ? ?def handType(self):
 ? ? ? ?"""
 ? ? ? ?檢查傳入的手部是左還是右
 ? ? ? ?:return: "Right" 或 "Left"
 ? ? ? ?"""
 ? ? ? ?if self.results.multi_hand_landmarks:
 ? ? ? ? ? ?if self.lmList[17][0] < self.lmList[5][0]:
 ? ? ? ? ? ? ? ?return "Right"
 ? ? ? ? ? ?else:
 ? ? ? ? ? ? ? ?return "Left"


class Main:
 ? ?def __init__(self):
 ? ? ? ?self.camera = cv2.VideoCapture(1, cv2.CAP_DSHOW)
 ? ? ? ?self.camera.set(3, 1280)
 ? ? ? ?self.camera.set(4, 720)


 ? ?def Gesture_recognition(self):
 ? ? ? ?while True:
 ? ? ? ? ? ?self.detector = HandDetector()
 ? ? ? ? ? ?frame, img = self.camera.read()
 ? ? ? ? ? ?img = self.detector.findHands(img)
 ? ? ? ? ? ?lmList, bbox = self.detector.findPosition(img)


 ? ? ? ? ? ?if lmList:
 ? ? ? ? ? ? ? ?x_1, y_1 = bbox["bbox"][0], bbox["bbox"][1]
 ? ? ? ? ? ? ? ?x1, x2, x3, x4, x5 = self.detector.fingersUp()


 ? ? ? ? ? ? ? ?if (x2 == 1 and x3 == 1) and (x4 == 0 and x5 == 0 and x1 == 0):
 ? ? ? ? ? ? ? ? ? ?cv2.putText(img, "2_TWO", (x_1, y_1), cv2.FONT_HERSHEY_PLAIN, 3,
 ? ? ? ? ? ? ? ? ? ? ? ? ? ? ? ?(0, 0, 255), 3)
 ? ? ? ? ? ? ? ?elif (x2 == 1 and x3 == 1 and x4 == 1) and (x1 == 0 and x5 == 0):
 ? ? ? ? ? ? ? ? ? ?cv2.putText(img, "3_THREE", (x_1, y_1), cv2.FONT_HERSHEY_PLAIN, 3,
 ? ? ? ? ? ? ? ? ? ? ? ? ? ? ? ?(0, 0, 255), 3)
 ? ? ? ? ? ? ? ?elif (x2 == 1 and x3 == 1 and x4 == 1 and x5 == 1) and (x1 == 0):
 ? ? ? ? ? ? ? ? ? ?cv2.putText(img, "4_FOUR", (x_1, y_1), cv2.FONT_HERSHEY_PLAIN, 3,
 ? ? ? ? ? ? ? ? ? ? ? ? ? ? ? ?(0, 0, 255), 3)
 ? ? ? ? ? ? ? ?elif x1 == 1 and x2 == 1 and x3 == 1 and x4 == 1 and x5 == 1:
 ? ? ? ? ? ? ? ? ? ?cv2.putText(img, "5_FIVE", (x_1, y_1), cv2.FONT_HERSHEY_PLAIN, 3,
 ? ? ? ? ? ? ? ? ? ? ? ? ? ? ? ?(0, 0, 255), 3)
 ? ? ? ? ? ? ? ?elif x2 == 1 and (x1 == 0, x3 == 0, x4 == 0, x5 == 0):
 ? ? ? ? ? ? ? ? ? ?cv2.putText(img, "1_ONE", (x_1, y_1), cv2.FONT_HERSHEY_PLAIN, 3,
 ? ? ? ? ? ? ? ? ? ? ? ? ? ? ? ?(0, 0, 255), 3)
 ? ? ? ? ? ? ? ?elif x1 and (x2 == 0, x3 == 0, x4 == 0, x5 == 0):
 ? ? ? ? ? ? ? ? ? ?cv2.putText(img, "GOOD!", (x_1, y_1), cv2.FONT_HERSHEY_PLAIN, 3,
 ? ? ? ? ? ? ? ? ? ? ? ? ? ? ? ?(0, 0, 255), 3)
 ? ? ? ? ? ?cv2.imshow("camera", img)
 ? ? ? ? ? ?if cv2.getWindowProperty('camera', cv2.WND_PROP_VISIBLE) < 1:
 ? ? ? ? ? ? ? ?break
 ? ? ? ? ? ?cv2.waitKey(1)
 ? ? ? ? ? ?# if cv2.waitKey(1) & 0xFF == ord("q"):
 ? ? ? ? ? ?# ? ? break


if __name__ == '__main__':
 ? ?Solution = Main()
 ? ?Solution.Gesture_recognition()
審核編輯:湯梓紅
-
IDE
+關(guān)注
關(guān)注
0文章
365瀏覽量
49054 -
開發(fā)環(huán)境
+關(guān)注
關(guān)注
1文章
270瀏覽量
17637 -
編譯環(huán)境
+關(guān)注
關(guān)注
0文章
13瀏覽量
8745 -
python
+關(guān)注
關(guān)注
57文章
4876瀏覽量
90022 -
手勢檢測
+關(guān)注
關(guān)注
0文章
10瀏覽量
7134
原文標(biāo)題:?使用旭日X3派實現(xiàn)手勢檢測
文章出處:【微信號:vision263com,微信公眾號:新機(jī)器視覺】歡迎添加關(guān)注!文章轉(zhuǎn)載請注明出處。
發(fā)布評論請先 登錄
【 地平線旭日X3派試用體驗】#旭日X3派首百嘗鮮#資料下載及環(huán)境搭建初試
【 地平線旭日X3派試用體驗】01. X3派開箱及上手
#旭日X3派首百嘗鮮# 用solidworks畫了一個旭日X3派的模型
【 地平線旭日X3派試用體驗】地平線旭日X3派AGV智能車設(shè)計
【地平線旭日X3派試用體驗】地平線旭日X3派AGV智能車設(shè)計
【百板嘗鮮】旭日x3派開箱及上手體驗-讀取手機(jī)攝像頭推流圖像跑通fcos目標(biāo)檢測demo
#旭日X3派首百嘗鮮# 【AI健身實體機(jī)】Arduino使用MAX30102人體心率血氧檢測模塊在X3派上位機(jī)上的顯示
#旭日X3派首百嘗鮮#旭日x3派移植mjpg-streamer

平平無奇縱享絲滑,旭日X3派高速網(wǎng)絡(luò)新體驗

當(dāng)旭日X3派遇上ChatGPT,我們能「chat」什么


 工商網(wǎng)監(jiān)
評論