 通過利用深度學習對道路損壞進行檢測分析

1.簡介
道路基礎設施是一項重要的公共資產,因為它有助于經濟發展和增長,同時帶來重要的社會效益。路面檢查主要基于人類的視覺觀察和使用昂貴機器的定量分析。這些方法的最佳替代方案是智能探測器,它使用記錄的圖像或視頻來檢測損壞情況。除了道路INFR一個結構,道路破損檢測器也將在自主駕駛汽車,以檢測他們的方式有些坑洼或其他干擾,盡量避免他們有用。
2.數據集
本項目中使用的數據集是從這里收集的。該數據集包含不同國家的道路圖像,它們是日本、印度、捷克。對于圖像,標簽的注釋是在 xml 文件中,即標簽是 PASCAL VOC 格式。由于數據集包含來自日本的大部分圖像(在以前的版本中,它僅包含來自日本的圖像),因此根據數據來源,根據日本道路指南確定了標簽。
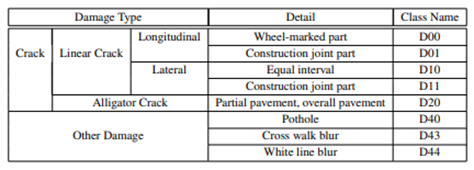
但是最新的數據集現在包含其他國家的圖像,因此為了概括我們只考慮以下標簽的損害。D00:垂直裂縫,D10:水平裂縫,D20:鱷魚裂縫,D40:坑洼
3.基于深度學習得目標檢測
CNN 或卷積神經網絡是所有計算機視覺任務的基石。即使在物體檢測的情況下,從圖像中提取物體的模式到特征圖(基本上是一個比圖像尺寸小的矩陣)卷積操作也被使用。現在從過去幾年開始,已經對對象檢測任務進行了大量研究,我們得到了大量最先進的算法或方法,其中一些簡而言之,我們在下面進行了解釋。
4.EDA
數據集中的圖像總數:26620
標簽分布
每個班級的計數D00 : 6592 D10 : 4446 D20 : 8381 D40 : 5627

各國標簽分布(全數據分析)
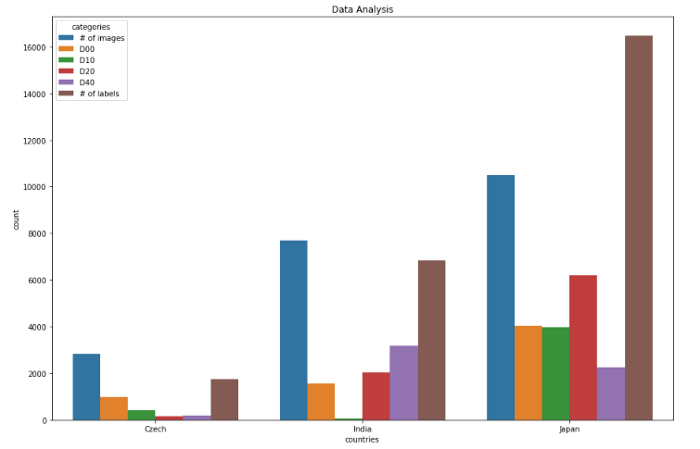
捷克數據分析0 圖像數量 2829 1 D00 988 2 D10 399 3 D20 161 4 D40 197 5 標簽數量 1745 ************************ **********************************************印度數據分析 類別計數6 圖像數量 7706 7 D00 1555 8 D10 68 9 D20 2021 10 D40 3187 11 標簽數量 6831 **************************** ******************************************日本數據分析12 圖像數量 10506 13 D00 404914 D10 3979 15 D20 6199 16 D40 2243 17 標簽數量 16470 ************************************ ************************************
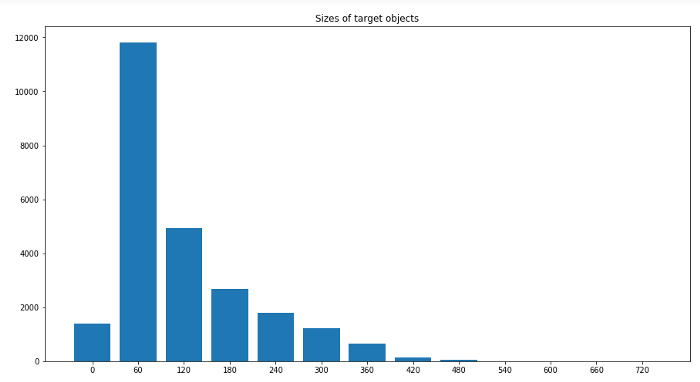
圖像中標簽大小的分布
標簽最小尺寸:0x1 標簽最大尺寸:704x492
5.關鍵技術
對象檢測現在是一個龐大的主題,相當于一個學期的主題。它由許多算法組成。因此,為了使其簡短,目標檢測算法被分為各種類別,例如基于區域的算法(RCNN、Fast-RCNN、Faster-RCNN)、兩級檢測器、一級檢測器,其中基于區域的算法本身是兩級檢測器的一部分,但我們將在下面簡要地解釋它們,因此我們明確地提到了它們。讓我們從RCNN(基于區域的卷積神經網絡)開始。
目標檢測算法的基本架構由兩部分組成。該部分由一個 CNN 組成,它將原始圖像信息轉換為特征圖,在下一部分中,不同的算法有不同的技術。因此,在 RCNN 的情況下,它使用選擇性搜索來獲得 ROI(感興趣區域),即在那個地方有可能有不同的對象。從每個圖像中提取大約 2000 個區域。它使用這些 ROI 對標簽進行分類并使用兩種不同的模型預測對象位置。因此這些模型被稱為兩級檢測器。
RCNN 有一些限制,為了克服這些限制,他們提出了 Fast RCNN。RCNN 具有很高的計算時間,因為每個區域都分別傳遞給 CNN,并且它使用三種不同的模型進行預測。因此,在 Fast RCNN 中,每個圖像只傳遞一次到 CNN 并提取特征圖。在這些地圖上使用選擇性搜索來生成預測。將 RCNN 中使用的所有三個模型組合在一起。
但是 Fast RCNN 仍然使用緩慢的選擇性搜索,因此計算時間仍然很長。猜猜他們想出了另一個名字有意義的版本,即更快的 RCNN。Faster RCNN 用區域提議網絡代替了選擇性搜索方法,使算法更快。現在讓我們轉向一些一次性檢測器。YOLO 和 SSD 是非常著名的物體檢測模型,因為它們在速度和準確性之間提供了非常好的權衡
YOLO:單個神經網絡在一次評估中直接從完整圖像中預測邊界框和類別概率。由于整個檢測管道是一個單一的網絡,因此可以直接在檢測性能上進行端到端的優化
SSD(Single Shot Detector):SSD 方法將邊界框的輸出空間離散為一組不同縱橫比的默認框。離散化后,該方法按特征圖位置進行縮放。Single Shot Detector 網絡結合了來自具有不同分辨率的多個特征圖的預測,以自然地處理各種大小的對象。
6.型號
作為深度學習的新手,或者準確地說是計算機視覺,為了學習基礎知識,我們嘗試了一些基本且快速的算法來實現如下數據集:
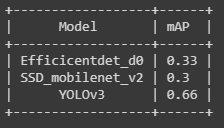
Efficientdet_d0SSD_mobilenet_v2YOLOv3
對于第一個和第二個模型,我們使用了tensorflow 模型 zoo并且為了訓練 yolov3 引用了this。用于評估 mAP(平均平均精度),使用 Effectivedet_d0 和 ssd_mobilenet_v2 得到的 mAP 非常低,可能是因為沒有更改學習率、優化器和數據增強的一些默認配置。
7.結果
使用 efficicentdet_d0 進行推導
import tensorflow as tffrom object_detection.utils import label_map_utilfrom object_detection.utils import config_utilfrom object_detection.utils import visualization_utils as viz_utilsfrom object_detection.builders import model_builder# Load pipeline config and build a detection modelconfigs = config_util.get_configs_from_pipeline_file('/content/efficientdet_d0_coco17_tpu-32/pipeline.config')model_config = configs['model']detection_model = model_builder.build(model_config=model_config, is_training=False)# Restore checkpointckpt = tf.compat.v2.train.Checkpoint(model=detection_model)ckpt.restore('/content/drive/MyDrive/efficientdet/checkpoints/ckpt-104').expect_partial()def detect_fn(image):"""Detect objects in image."""image, shapes = detection_model.preprocess(image)prediction_dict = detection_model.predict(image, shapes)detections = detection_model.postprocess(prediction_dict, shapes)return detectionscategory_index = label_map_util.create_category_index_from_labelmap('/content/data/label_map.pbtxt',use_display_name=True)for image_path in IMAGE_PATHS:print('Running inference for {}... '.format(image_path), end='')image_np = load_image_into_numpy_array(image_path)input_tensor = tf.convert_to_tensor(np.expand_dims(image_np, 0), dtype=tf.float32)detections = detect_fn(input_tensor)num_detections = int(detections.pop('num_detections'))detections = {key: value[0, :num_detections].numpy()for key, value in detections.items()}detections['num_detections'] = num_detections# detection_classes should be ints.detections['detection_classes'] = detections['detection_classes'].astype(np.int64)label_id_offset = 1image_np_with_detections = image_np.copy()viz_utils.visualize_boxes_and_labels_on_image_array(image_np_with_detections,detections['detection_boxes'],detections['detection_classes']+label_id_offset,detections['detection_scores'],category_index,use_normalized_coordinates=True,max_boxes_to_draw=200,min_score_thresh=.30,agnostic_mode=False)%matplotlib inlinefig = plt.figure(figsize = (10,10))plt.imshow(image_np_with_detections)print('Done')plt.show()
使用 SSD_mobilenet_v2 進行推導
(與efficientdet 相同的代碼)
YOLOv3 的推導
def func(input_file):classes = ['D00', 'D10', 'D20', 'D40']alt_names = {'D00': 'lateral_crack', 'D10': 'linear_cracks', 'D20': 'aligator_crakcs', 'D40': 'potholes'}# initialize a list of colors to represent each possible class labelnp.random.seed(42)COLORS = np.random.randint(0, 255, size=(len(classes), 3),dtype="uint8")# derive the paths to the YOLO weights and model configurationweightsPath = "/content/drive/MyDrive/yolo/yolo-obj_final.weights"configPath = "/content/yolov3.cfg"# load our YOLO object detector trained on COCO dataset (80 classes)# and determine only the *output* layer names that we need from YOLO#print("[INFO] loading YOLO from disk...")net = cv2.dnn.readNetFromDarknet(configPath, weightsPath)ln = net.getLayerNames()ln = [ln[i[0] - 1] for i in net.getUnconnectedOutLayers()]# read the next frame from the fileframe = cv2.imread(input_file)(H, W) = frame.shape[:2]# construct a blob from the input frame and then perform a forward# pass of the YOLO object detector, giving us our bounding boxes# and associated probabilitiesblob = cv2.dnn.blobFromImage(frame, 1 / 255.0, (416, 416),swapRB=True, crop=False)net.setInput(blob)start = time.time()layerOutputs = net.forward(ln)end = time.time()# initialize our lists of detected bounding boxes, confidences,# and class IDs, respectivelyboxes = []confidences = []classIDs = []# loop over each of the layer outputsfor output in layerOutputs:# loop over each of the detectionsfor detection in output:# extract the class ID and confidence (i.e., probability)# of the current object detectionscores = detection[5:]classID = np.argmax(scores)confidence = scores[classID]# filter out weak predictions by ensuring the detected# probability is greater than the minimum probabilityif confidence > 0.3:# scale the bounding box coordinates back relative to# the size of the image, keeping in mind that YOLO# actually returns the center (x, y)-coordinates of# the bounding box followed by the boxes' width and# heightbox = detection[0:4] * np.array([W, H, W, H])(centerX, centerY, width, height) = box.astype("int")# use the center (x, y)-coordinates to derive the top# and and left corner of the bounding boxx = int(centerX - (width / 2))y = int(centerY - (height / 2))# update our list of bounding box coordinates,# confidences, and class IDsboxes.append([x, y, int(width), int(height)])confidences.append(float(confidence))classIDs.append(classID)# apply non-maxima suppression to suppress weak, overlapping# bounding boxesidxs = cv2.dnn.NMSBoxes(boxes, confidences, 0.3,0.25)# ensure at least one detection existsif len(idxs) > 0:# loop over the indexes we are keepingfor i in idxs.flatten():# extract the bounding box coordinates(x, y) = (boxes[i][0], boxes[i][1])(w, h) = (boxes[i][2], boxes[i][3])# draw a bounding box rectangle and label on the framecolor = [int(c) for c in COLORS[classIDs[i]]]cv2.rectangle(frame, (x, y), (x + w, y + h), color, 2)label = classes[classIDs[i]]text = "{}: {:.4f}".format(alt_names[label],confidences[i])cv2.putText(frame, text, (x, y - 5),cv2.FONT_HERSHEY_SIMPLEX, 0.5, color, 2)cv2_imshow(frame)
-
檢測器
+關注
關注
1文章
932瀏覽量
49944 -
計算機
+關注
關注
19文章
7807瀏覽量
93202 -
深度學習
+關注
關注
73文章
5599瀏覽量
124398
原文標題:實戰:基于深度學習的道路損壞檢測
文章出處:【微信號:vision263com,微信公眾號:新機器視覺】歡迎添加關注!文章轉載請注明出處。
發布評論請先 登錄
穿孔機頂頭檢測儀 機器視覺深度學習
【團購】獨家全套珍藏!龍哥LabVIEW視覺深度學習實戰課(11大系列課程,共5000+分鐘)
為進行檢測溫度的記錄,可使用串口數據記錄模塊來實現
如何深度學習機器視覺的應用場景
XKCON祥控輸煤皮帶智能機器人巡檢系統對監測數據進行挖掘分析
如何在機器視覺中部署深度學習神經網絡
普蘭店來看看你的產品是否適用單軸測徑儀進行檢測?
存儲示波器的存儲深度對信號分析有什么影響?
提高IT運維效率,深度解讀京東云AIOps落地實踐(異常檢測篇)
基于RV1126開發板的吸煙檢測算法開發

基于RV1126開發板的火焰檢測算法開發
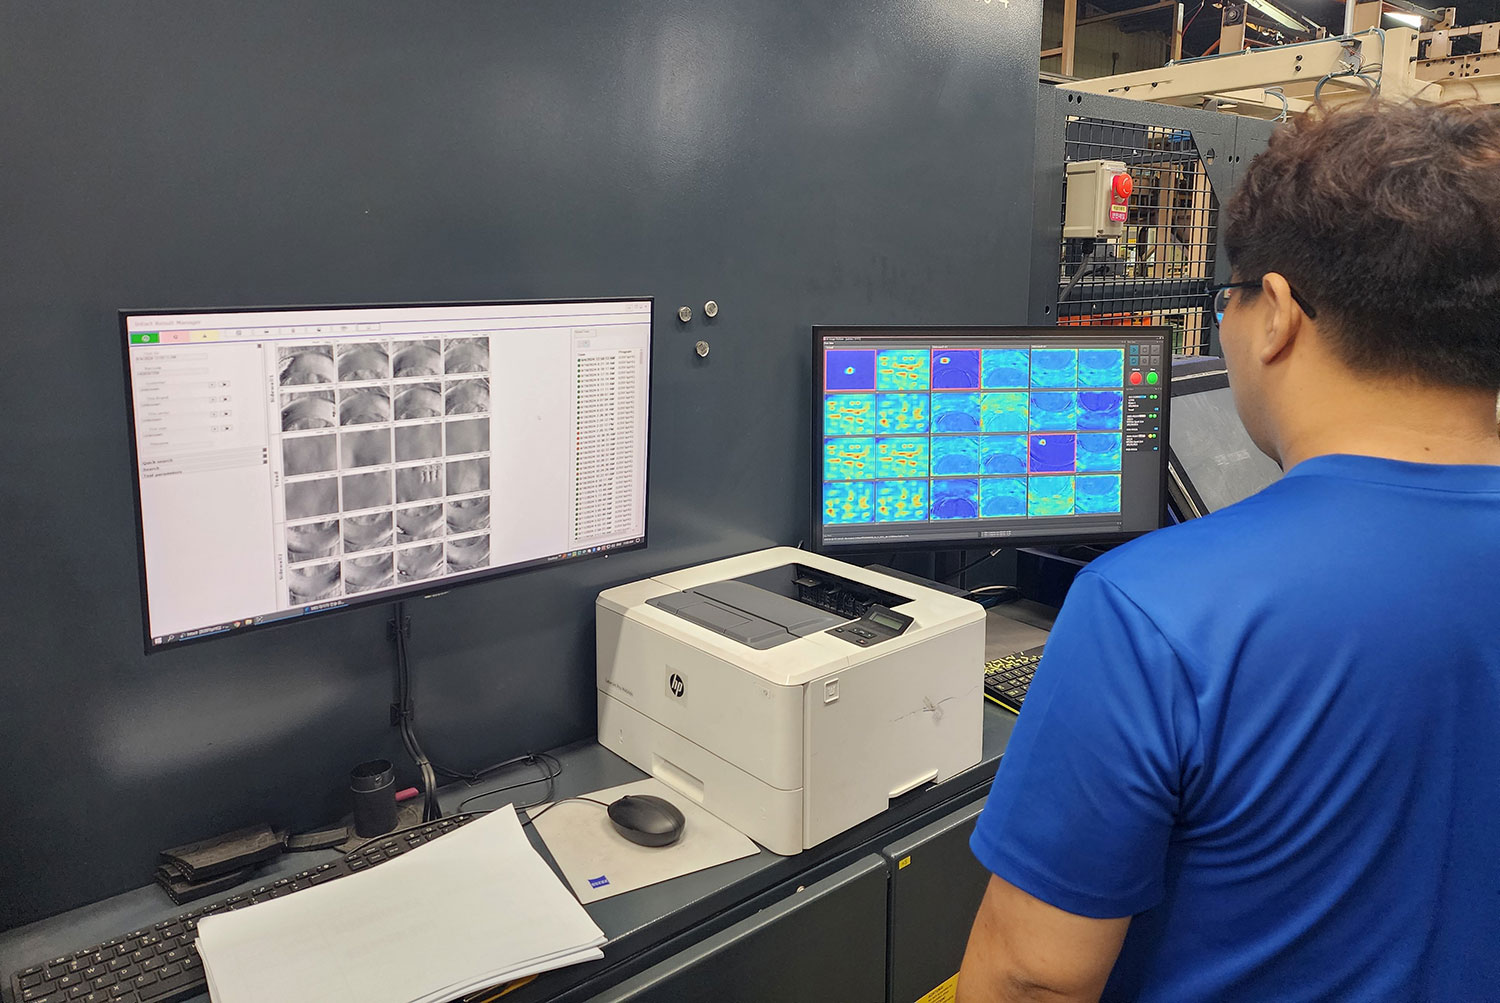
行業首創:基于深度學習視覺平臺的AI驅動輪胎檢測自動化


 工商網監
工商網監
評論