 如何構建MCP客戶端

以下文章來源于阿里云開發者,作者無棄
Anthropic開源了一套MCP協議,它為連接AI系統與數據源提供了一個通用的、開放的標準,用單一協議取代了碎片化的集成方式。本文教你從零打造一個MCP客戶端。
一、背景
如何讓大語言模型與外部系統交互,一直是AI系統需要解決的問題:
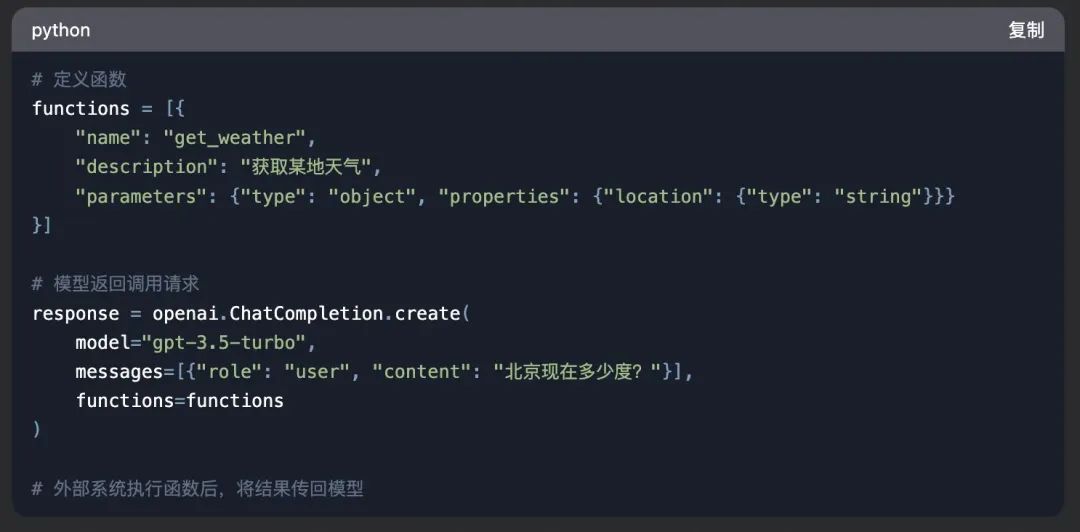
Plugins:OpenAI推出ChatGPT Plugins,首次允許模型通過插件與外部應用交互。插件功能包括實時信息檢索(如瀏覽器訪問)、代碼解釋器(Code Interpreter)執行計算、第三方服務調用(如酒店預訂、外賣服務等)
Function Calling:Function Calling技術逐步成熟,成為大模型與外部系統交互的核心方案。
Agent框架 Tools: 模型作為代理(Agent),動態選擇工具完成任務,比如langchain的Tool。

一個企業,面對不同的框架或系統,可能都需要參考他們的協議,去開發對應Tool,這其實是一個非常重復的工作。
面對這種問題,Anthropic開源了一套MCP協議(Model Context Protocol),
https://www.anthropic.com/news/model-context-protocol?
https://modelcontextprotocol.io/introduction?
它為連接AI系統與數據源提供了一個通用的、開放的標準,用單一協議取代了碎片化的集成方式。其結果是,能以更簡單、更可靠的方式讓人工智能系統獲取所需數據。
二、架構
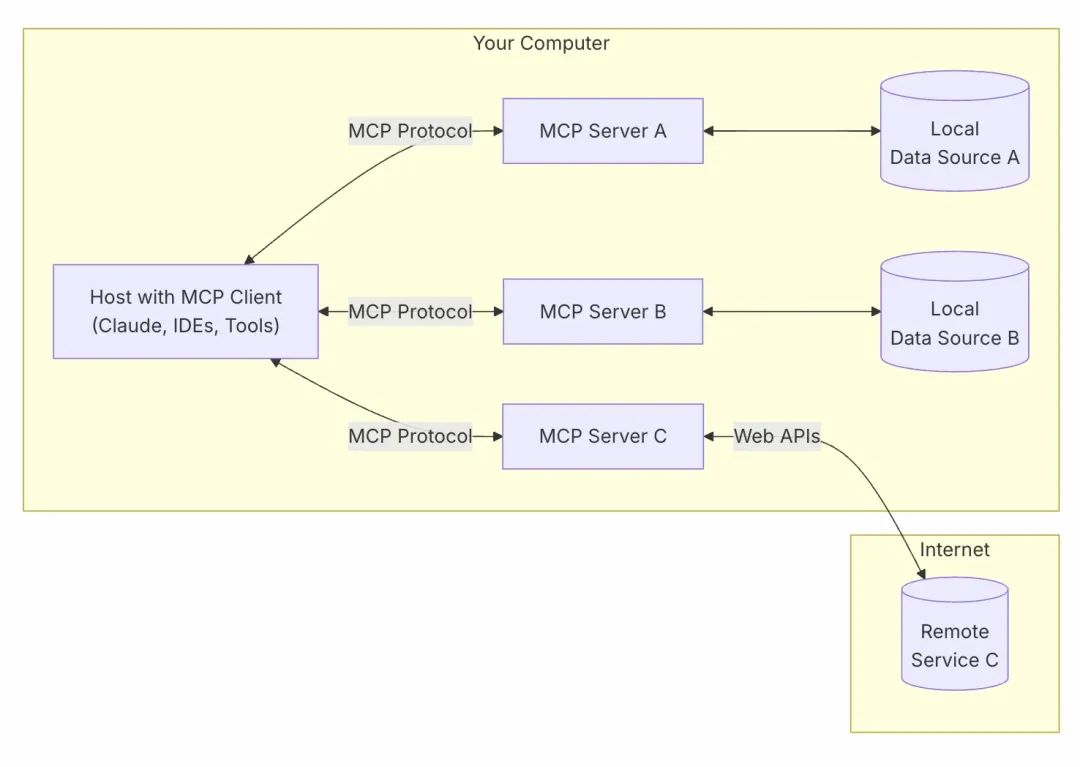
MCP Hosts:像 Claude Desktop、Cursor這樣的程序,它們通過MCP訪問數據。
MCP Clients:與服務器保持 1:1 連接的協議客戶端。
MCP Servers:輕量級程序,每個程序都通過標準化的模型上下文協議公開特定功能。
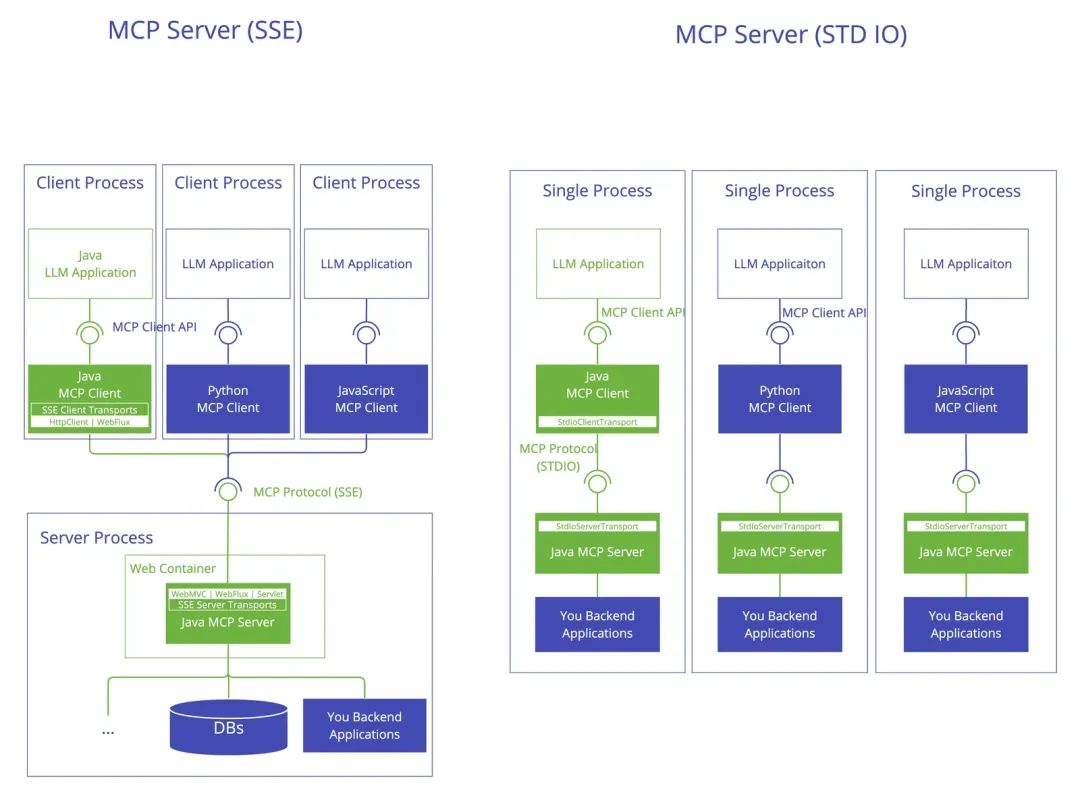
結合AI模型,以一個Java應用為例,架構是這樣:
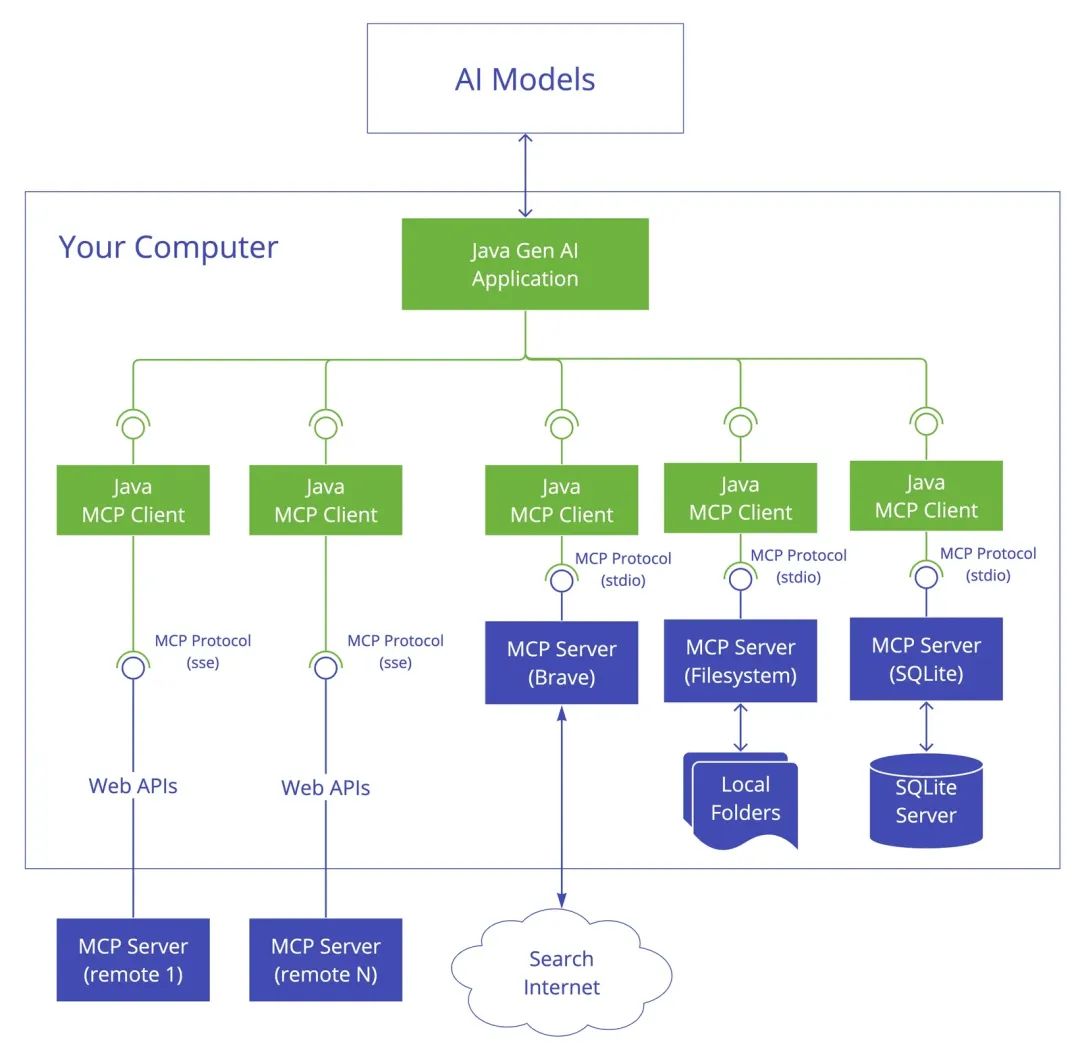
可以看到傳輸層有兩類:
StdioTransport
HTTP SSE
三、實現MCP Server
首先看一個最簡單的MCP Server例子:
import { McpServer, ResourceTemplate } from "@modelcontextprotocol/sdk/server/mcp.js";
import { StdioServerTransport } from "@modelcontextprotocol/sdk/server/stdio.js";
import { z } from "zod";


// Create an MCP server
const server = new McpServer({
 name: "Demo",
 version: "1.0.0"
});


// Add an addition tool
server.tool("add",
 'Add two numbers',
 { a: z.number(), b: z.number() },
 async ({ a, b }) => ({
  content: [{ type: "text", text: String(a + b) }]
 })
);


async function main() {
 // Start receiving messages on stdin and sending messages on stdout
 const transport = new StdioServerTransport();
 await server.connect(transport);
}


main()
代碼頭部和底部都是一些樣板代碼,主要變化的是在tool這塊,這個聲明了一個做加法的工具。這就是一個最簡單的可運行的Server了。
同時也可以使用官方的腳手架,來創建一個完整復雜的Server:
npx @modelcontextprotocol/create-server my-server
3.1 使用SDK
從上面代碼可以看到很多模塊都是從@modelcontextprotocol/sdk 這個SDK里導出的。
SDK封裝好了協議內部細節(JSON-RPC 2.0),包括架構分層,開發者直接寫一些業務代碼就可以了。
https://github.com/modelcontextprotocol/typescript-sdk?
MCP服務器可以提供三種主要功能類型:
Resources:可以由客戶端讀取的類似文件的數據(例如API響應或文件內容)
Tools:LLM可以調用的功能(在用戶批準下)
Prompts:可幫助用戶完成特定任務的預先編寫的模板
Resources和Prompts可以讓客戶端喚起,供用戶選擇,比如用戶所有的筆記,或者最近訂單。
重點在Tools,其他很多客戶端都不支持。
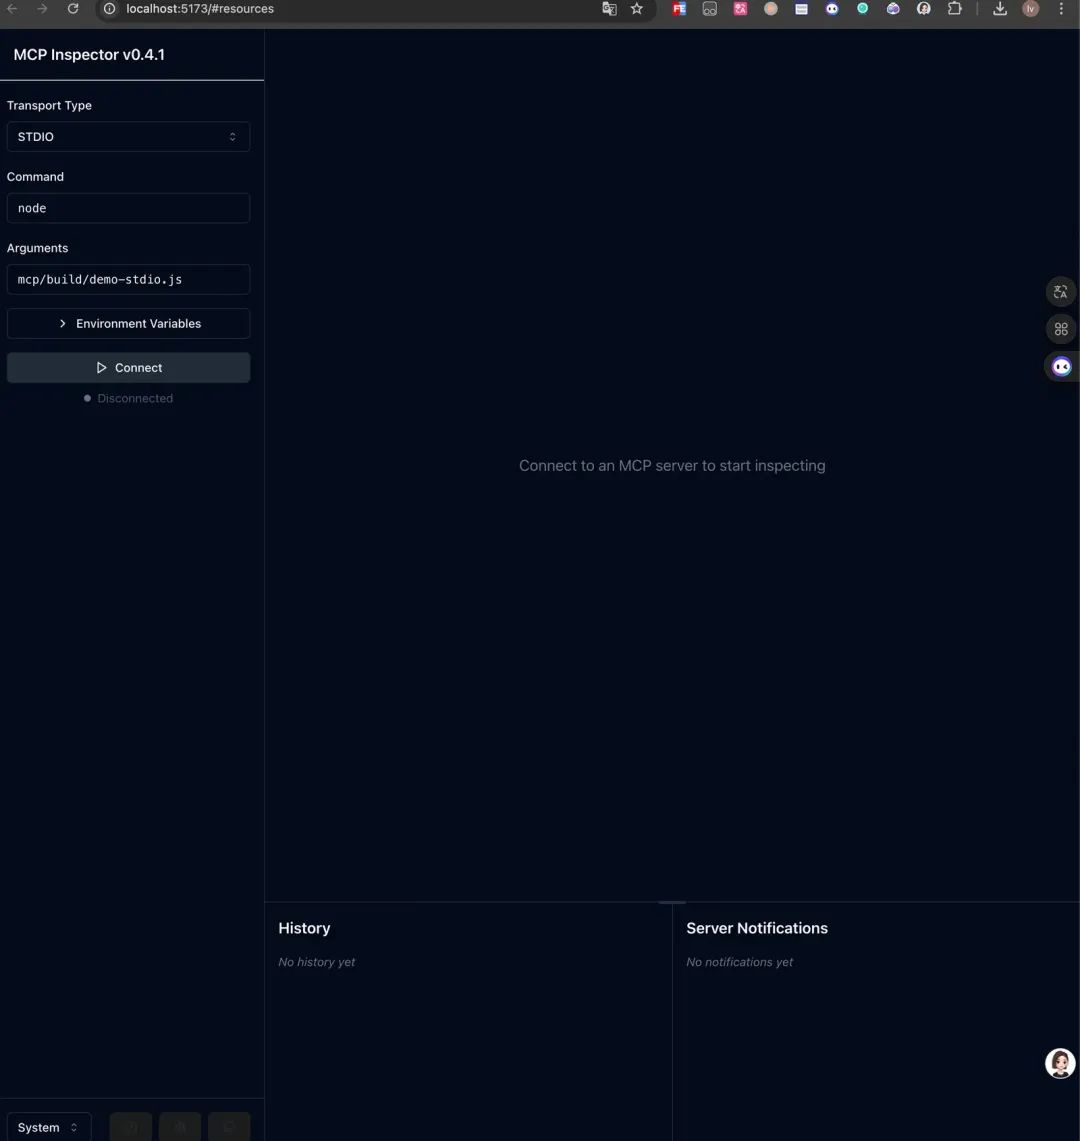
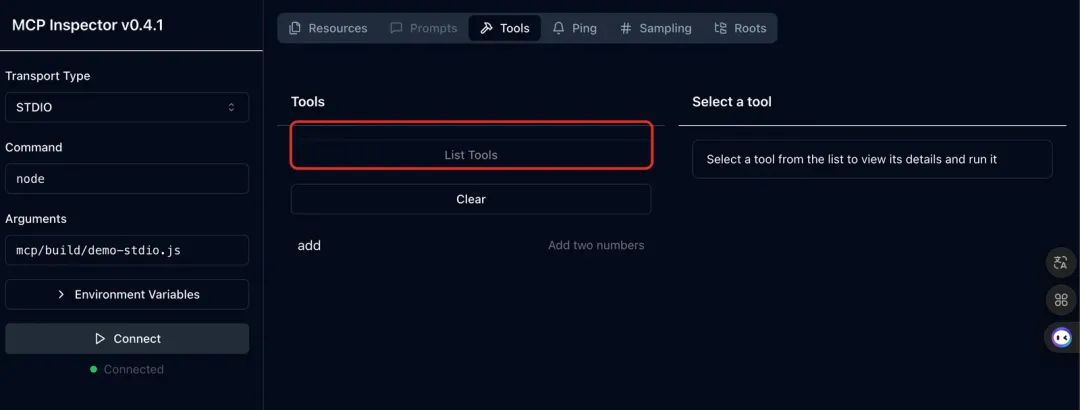
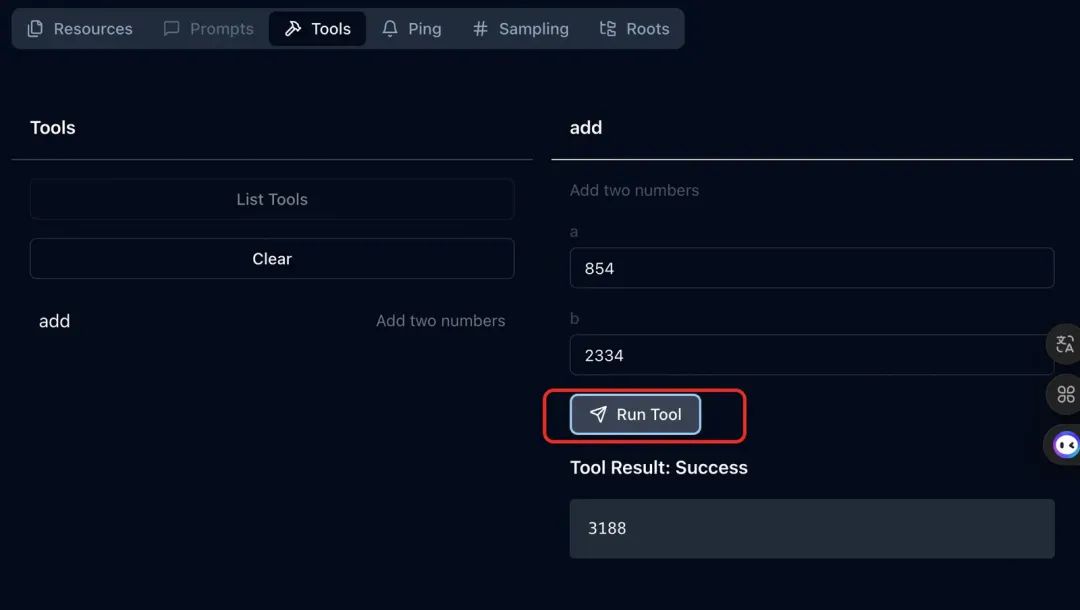
3.2 調試
如果寫好了代碼,怎么調試這個Server呢?官方提供了一個調試器:
npx @modelcontextprotocol/inspector
1.連接Server
2.獲取工具
3.執行調試
3.3 在客戶端使用
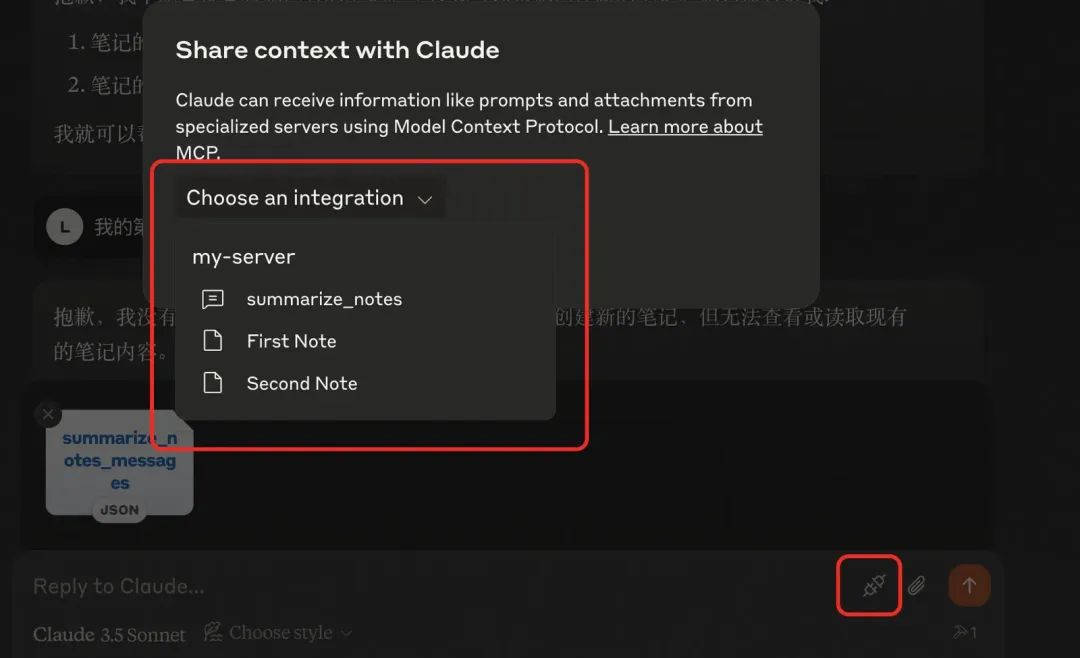
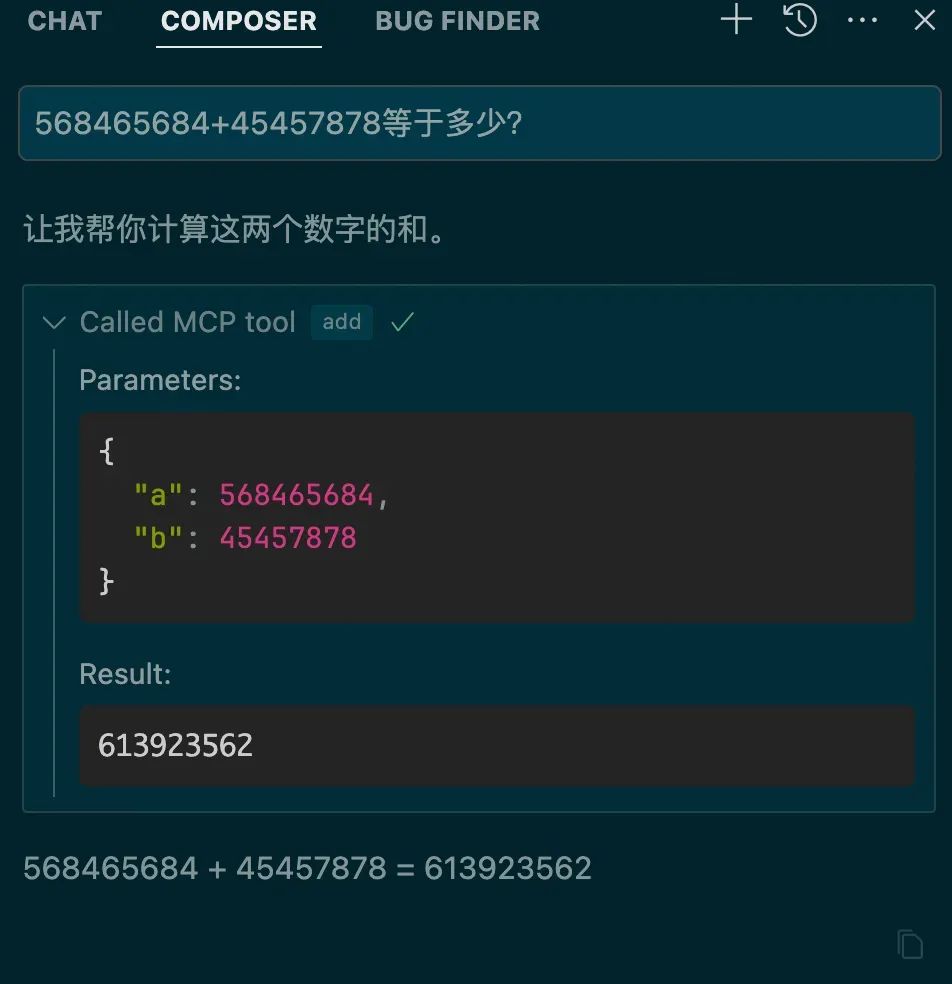
如果運行結果沒錯,就可以上架到支持MCP協議的客戶端使用了,比如Claude、Cursor,這里以Cursor為例:
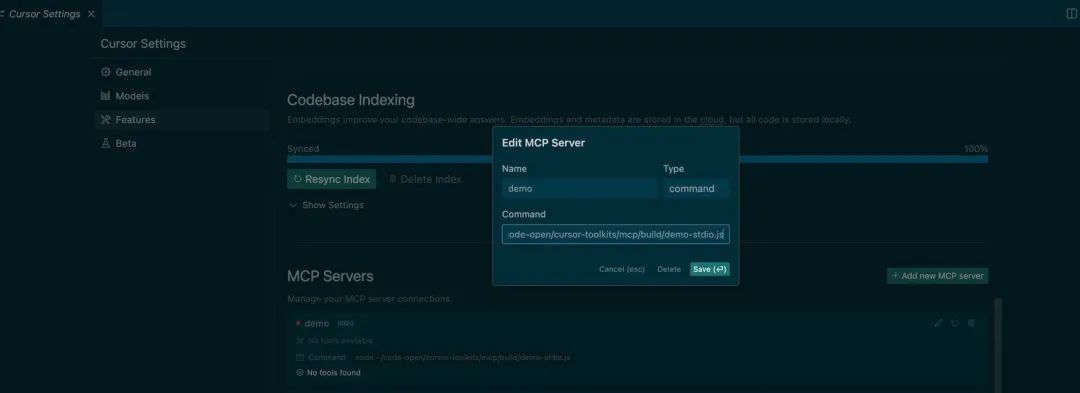
在Cursor Composer中對話,會自動識別這個Tool,并尋求用戶是否調用
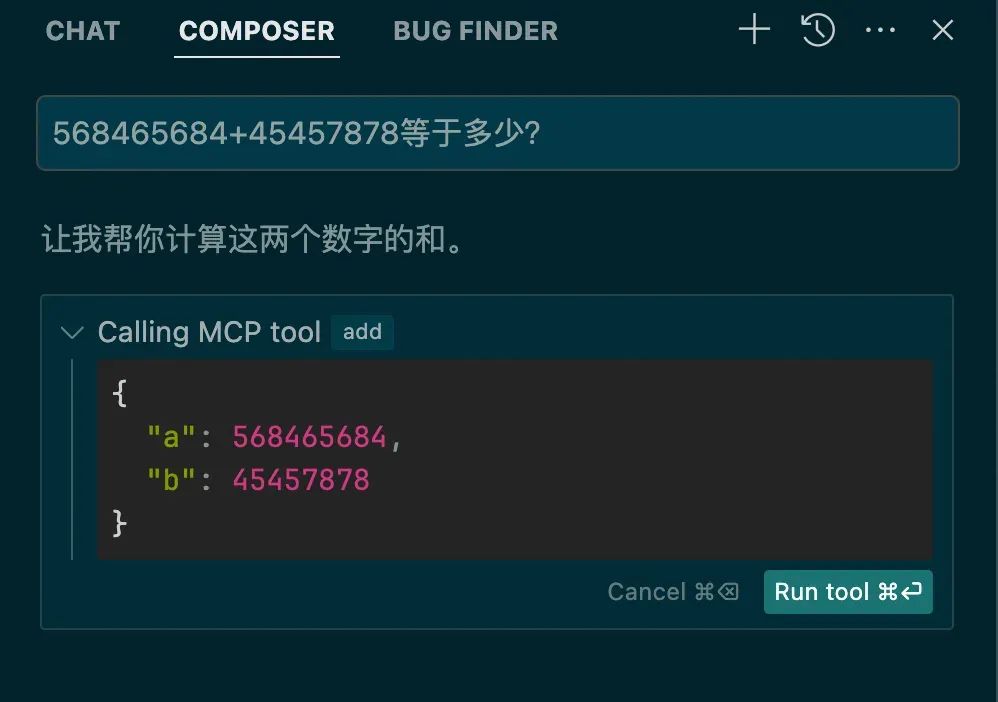
點擊運行,就可以調用執行:
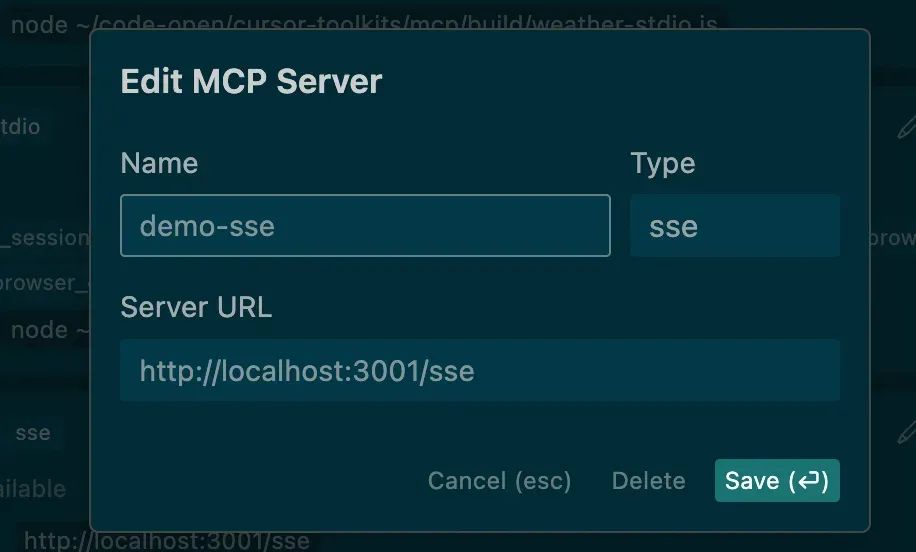
3.4 HTTP SSE類型Server
import express from "express";
import { McpServer } from "@modelcontextprotocol/sdk/server/mcp.js";
import { SSEServerTransport } from "@modelcontextprotocol/sdk/server/sse.js";
import { z } from "zod";
const server = new McpServer({
name: "demo-sse",
version: "1.0.0"
});
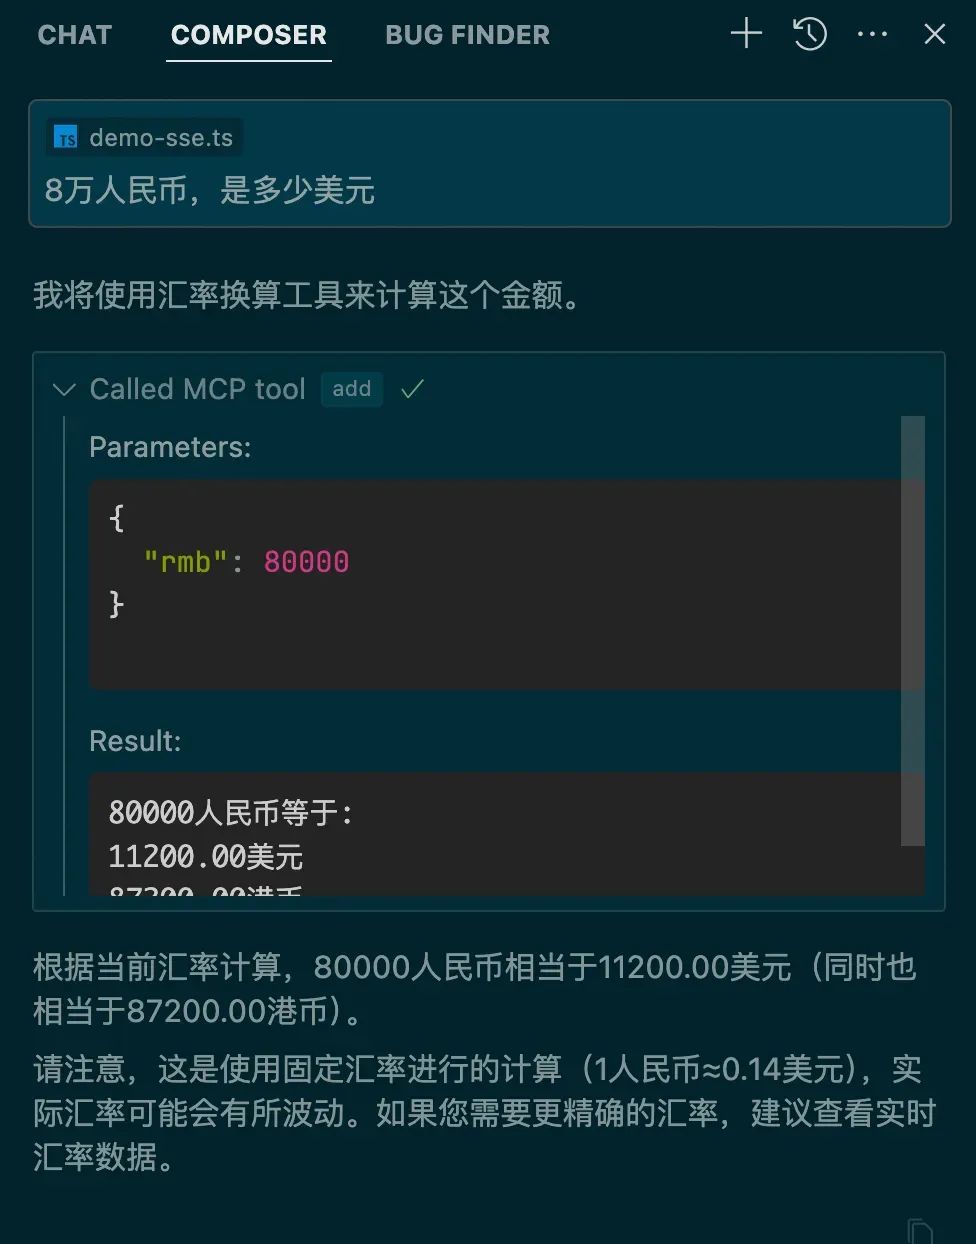
server.tool("exchange",
'人民幣匯率換算',
{ rmb: z.number() },
async ({ rmb }) => {
// 使用固定匯率進行演示,實際應該調用匯率API
const usdRate = 0.14; // 1人民幣約等于0.14美元
const hkdRate = 1.09; // 1人民幣約等于1.09港幣
const usd = (rmb * usdRate).toFixed(2);
const hkd = (rmb * hkdRate).toFixed(2);
return {
content: [{
type: "text",
text: `${rmb}人民幣等于:
${usd}美元
${hkd}港幣`
}]
}
},
);
const app = express();
const sessions: Record = {}
app.get("/sse", async (req, res) => {
console.log(`New SSE connection from ${req.ip}`);
const sseTransport = new SSEServerTransport("/messages", res);
const sessionId = sseTransport.sessionId;
if (sessionId) {
sessions[sessionId] = { transport: sseTransport, response: res }
}
await server.connect(sseTransport);
});
app.post("/messages", async (req, res) => {
const sessionId = req.query.sessionId as string;
const session = sessions[sessionId];
if (!session) {
res.status(404).send("Session not found");
return;
}
await session.transport.handlePostMessage(req, res);
});
app.listen(3001);
核心的差別在于需要提供一個sse服務,對于Tool基本一樣,但是sse類型就可以部署在服務端了。上架也和command類型相似:
3.5 一個復雜一點的例子
操作瀏覽器執行自動化流程。
可以操作瀏覽器,Cursor秒變Devin。想象一下,寫完代碼,編輯器自動打開瀏覽器預覽效果,然后截圖給視覺模型,發現樣式不對,自動修改。
如果對接好內部系統,貼一個需求地址,自動連接瀏覽器,打開網頁,分析需求,分析視覺稿,然后自己寫代碼,對比視覺稿,你就喝杯咖啡,靜靜的看著它工作。
3.6 MCP Server資源
有很多寫好的Server,可以直接復用。
https://github.com/modelcontextprotocol/servers?
https://github.com/punkpeye/awesome-mcp-servers/blob/main/README-zh.md?
四、實現MCP Client
一般MCP Host以一個Chat box為入口,對話形式去調用。
那我們怎么在自己的應用里支持MCP協議呢?這里需要實現MCP Client。
4.1 配置文件
使用配置文件來標明有哪些MCP Server,以及類型。
const config = [
 {
  name: 'demo-stdio',
  type: 'command',
  command: 'node ~/code-open/cursor-toolkits/mcp/build/demo-stdio.js',
  isOpen: true
 },
 {
  name: 'weather-stdio',
  type: 'command',
  command: 'node ~/code-open/cursor-toolkits/mcp/build/weather-stdio.js',
  isOpen: true
 },
 {
  name: 'demo-sse',
  type: 'sse',
  url: 'http://localhost:3001/sse',
  isOpen: false
 }
];
export default config;
4.2 確認交互形態
MCP Client主要還是基于LLM,識別到需要調用外部系統,調用MCP Server提供的Tool,所以還是以對話為入口,可以方便一點,直接在terminal里對話,使用readline來讀取用戶輸入。大模型可以直接使用openai,Tool的路由直接使用function calling。
4.3 編寫Client
大致的邏輯:
1.讀取配置文件,運行所有Server,獲取可用的Tools 2.用戶與LLM對話(附帶所有Tools名稱描述,參數定義) 3.LLM識別到要執行某個Tool,返回名稱和參數 4.找到對應Server的Tool,調用執行,返回結果 5.把工具執行結果提交給LLM 6.LLM返回分析結果給用戶
使用SDK編寫Client代碼
import { Client } from "@modelcontextprotocol/sdk/client/index.js";
import { StdioClientTransport, StdioServerParameters } from "@modelcontextprotocol/sdk/client/stdio.js";
import { SSEClientTransport } from "@modelcontextprotocol/sdk/client/sse.js";
import OpenAI from "openai";
import { Tool } from "@modelcontextprotocol/sdk/types.js";
import { ChatCompletionMessageParam } from "openai/resources/chat/completions.js";
import { createInterface } from "readline";
import { homedir } from 'os';
import config from "./mcp-server-config.js";
// 初始化環境變量
const OPENAI_API_KEY = process.env.OPENAI_API_KEY;
if (!OPENAI_API_KEY) {
  throw new Error("OPENAI_API_KEY environment variable is required");
}
interface MCPToolResult {
  content: string;
}
interface ServerConfig {
  name: string;
  type: 'command' | 'sse';
  command?: string;
  url?: string;
  isOpen?: boolean;
}
class MCPClient {
  static getOpenServers(): string[] {
    return config.filter(cfg => cfg.isOpen).map(cfg => cfg.name);
  }
  private sessions: Map = new Map();
  private transports: Map = new Map();
  private openai: OpenAI;
  constructor() {
    this.openai = new OpenAI({
      apiKey: OPENAI_API_KEY
    });
  }
  async connectToServer(serverName: string): Promise {
    const serverConfig = config.find(cfg => cfg.name === serverName) as ServerConfig;
    if (!serverConfig) {
      throw new Error(`Server configuration not found for: ${serverName}`);
    }
    let transport: StdioClientTransport | SSEClientTransport;
    if (serverConfig.type === 'command' && serverConfig.command) {
      transport = await this.createCommandTransport(serverConfig.command);
    } else if (serverConfig.type === 'sse' && serverConfig.url) {
      transport = await this.createSSETransport(serverConfig.url);
    } else {
      throw new Error(`Invalid server configuration for: ${serverName}`);
    }
    const client = new Client(
      {
        name: "mcp-client",
        version: "1.0.0"
      },
      {
        capabilities: {
          prompts: {},
          resources: {},
          tools: {}
        }
      }
    );
    await client.connect(transport);

    this.sessions.set(serverName, client);
    this.transports.set(serverName, transport);
    // 列出可用工具
    const response = await client.listTools();
    console.log(`
Connected to server '${serverName}' with tools:`, response.tools.map((tool: Tool) => tool.name));
  }
  private async createCommandTransport(shell: string): Promise {
    const [command, ...shellArgs] = shell.split(' ');
    if (!command) {
      throw new Error("Invalid shell command");
    }
    // 處理參數中的波浪號路徑
    const args = shellArgs.map(arg => {
      if (arg.startsWith('~/')) {
        return arg.replace('~', homedir());
      }
      return arg;
    });

    const serverParams: StdioServerParameters = {
      command,
      args,
      env: Object.fromEntries(
        Object.entries(process.env).filter(([_, v]) => v !== undefined)
      ) as Record
    };
    return new StdioClientTransport(serverParams);
  }
  private async createSSETransport(url: string): Promise {
    return new SSEClientTransport(new URL(url));
  }
  async processQuery(query: string): Promise {
    if (this.sessions.size === 0) {
      throw new Error("Not connected to any server");
    }
    const messages: ChatCompletionMessageParam[] = [
      {
        role: "user",
        content: query
      }
    ];
    // 獲取所有服務器的工具列表
    const availableTools: any[] = [];
    for (const [serverName, session] of this.sessions) {
      const response = await session.listTools();
      const tools = response.tools.map((tool: Tool) => ({
        type: "function" as const,
        function: {
          name: `${serverName}__${tool.name}`,
          description: `[${serverName}] ${tool.description}`,
          parameters: tool.inputSchema
        }
      }));
      availableTools.push(...tools);
    }
    // 調用OpenAI API
    const completion = await this.openai.chat.completions.create({
      model: "gpt-4-turbo-preview",
      messages,
      tools: availableTools,
      tool_choice: "auto"
    });
    const finalText: string[] = [];

    // 處理OpenAI的響應
    for (const choice of completion.choices) {
      const message = choice.message;

      if (message.content) {
        finalText.push(message.content);
      }
      if (message.tool_calls) {
        for (const toolCall of message.tool_calls) {
          const [serverName, toolName] = toolCall.function.name.split('__');
          const session = this.sessions.get(serverName);

          if (!session) {
            finalText.push(`[Error: Server ${serverName} not found]`);
            continue;
          }
          const toolArgs = JSON.parse(toolCall.function.arguments);
          // 執行工具調用
          const result = await session.callTool({
            name: toolName,
            arguments: toolArgs
          });
          const toolResult = result as unknown as MCPToolResult;
          finalText.push(`[Calling tool ${toolName} on server ${serverName} with args ${JSON.stringify(toolArgs)}]`);
          console.log(toolResult.content);
          finalText.push(toolResult.content);
          // 繼續與工具結果的對話
          messages.push({
            role: "assistant",
            content: "",
            tool_calls: [toolCall]
          });
          messages.push({
            role: "tool",
            tool_call_id: toolCall.id,
            content: toolResult.content
          });
          // 獲取下一個響應
          const nextCompletion = await this.openai.chat.completions.create({
            model: "gpt-4-turbo-preview",
            messages,
            tools: availableTools,
            tool_choice: "auto"
          });
          if (nextCompletion.choices[0].message.content) {
            finalText.push(nextCompletion.choices[0].message.content);
          }
        }
      }
    }
    return finalText.join("
");
  }
  async chatLoop(): Promise {
    console.log("
MCP Client Started!");
    console.log("Type your queries or 'quit' to exit.");
    const readline = createInterface({
      input: process.stdin,
      output: process.stdout
    });
    const askQuestion = () => {
      return new Promise((resolve) => {
        readline.question("
Query: ", resolve);
      });
    };
    try {
      while (true) {
        const query = (await askQuestion()).trim();
        if (query.toLowerCase() === 'quit') {
          break;
        }
        try {
          const response = await this.processQuery(query);
          console.log("
" + response);
        } catch (error) {
          console.error("
Error:", error);
        }
      }
    } finally {
      readline.close();
    }
  }
  async cleanup(): Promise {
    for (const transport of this.transports.values()) {
      await transport.close();
    }
    this.transports.clear();
    this.sessions.clear();
  }
  hasActiveSessions(): boolean {
    return this.sessions.size > 0;
  }
}
// 主函數
async function main() {
  const openServers = MCPClient.getOpenServers();
  console.log("Connecting to servers:", openServers.join(", "));
  const client = new MCPClient();

  try {
    // 連接所有開啟的服務器
    for (const serverName of openServers) {
      try {
        await client.connectToServer(serverName);
      } catch (error) {
        console.error(`Failed to connect to server '${serverName}':`, error);
      }
    }
    if (!client.hasActiveSessions()) {
      throw new Error("Failed to connect to any server");
    }
    await client.chatLoop();
  } finally {
    await client.cleanup();
  }
}
// 運行主函數
main().catch(console.error);?
4.4 運行效果
NODE_TLS_REJECT_UNAUTHORIZED=0 node build/client.js
NODE_TLS_REJECT_UNAUTHORIZED=0 可以忽略(不校驗證書)
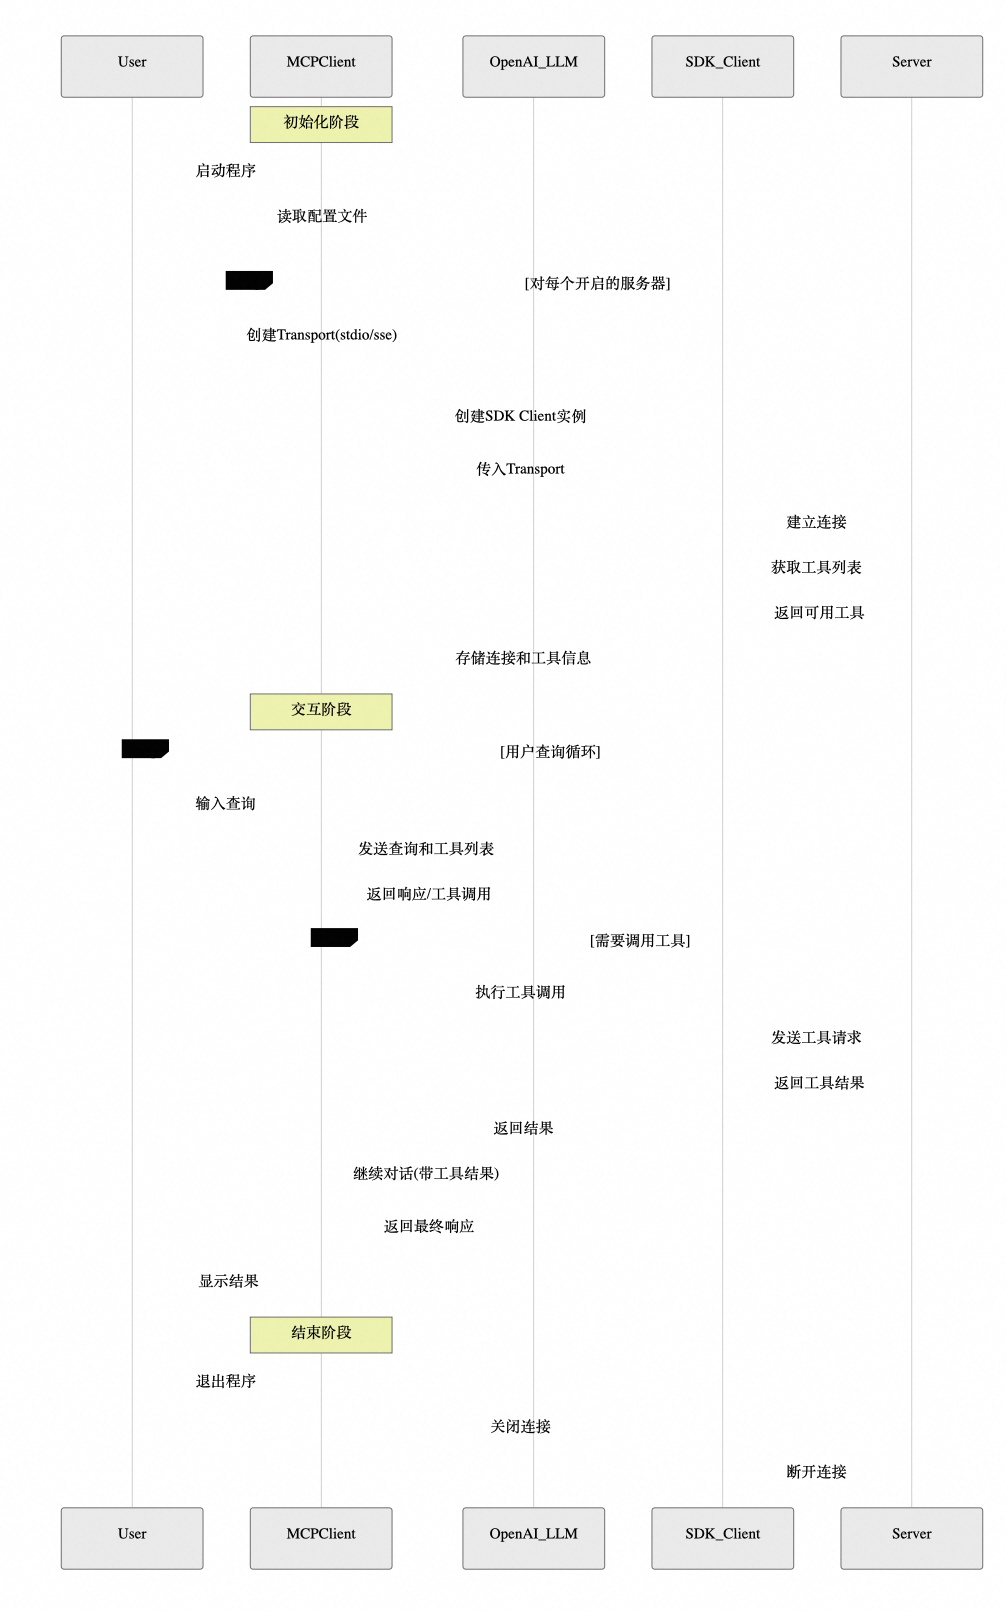
4.5 時序圖?
五、總結
總體來說解決了Client和Server數據交互的問題,但是沒有解決LLM到Tool的對接:不同模型實現function call支持度不一樣,比如DeepSeek R1不支持,那么如何路由到工具就成了問題。
不足:
1.開源時間不長,目前還不是很完善,語言支持度不夠,示例代碼不多。
2.Server質量良莠不齊,缺乏一個統一的質量保障體系和包管理工具,很多Server運行不起來,或者經常崩。
3.本地的Server還是依賴Node.js或者Python環境,遠程Server支持的很少。
如果未來都開始接入MCP協議,生態起來了,能力就會非常豐富了,使用的人多了,就會有更多的系統愿意來對接,寫一套代碼就可以真正所有地方運行了。
個人認為MCP還是有前途的,未來可期!
-
開源
+關注
關注
3文章
4256瀏覽量
46302 -
模型
+關注
關注
1文章
3778瀏覽量
52181 -
客戶端
+關注
關注
1文章
306瀏覽量
17599 -
MCP
+關注
關注
0文章
292瀏覽量
15041
原文標題:從零開始教你打造一個MCP客戶端
文章出處:【微信號:OSC開源社區,微信公眾號:OSC開源社區】歡迎添加關注!文章轉載請注明出處。
發布評論請先 登錄
一文詳解MCP傳輸機制

websocket客戶端性能很差是什么原因?
用Delphi開發OPC客戶端工具的方法研究

MQTT中服務端和客戶端
ROS是如何設計的 ROS客戶端庫
OPCUA客戶端工具:UaExpert使用進階小技巧


 工商網監
工商網監
評論