 TDengine+OpenVINO+AIxBoard助力時序數據分類

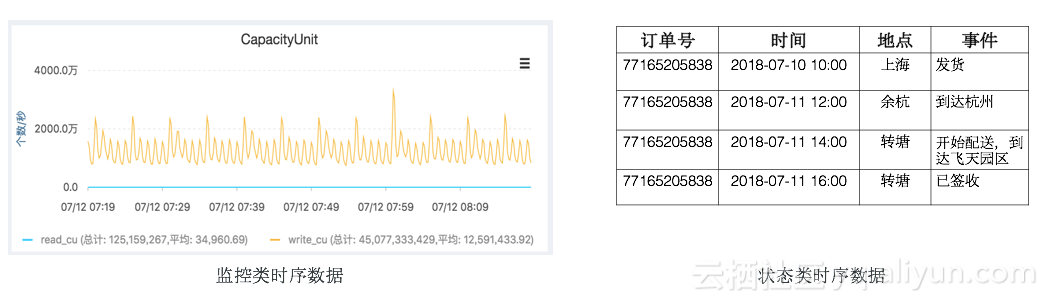
時間序列數據分析在工業,能源,醫療,交通,金融,零售等多個領域都有廣泛應用。其中時間序列數據分類是分析時序數據的常見任務之一。本文將通過一個具體的案例,介紹 Intel 團隊如何使用 TDengine 作為基礎軟件存儲實驗數據,并通過 TDengine 高效的查詢能力在 OpenVINO 部署深度學習模型,最終在 AIxBoard 開發板上實時運行分類任務。
01模型簡介
近年來機器學習和深度學習在時序數據分類任務中取得了顯著進展,HIVE-COTE 和 InceptionTime 模型都取得了不錯的成果。相比基于 Nearest Neighbor 和 DTW 算法的 HIVE-COTE 模型,基于一維卷積 (Conv1D) 的 InceptionTime 模型成果更為顯著,其在極大降低計算復雜度的基礎上,還達到了與 HIVE-COTE 相當的分類精度。
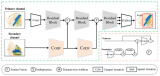
如下圖所示,Inception 模塊是 InceptionTime 模型的基本組成模塊,由多個一維卷積 (Conv1D) 操作堆疊,并于殘差連接而成。
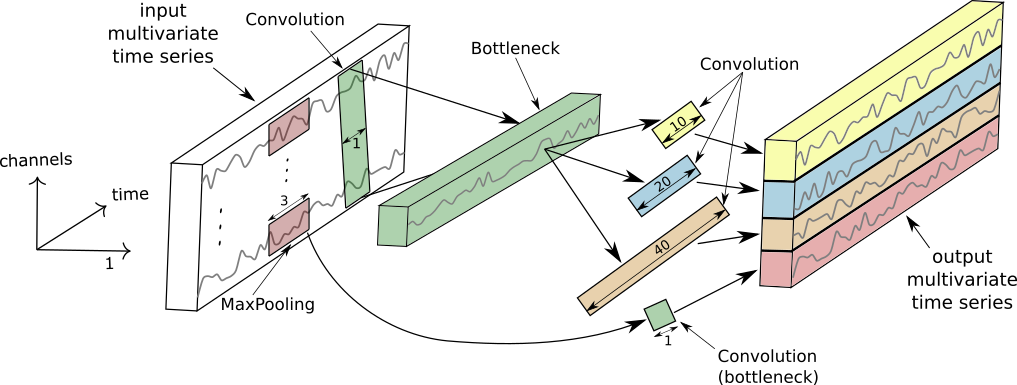
完整的 InceptionTime 模型由多個 Inception 模塊連接而成。 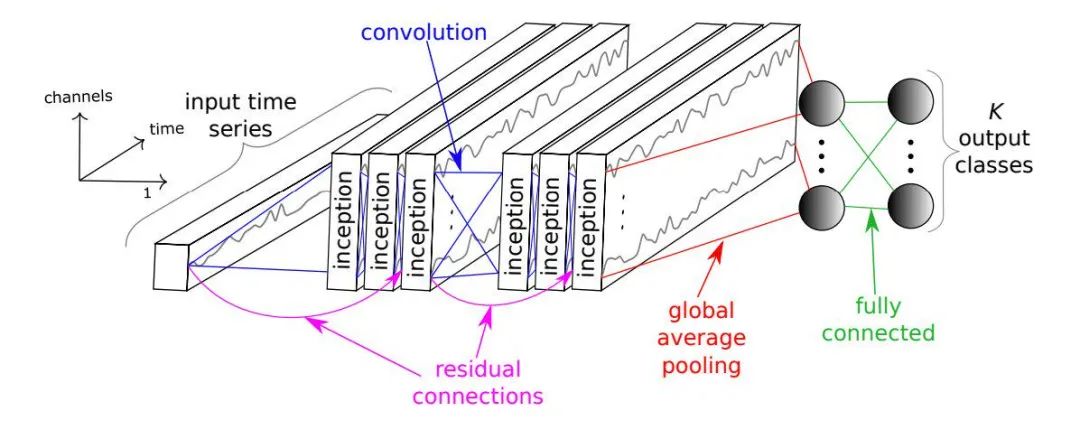 關于 InceptionTime 的更多細節請參考論文:https://arxiv.org/abs/1909.04939。
02數據集
本文采用的數據集來自http://timeseriesclassification.com/TSC.zip,由 128 個時間序列分類任務組成。其中的 Wafer 數據集包含 1000 條訓練數據和和 6164 條測試數據,每條數據均包含標簽值和長度 152 的時間序列數據。數據通過程序提前寫入到 TDengine 中。
這里描述的時序數據是晶片生成過程中同一個工具通過單個傳感器記錄的時間序列數據。下圖展示了正常 (class 1) 和異常 (class 0) 兩種標簽對應的時序數據示例。 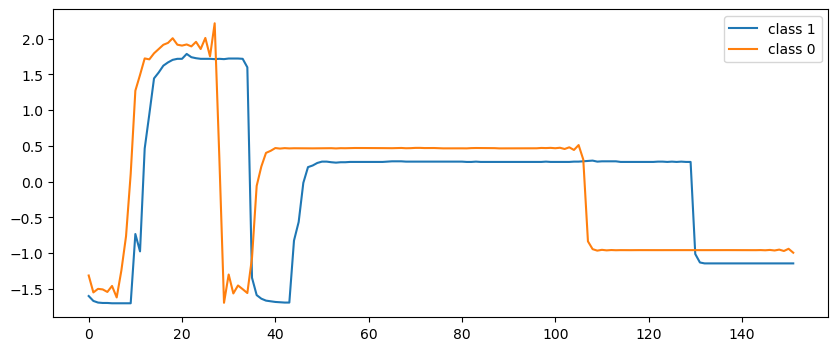
不難看出,這是一個標準的監督學習分類任務。我們希望找到一個模型,在每輸入長度 152 的時序數據時,模型輸出 0 或 1,以此判斷輸入時序數據對應的晶片在生成過程是否存在異常。
03模型訓練
本文中我們將使用 Wafer 數據集訓練一個 InceptionTime 模型。訓練得到的模型可以根據晶片生產過程中傳感器記錄的時序數據,判斷某個晶片的生產過程是否存在異常。
InceptionTime 的作者開源了基于 tensorflow.keras 的實現,本文的模型代碼基于 InceptionTime 開源版本并集成 TDengine 支持 https://github.com/sangshuduo/InceptionTime。
首先加載 Python 庫。
from os import path
import numpy as np
from sklearn import preprocessing


from tensorflow import keras
from tensorflow.keras.layers import (
    Activation, Add, BatchNormalization, Concatenate,
    Conv1D, Dense, Input, GlobalAveragePooling1D, MaxPool1D
)


from sqlalchemy import create_engine, text
然后使用 TDengine 的 SQLAlchemy 驅動加載 Wafer 數據集并進行預處理。
def readucr(conn, dbName, tableName):
    data = pd.read_sql(
        text(
            "select * from " + dbName + "." + tableName
        ),
        conn,
    )
    y = data[:, 0]
    x = data[:, 1:]
    return x, y


def load_data(db):
    engine = create_engine("taos://root:taosdata@localhost:6030/" + db)
    try:
        conn = engine.connect()
    except Exception as e:
        print(e)
        exit(1)


    if conn is not None:
        print("Connected to the TDengine ...")
    else:
        print("Failed to connect to taos")
        exit(1)


    x_train, y_train = readucr(conn, db + '_TRAIN.tsv')
    x_test, y_test = readucr(conn, db + '_TEST.tsv')
    n_classes = len(np.unique(y_train))
    enc = preprocessing.OneHotEncoder()
    y = np.concatenate((y_train, y_test), axis=0).reshape(-1,1)
    enc.fit(y)
    y_tr = enc.transform(y_train.reshape(-1,1)).toarray()
    y_te = enc.transform(y_test.reshape(-1,1)).toarray()
    x_tr, x_te = map(lambda x: x.reshape(x.shape[0], x.shape[1], 1), [x_train, x_test])
    return x_tr, y_tr, x_te, y_te, n_classes


x_tr, y_tr, x_te, y_te, n_classes = load_data('Wafer')
再使用 tensorflow.keras 實現 IncetionTime,并創建模型。
def inception_module(input_tensor, filters, kernel_size, bottleneck_size,
                     activation='relu', use_bottleneck=True):
    if use_bottleneck and int(input_tensor.shape[-1]) > 1:
        input_inception = Conv1D(filters=bottleneck_size, kernel_size=1, padding='same',
                                 activation=activation, use_bias=False)(input_tensor)
    else:
        input_inception = input_tensor
    kernel_size_s = [kernel_size // (2 ** i) for i in range(3)] # [40, 20, 10]
    conv_list = []
    for i in range(len(kernel_size_s)):
        conv = Conv1D(filters=filters, kernel_size=kernel_size_s[i],
                      strides=1, padding='same', activation=activation,
                      use_bias=False)(input_inception)
        conv_list.append(conv)
    max_pool = MaxPool1D(pool_size=3, strides=1, padding='same')(input_tensor)
    conv_6 = Conv1D(filters=filters, kernel_size=1, padding='same',
                      activation=activation, use_bias=False)(max_pool)
    conv_list.append(conv_6)
    x = Concatenate(axis=2)(conv_list)
    x = BatchNormalization()(x)
    x = Activation(activation='relu')(x)
    return x


def shortcut_layer(input_tensor, output_tensor):
    y = Conv1D(filters=int(output_tensor.shape[-1]), kernel_size=1,
               padding='same', use_bias=False)(input_tensor)
    y = BatchNormalization()(y)
    x = Add()([y, output_tensor])
    x = Activation(activation='relu')(x)
    return x


def build_model(input_shape, n_classes, depth=6,
                filters=32, kernel_size=40, bottleneck_size=32,
                use_residual=True):
    input_layer = Input(input_shape)
    x = input_layer
    input_res = input_layer
    for d in range(depth):
        x = inception_module(x, filters, kernel_size, bottleneck_size)
        if use_residual and d % 3 == 2:
            x = shortcut_layer(input_res, x)
            input_res = x
    gap_layer = GlobalAveragePooling1D()(x)
    output_layer = Dense(n_classes, activation="softmax")(gap_layer)
    model = keras.Model(input_layer, output_layer)
    return model


model = build_model(x_tr.shape[1:], n_classes)


model.compile(
    optimizer='adam',
    loss='categorical_crossentropy',
    metrics=['accuracy']
)
訓練模型:
ckpt_path = path.sep.join(['.', 'models', 'inception_wafer.h5'])


callbacks = [
    keras.callbacks.ReduceLROnPlateau(
        monitor='val_loss', factor=0.5, patience=20, min_lr=0.0001
    ),
    keras.callbacks.EarlyStopping(monitor='val_loss', patience=20, verbose=1),
    keras.callbacks.ModelCheckpoint(
        filepath=ckpt_path, monitor='val_loss', save_best_only=True
    )
]


batch_size = 32
epochs = 500


history = model.fit(x_tr, y_tr, batch_size, epochs, verbose='auto', shuffle=True, validation_split=0.2, callbacks=callbacks)
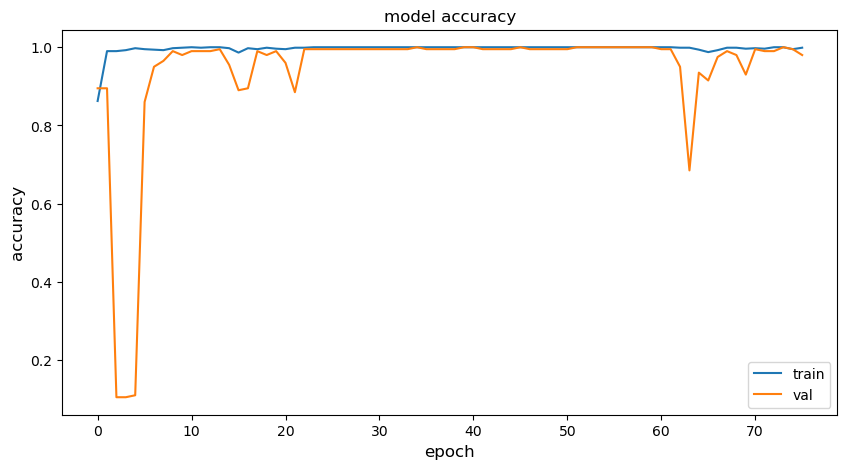
簡單顯示一下訓練過程:
metric = 'accuracy'
plt.figure(figsize=(10, 5))
plt.plot(history.history[metric])
plt.plot(history.history['val_'+metric])
plt.title("model " + metric)
plt.ylabel(metric, fontsize='large')
plt.xlabel('epoch', fontsize='large')
plt.legend(["train", "val"], loc="best")
plt.show()
plt.close()
使用測試數據驗證模型的推理精度。
classifier = keras.models.load_model(ckpt_path)
test_loss, test_acc = classifier.evaluate(x_te, y_te)
print("Test accuracy: ", test_acc)
print("Test loss: ", test_loss)
193/193 [==============================] - 2s 11ms/step - loss: 0.0142 - accuracy: 0.9958
Test accuracy:  0.9957819581031799
Test loss:  0.014155667275190353
我們的模型在 Wafer 測試數據上取得了 99.58% 的精度。
04模型轉換
為了達成使用 OpenVINO Runtime 進行推理計算的目的,我們需要將 tensorflow 模型轉換為 OpenVINO IR 格式。
from pathlib import Path
from openvino.tools import mo
from tensorflow import keras


model = keras.models.load_model('models/inception_wafer.h5')


model_path = Path('models/inception.0_float')
model.save(model_path)


model_dir = Path("ov")
model_dir.mkdir(exist_ok=True)
ir_path = Path("ov/inception.xml")


input_shape = [1, 152, 1]


if not ir_path.exists():
    print("Exporting TensorFlow model to IR...")
    ov_model = mo.convert_model(saved_model_dir=model_path, input_shape=input_shape, compress_to_fp16=True)
    serialize(ov_model, ir_path)
else:
    print(f"IR model {ir_path} already exists.")
轉換完成后,生成的 IR 格式模型被存儲為模型定義文件 inception.xml 和二進制文件 inception.bin。
05模型部署
接下來我們在 AIxBoard 開發板上部署剛剛訓練的 IncetpionTime 模型。首先將 inception.bin、inception.xml 和 Wafer_TEST.tsv 幾個文件復制到 AIxBoard 板上。
加載 Python 庫。
from pathlib import Path
import numpy as np
from openvino.runtime import Core, serialize
使用 OpenVINO 運行 Inception 模型。
ir_path = Path("inception.xml")
core = Core()
model = core.read_model(ir_path)
import ipywidgets as widgets


device = widgets.Dropdown(
    options=core.available_devices + ["AUTO"],
    value='AUTO',
    description='Device:',
    disabled=False
)


device
def readucr(filename, delimiter='	'):
    data = np.loadtxt(filename, delimiter=delimiter)
    y = data[:, 0]
    x = data[:, 1:]
    y[y==-1] = 0
    return np.expand_dims(x, axis=2), y


X, y = readucr('Wafer_TEST.tsv')


compiled_model = core.compile_model(model, device_name=device.value)


input_key = compiled_model.input(0)
output_key = compiled_model.output(0)
network_input_shape = input_key.shape


counter = 0
for idx, i in enumerate(X):
    i = np.expand_dims(i, axis=0)
    r = compiled_model(i)[output_key]
    counter += 1 if r.argmax() == y[idx] else 0


print('{:.6f}'.format(counter/len(y)))
0.995782
使用 OpenVINO 推理的精度跟 tensorflow 模型推理精度一致,同樣達到了 99.58%。我們在模型轉換時將原模型數據格式壓縮為 FP16,這一操作并沒有導致精度下降。
性能測試
使用 OpenVINO 自帶的 benchmark 工具可以輕松地在 AIxBoard 上進行性能測試。
benchmark_app -m inception.xml -hint latency -d CPU
[ INFO ] First inference took 8.59 ms
[Step 11/11] Dumping statistics report
[ INFO ] Execution Devices:['CPU']
[ INFO ] Count:            8683 iterations
[ INFO ] Duration:         60012.27 ms
[ INFO ] Latency:
[ INFO ]    Median:        6.44 ms
[ INFO ]    Average:       6.81 ms
[ INFO ]    Min:           6.34 ms
[ INFO ]    Max:           37.13 ms
[ INFO ] Throughput:   144.69 FPS
benchmark_app -m inception.xml -hint latency -d GPU
[ INFO ] First inference took 10.58 ms [Step 11/11] Dumping statistics report [ INFO ] Execution Devices:['GPU.0'] [ INFO ] Count: 7151 iterations [ INFO ] Duration: 60026.34 ms [ INFO ] Latency: [ INFO ] Median: 7.50 ms [ INFO ] Average: 8.23 ms [ INFO ] Min: 7.04 ms [ INFO ] Max: 21.78 ms [ INFO ] Throughput: 119.13 FPS從上面結果可以看出,使用 AIxBoard 的 CPU 運行 InceptionTime 模型推理,平均時長為 6.81ms。使用集成 GPU 推理,平均時長為 8.23ms。
06總結
本文介紹了如何利用 TDengine 支持時間序列數據的底層存儲,以及如何通過分類模型 InceptionTime 在 UCR 時序數據集的 Wafer 分類任務上進行訓練。最后,我們使用 OpenVINO 將該模型部署在 AIxBoard 開發板上,實現了高效的實時時序數據分類任務。希望本文的內容能夠幫助大家在項目中利用 TDengine、OpenVINO 和 AIxBoard 來解決更多的時間序列分析問題。
01關于 AIxBoard
英特爾開發者套件 AIxBoard(愛克斯開發板)是專為支持入門級邊緣 AI 應用程序和設備而設計,能夠滿足人工智能學習、開發、實訓等應用場景。該開發板是類樹莓派的 x86 主機,可支持 Linux Ubuntu 及完整版 Windows 操作系統,板載一顆英特爾 4 核處理器,最高運行頻率可達 2.9 GHz,且內置核顯(iGPU),板載 64GB eMMC 存儲及 LPDDR4x 2933MHz(4GB/6GB/8GB),內置藍牙和 Wi-Fi 模組,支持 USB 3.0、HDMI 視頻輸出、3.5mm 音頻接口,1000Mbps 以太網口,完全可把它作為一臺 mini 小電腦來看待,且其可集成一塊 Arduino Leonardo 單片機,可外拓各種傳感器模塊。此外,其接口與 Jetson Nano 載板兼容,GPIO 與樹莓派兼容,能夠最大限度地復用樹莓派、Jetson Nano 等生態資源,無論是攝像頭物體識別,3D 打印,還是 CNC 實時插補控制都能穩定運行,不僅可作為邊緣計算引擎用于人工智能產品驗證、開發,也可作為域控核心用于機器人產品開發。
02關于 TDengine
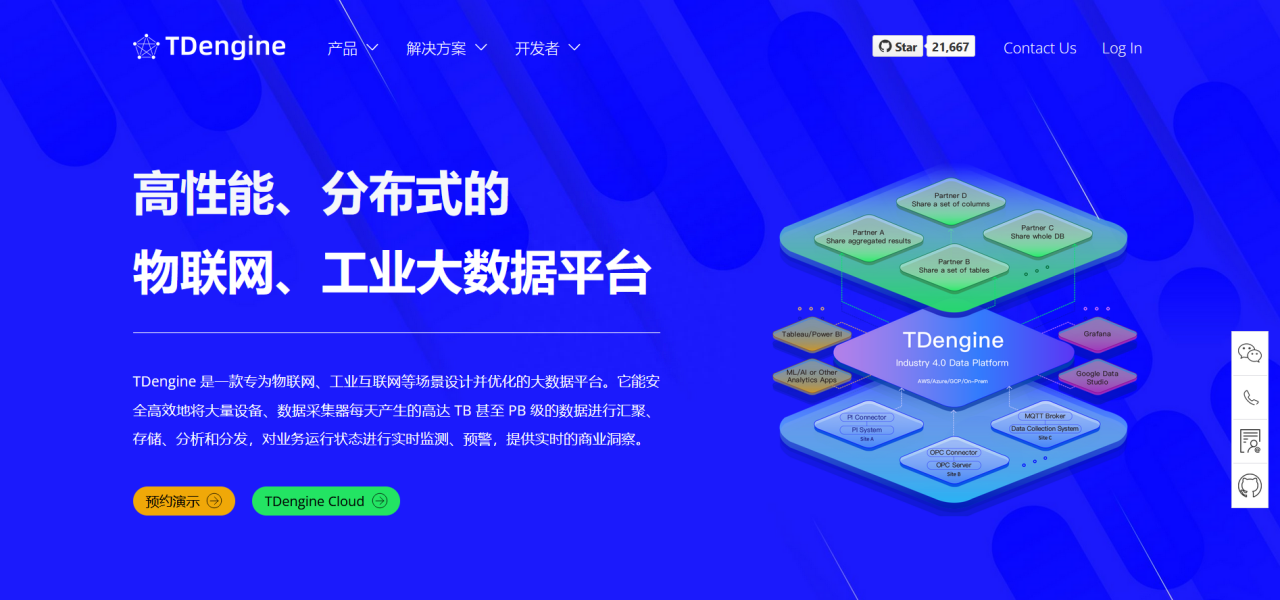
TDengine 核心是一款高性能、集群開源、云原生的時序數據庫(Time Series Database,TSDB),專為物聯網、工業互聯網、電力、IT 運維等場景設計并優化,具有極強的彈性伸縮能力。同時它還帶有內建的緩存、流式計算、數據訂閱等系統功能,能大幅減少系統設計的復雜度,降低研發和運營成本,是一個高性能、分布式的物聯網、工業大數據平臺。當前 TDengine 主要提供兩大版本,分別是支持私有化部署的 TDengine Enterprise 以及全托管的物聯網、工業互聯網云服務平臺 TDengine Cloud,兩者在開源時序數據庫 TDengine OSS 的功能基礎上有更多加強,用戶可根據自身業務體量和需求進行版本選擇。
03關于作者
馮偉,英特爾軟件架構師,16 年軟件研發經驗,涵蓋瀏覽器、計算機視覺、虛擬機等多個領域。2015 年加入英特爾,近年來專注于邊緣計算、深度學習模型落地,以及時序數據分析等方向。
審核編輯:湯梓紅
-
英特爾
+關注
關注
61文章
10301瀏覽量
180433 -
機器學習
+關注
關注
66文章
8553瀏覽量
136935 -
深度學習
+關注
關注
73文章
5598瀏覽量
124396 -
OpenVINO
+關注
關注
0文章
118瀏覽量
767
原文標題:TDengine + OpenVINO + AIxBoard,助力時序數據分類
文章出處:【微信號:英特爾物聯網,微信公眾號:英特爾物聯網】歡迎添加關注!文章轉載請注明出處。
發布評論請先 登錄
基于OpenVINO?和AIxBoard的智能安檢盒子設計

多片段時序數據建模預測實踐資料分享
關于時序數據庫的內容
TDengine簡介
TableStore時序數據存儲 - 架構篇
時序數據庫的前世今生
華為時序數據庫為智慧健康養老行業貢獻應用之道
華為PB級時序數據庫Gauss DB,助力海量數據處理
涂鴉推出NekoDB時序數據庫,助力全球客戶實現低成本部署

時序數據庫 TDengine 官網全新上線,四大亮點搶先看
基于OpenVINO和AIxBoard的智能安檢盒子設計
時序數據庫是什么?時序數據庫的特點
時序數據庫TDengine 2024年保持高增長,實現收入翻倍
TDengine 發布時序數據分析 AI 智能體 TDgpt,核心代碼開源


 工商網監
工商網監
評論