 探索 Kunlun Pi | 基于匠芯創D13x系列開發板分享(二)

作者ID:jf_92517703
環境搭建
板卡實物

首次編譯燒寫源碼
下載源碼:https://gitee.com/artinchip/luban-lite.git
VSCode 安裝插件

在VSCode打開源碼

在第一次編譯之前必須清理下工程

下載燒寫工具:
https://gitee.com/artinchip/tools,下載后安裝。

在VSCode安裝插件后打開SDK目錄

否則報錯

選擇配置

編譯bootloader程序,選擇配置。

編譯

編譯helloword程序,選擇配置。

編譯APP
燒錄固件
先按住【BOOT】,然后按下【RESET】,AiBrun顯示設置已連接選擇生成的固件,點擊【開始】,完成下載。
焊接調試串口

打開mobarxterm查看日志

SDK應用程序入口

修改RTT的main函數,循環打印輸出計數。
application\rt-thread\helloworld\main.c

板卡初始化文件:target\d13x\kunlunpi88-nor\board.c
顯示了軟件版本【Version: Car1.2.3】,說明找到了板子的初始化文件【board.c】文件。

板卡的配置文件:
target\d13x\common\Kconfig.board
target\configs\d13x_kunlunpi88-nor_rt-thread_helloworld_defconfig
KEY測試
使能gpio_key的測試程序
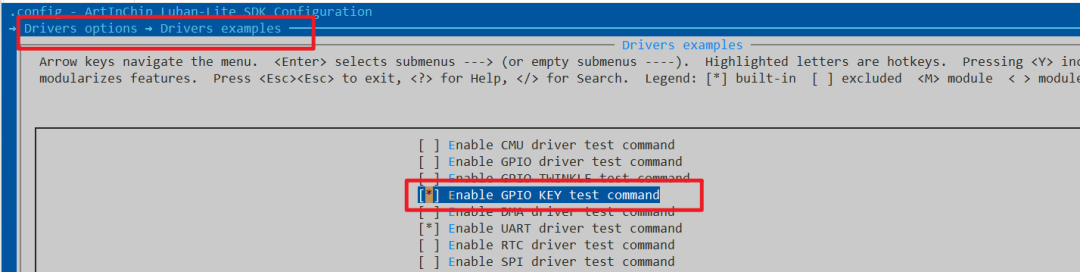
修改了對應的配置文件

根據配置添加編譯

關聯源碼:
bsp\examples\test-gpio\test_gpio_key.c


LVGL-Music Demo
添加LVGL的Music示例Demo測試
要想直到helloword的程序到底運行的什么LVGL程序,首先查看運行的線程,發現存在LVGL線程。

在VSCode中搜索【LVGL】線程的創建:packages\artinchip\lvgl-ui\lvgl_v9\lvgl\env_support\rt-thread\lv_rt_thread_port.c
在RT-Thread 環境中使用【scons】(即通過 ENV 工具鏈)編譯時,會自動定義宏【__RTTHREAD__】

線程初始化位置:packages\artinchip\lvgl-ui\lv_demo.c

打開工程配置:scons --menuconfig
配置文件變化:target\configs\d13x_kunlunpi88-nor_rt-thread_helloworld_defconfig

這就是出廠的demo入口【ui_init】

【void lv_example_observer_2(void)】這個沒有被調用,所以【void aic_ui_init()】就是入口:packages\artinchip\lvgl-ui\aic_ui.c

在這里修改為【music】的demo

編譯下載

打開內存和性能監視:packages\artinchip\lvgl-ui\lvgl_v9\lv_conf.h

屏幕刷新幀率最低35幀,CPU使用最高50%。

LVGL-自己添加APP
要自己定義自己的UI程序,我們自己僅僅需要實現【ui_init】函數即可,從官方的串口工具得到啟發。
第一步

第二步

第三步

第四步

那我自己做一個串口工具的UI試試
在【packages\artinchip\lvgl-ui\lv_demo.c】中添加源碼,源碼由通義千問完成。
#include"lvgl.h"#include"stdio.h"#include"string.h"http:// 全局控件句柄staticlv_obj_t*rx_textarea =NULL;staticlv_obj_t*tx_textarea =NULL;staticlv_obj_t*baud_dropdown =NULL;staticlv_obj_t*port_dropdown =NULL;staticlv_obj_t*hex_recv_checkbox =NULL;staticlv_obj_t*hex_send_checkbox =NULL;staticlv_obj_t*interval_textarea =NULL;staticlv_obj_t*auto_send_checkbox =NULL;// 模擬發送按鈕回調staticvoidsend_btn_event_cb(lv_event_t*e){constchar*text =lv_textarea_get_text(tx_textarea);if(text &&strlen(text) >0) {// 模擬追加到接收區(實際應由 UART 中斷處理)staticcharbuf[128];snprintf(buf,sizeof(buf),"Sent: %s\r\n", text);lv_textarea_add_text(rx_textarea, buf);// lv_textarea_cursor_end(rx_textarea); // 滾動到底部}}// 模擬打開串口按鈕回調staticvoidopen_uart_btn_event_cb(lv_event_t*e){
charmsg[64];snprintf(msg,sizeof(msg),"Opened %s @ %sbps\r\n","com3","115200");lv_textarea_add_text(rx_textarea, msg);
// lv_textarea_cursor_end(rx_textarea);}// 創建串口調試助手 UIvoidcreate_uart_tool(void) {// 主容器:水平布局,左右分區lv_obj_t *main_cont =lv_obj_create(lv_screen_active());lv_obj_set_size(main_cont,LV_PCT(100),LV_PCT(100));lv_obj_set_layout(main_cont,LV_LAYOUT_FLEX);lv_obj_set_flex_flow(main_cont,LV_FLEX_FLOW_ROW);lv_obj_set_style_pad_all(main_cont,8,0);//lv_obj_set_style_bg_color(main_cont, lv_color_light_gray(), 0);
// ========== 左側:控制面板 ==========lv_obj_t*left_panel =lv_obj_create(main_cont);lv_obj_set_width(left_panel,160);lv_obj_set_height(left_panel,LV_PCT(100));lv_obj_set_layout(left_panel, LV_LAYOUT_FLEX);lv_obj_set_flex_flow(left_panel, LV_FLEX_FLOW_COLUMN);lv_obj_set_style_pad_row(left_panel,8,0);// 串口端口lv_obj_t*label =lv_label_create(left_panel);lv_label_set_text(label,"Port:");port_dropdown =lv_dropdown_create(left_panel);lv_dropdown_set_options(port_dropdown,"UART0\nUART1\nUART2\nUART3");// 波特率label =lv_label_create(left_panel);lv_label_set_text(label,"Baudrate:");baud_dropdown =lv_dropdown_create(left_panel);lv_dropdown_set_options(baud_dropdown,"9600\n19200\n38400\n57600\n115200");lv_dropdown_set_selected(baud_dropdown,4); // 默認 115200// 打開串口按鈕lv_obj_t*open_btn =lv_button_create(left_panel);lv_obj_set_width(open_btn,LV_PCT(100));lv_obj_add_event_cb(open_btn, open_uart_btn_event_cb, LV_EVENT_CLICKED,NULL);lv_obj_t*btn_label =lv_label_create(open_btn);lv_label_set_text(btn_label,"Open UART");lv_obj_center(btn_label);// HEX 顯示hex_recv_checkbox =lv_checkbox_create(left_panel);lv_checkbox_set_text(hex_recv_checkbox,"Hex Display");// HEX 發送hex_send_checkbox =lv_checkbox_create(left_panel);lv_checkbox_set_text(hex_send_checkbox,"Hex Send");// 發送間隔label =lv_label_create(left_panel);lv_label_set_text(label,"Interval (ms):");interval_textarea =lv_textarea_create(left_panel);lv_textarea_set_text(interval_textarea,"1000");lv_textarea_set_one_line(interval_textarea,true);lv_textarea_set_max_length(interval_textarea,8);lv_obj_set_height(interval_textarea,30);// 自動發送auto_send_checkbox =lv_checkbox_create(left_panel);lv_checkbox_set_text(auto_send_checkbox,"Auto Send");// 發送按鈕lv_obj_t*send_btn =lv_button_create(left_panel);lv_obj_set_width(send_btn,LV_PCT(100));lv_obj_add_event_cb(send_btn, send_btn_event_cb, LV_EVENT_CLICKED,NULL);btn_label =lv_label_create(send_btn);lv_label_set_text(btn_label,"Send");lv_obj_center(btn_label);// ========== 右側:接收/發送區 ==========lv_obj_t*right_panel =lv_obj_create(main_cont);lv_obj_set_flex_grow(right_panel,1);lv_obj_set_height(right_panel,LV_PCT(100));lv_obj_set_flex_flow(right_panel, LV_FLEX_FLOW_COLUMN);lv_obj_set_layout(right_panel, LV_LAYOUT_FLEX);lv_obj_set_style_pad_row(right_panel,8,0);// 接收區label =lv_label_create(right_panel);lv_label_set_text(label,"Received Data:");lv_obj_set_style_margin_bottom(label,4,0);rx_textarea =lv_textarea_create(right_panel);lv_obj_set_flex_grow(rx_textarea,1);lv_textarea_set_placeholder_text(rx_textarea,"Waiting for data...");//lv_obj_clear_flag(rx_textarea, LV_OBJ_FLAG_EDITABLE); // 只讀lv_obj_set_style_bg_color(rx_textarea,lv_color_white(),0);lv_obj_set_style_text_color(rx_textarea,lv_color_black(),0);// 發送區label =lv_label_create(right_panel);lv_label_set_text(label,"Transmit Data:");lv_obj_set_style_margin_bottom(label,4,0);tx_textarea =lv_textarea_create(right_panel);lv_obj_set_flex_grow(tx_textarea,1);lv_textarea_set_placeholder_text(tx_textarea,"Enter data to send...");lv_obj_set_style_bg_color(tx_textarea,lv_color_white(),0);lv_obj_set_style_text_color(tx_textarea,lv_color_black(),0);// 可選:設置默認字體(防止文字太小)lv_obj_set_style_text_font(lv_screen_active(), &lv_font_montserrat_14,0);}


LVGL-使用AIUIBuilder開發
使用AIUIBuilder開發LVGL程序值得點贊,頁面繪制、資源管理一次解決,安逸啊!
使用AIUIBuilder
scons --menuconfig
打開工程配置

先設計一個簡單的demo

將生成的【ui_builder】下的文件全部拷貝到工程目錄【packages\artinchip\lvgl-ui\aic_demo\ui_builder】。
首次拷貝可能需要拷貝【lv_conf_custom.h】文件,因為拷貝了這個文件導致整個LVGL源碼會重新編譯,因為【lv_conf.h】包含了它,在【lv_conf_custom.h】文件在沒有改變就不要拷貝這個文件。
運行結果

字庫和圖片資源測試

字體生成

還可以添加各種字體文件

圖片資源的使用

測試結果

添加用戶APP文件夾到構建系統
添加自己的APP代碼
**修改SConscript文件,**修改此文件會導致整個工程重新編譯
添加user_app目錄及子目錄:SConscript
user_app內部的SConscript文件都是一樣的,復制于【application\rt-thread\helloworld\SConscript】,Kconfig都是空文件。


**這個構建腳本大致意思是,**添加當前目錄的c文件到構建系統,遞歸添加子目錄的c文件到構建系統。
Import('RTT_ROOT')Import('rtconfig')frombuilding import *
cwd = GetCurrentDir()src = Glob('*.c')CPPPATH = [cwd, ]
CFLAGS =' -c -ffunction-sections'
group = DefineGroup('Applications', src, depend = [''], CPPPATH = CPPPATH, CFLAGS=CFLAGS)
list = os.listdir(cwd)foriteminlist: ifos.path.isfile(os.path.join(cwd, item,'SConscript')): group=group+ SConscript(os.path.join(item,'SConscript'))
Return('group')
application\user_app\helloworld\user_main.c
/* * Copyright (c) 2022-2024, ArtInChip Technology Co., Ltd * * SPDX-License-Identifier: Apache-2.0 * * Authors: weilin.peng@artinchip.com */
#include#ifdefRT_USING_ULOG#include#endif
rt_device_tg_serial;
intuser_app_entry(void){ log_i("INIT_APP_EXPORT Hello World!\n"); g_serial =rt_device_find("uart2");
if(!g_serial) { log_w("find %s failed!\n","uart2"); return-RT_ERROR; } rt_err_t ret =rt_device_open(g_serial, RT_DEVICE_OFLAG_RDWR | RT_DEVICE_FLAG_INT_RX); if(ret != RT_EOK) { log_w("open %s failed !\n","uart2"); return-RT_ERROR; }
return0;}INIT_APP_EXPORT(user_app_entry);
application\user_app\ui\ui.c
/* * Copyright (c) 2022-2024, ArtInChip Technology Co., Ltd * * SPDX-License-Identifier: Apache-2.0 * * Authors: weilin.peng@artinchip.com */
#include#ifdefRT_USING_ULOG#include#endif
externrt_device_tg_serial;voidscreen_button_1_custom_clicked(void){ char*msg ="Hello World!\n"; log_i("send:%s\n",msg); rt_device_write(g_serial,0, msg,strlen(msg));}
screen_button_1_custom_clicked這個是按鍵點擊的重寫函數,原本是弱定義。

測試結果
點擊button串口發送hello word。


以上內容來源:電子發燒友論壇
-
板卡
+關注
關注
3文章
178瀏覽量
17500 -
開發板
+關注
關注
26文章
6358瀏覽量
119746 -
匠芯創
+關注
關注
0文章
63瀏覽量
201
發布評論請先 登錄
Banana Pi開源社區基于瑞芯微RK3588開發板,DeepSeek開發利器

探索 KunLun Pi | 基于匠芯創D13x系列開發板分享(三)

【匠芯創科技】D13X-DOC
匠芯創D133CBS RISC-V KunLun Pi V1.0開發板開發資料
【匠芯創D133CBS KunLun Pi開發板試用體驗】《匠芯創D133CBS RISC-V KunLun Pi 》 開箱及搭建vscode開發環境
【匠芯創D133CBS KunLun Pi開發板試用體驗】1、開發板開箱及介紹
【匠芯創D133CBS KunLun Pi開發板試用體驗】2、SDK下載+環境搭建
【免費試用】匠芯創D133CBS KunLun Pi開發板試用體驗

匠芯創D13x系列通過工業和信息化部重點實驗室測試
賦能兩輪車新國標 | 匠芯創D13x系列芯片為手機無線投屏與導航提供核心支持
探索KunLun Pi | 基于匠芯創D13x系列開發板分享


 工商網監
工商網監
評論