 怎樣使用YOLOv8構建目標計數GUI呢?

標檢測是在圖片或視頻中定位物體的過程。其中一個著名的目標檢測框架是YOLO(You Only Look Once)。在某些情況下,我們不僅需要定位圖片或視頻中的物體,還需要了解每個物體的運動,就像在這篇文章中,我們想要計數通過某些位置的物體。這就是我們需要不僅僅是檢測的地方,我們需要稱為目標跟蹤的東西的地方。
此外,大多數情況下,我們通常只是通過執行腳本或命令行中的代碼來使用它,如果我們可以將我們的模型部署為GUI或應用程序,以便用戶更輕松地使用它,那將更好。在這篇文章中,將分享如何使用框架YOLOv8和PySimpleGUI構建一個目標計數GUI。
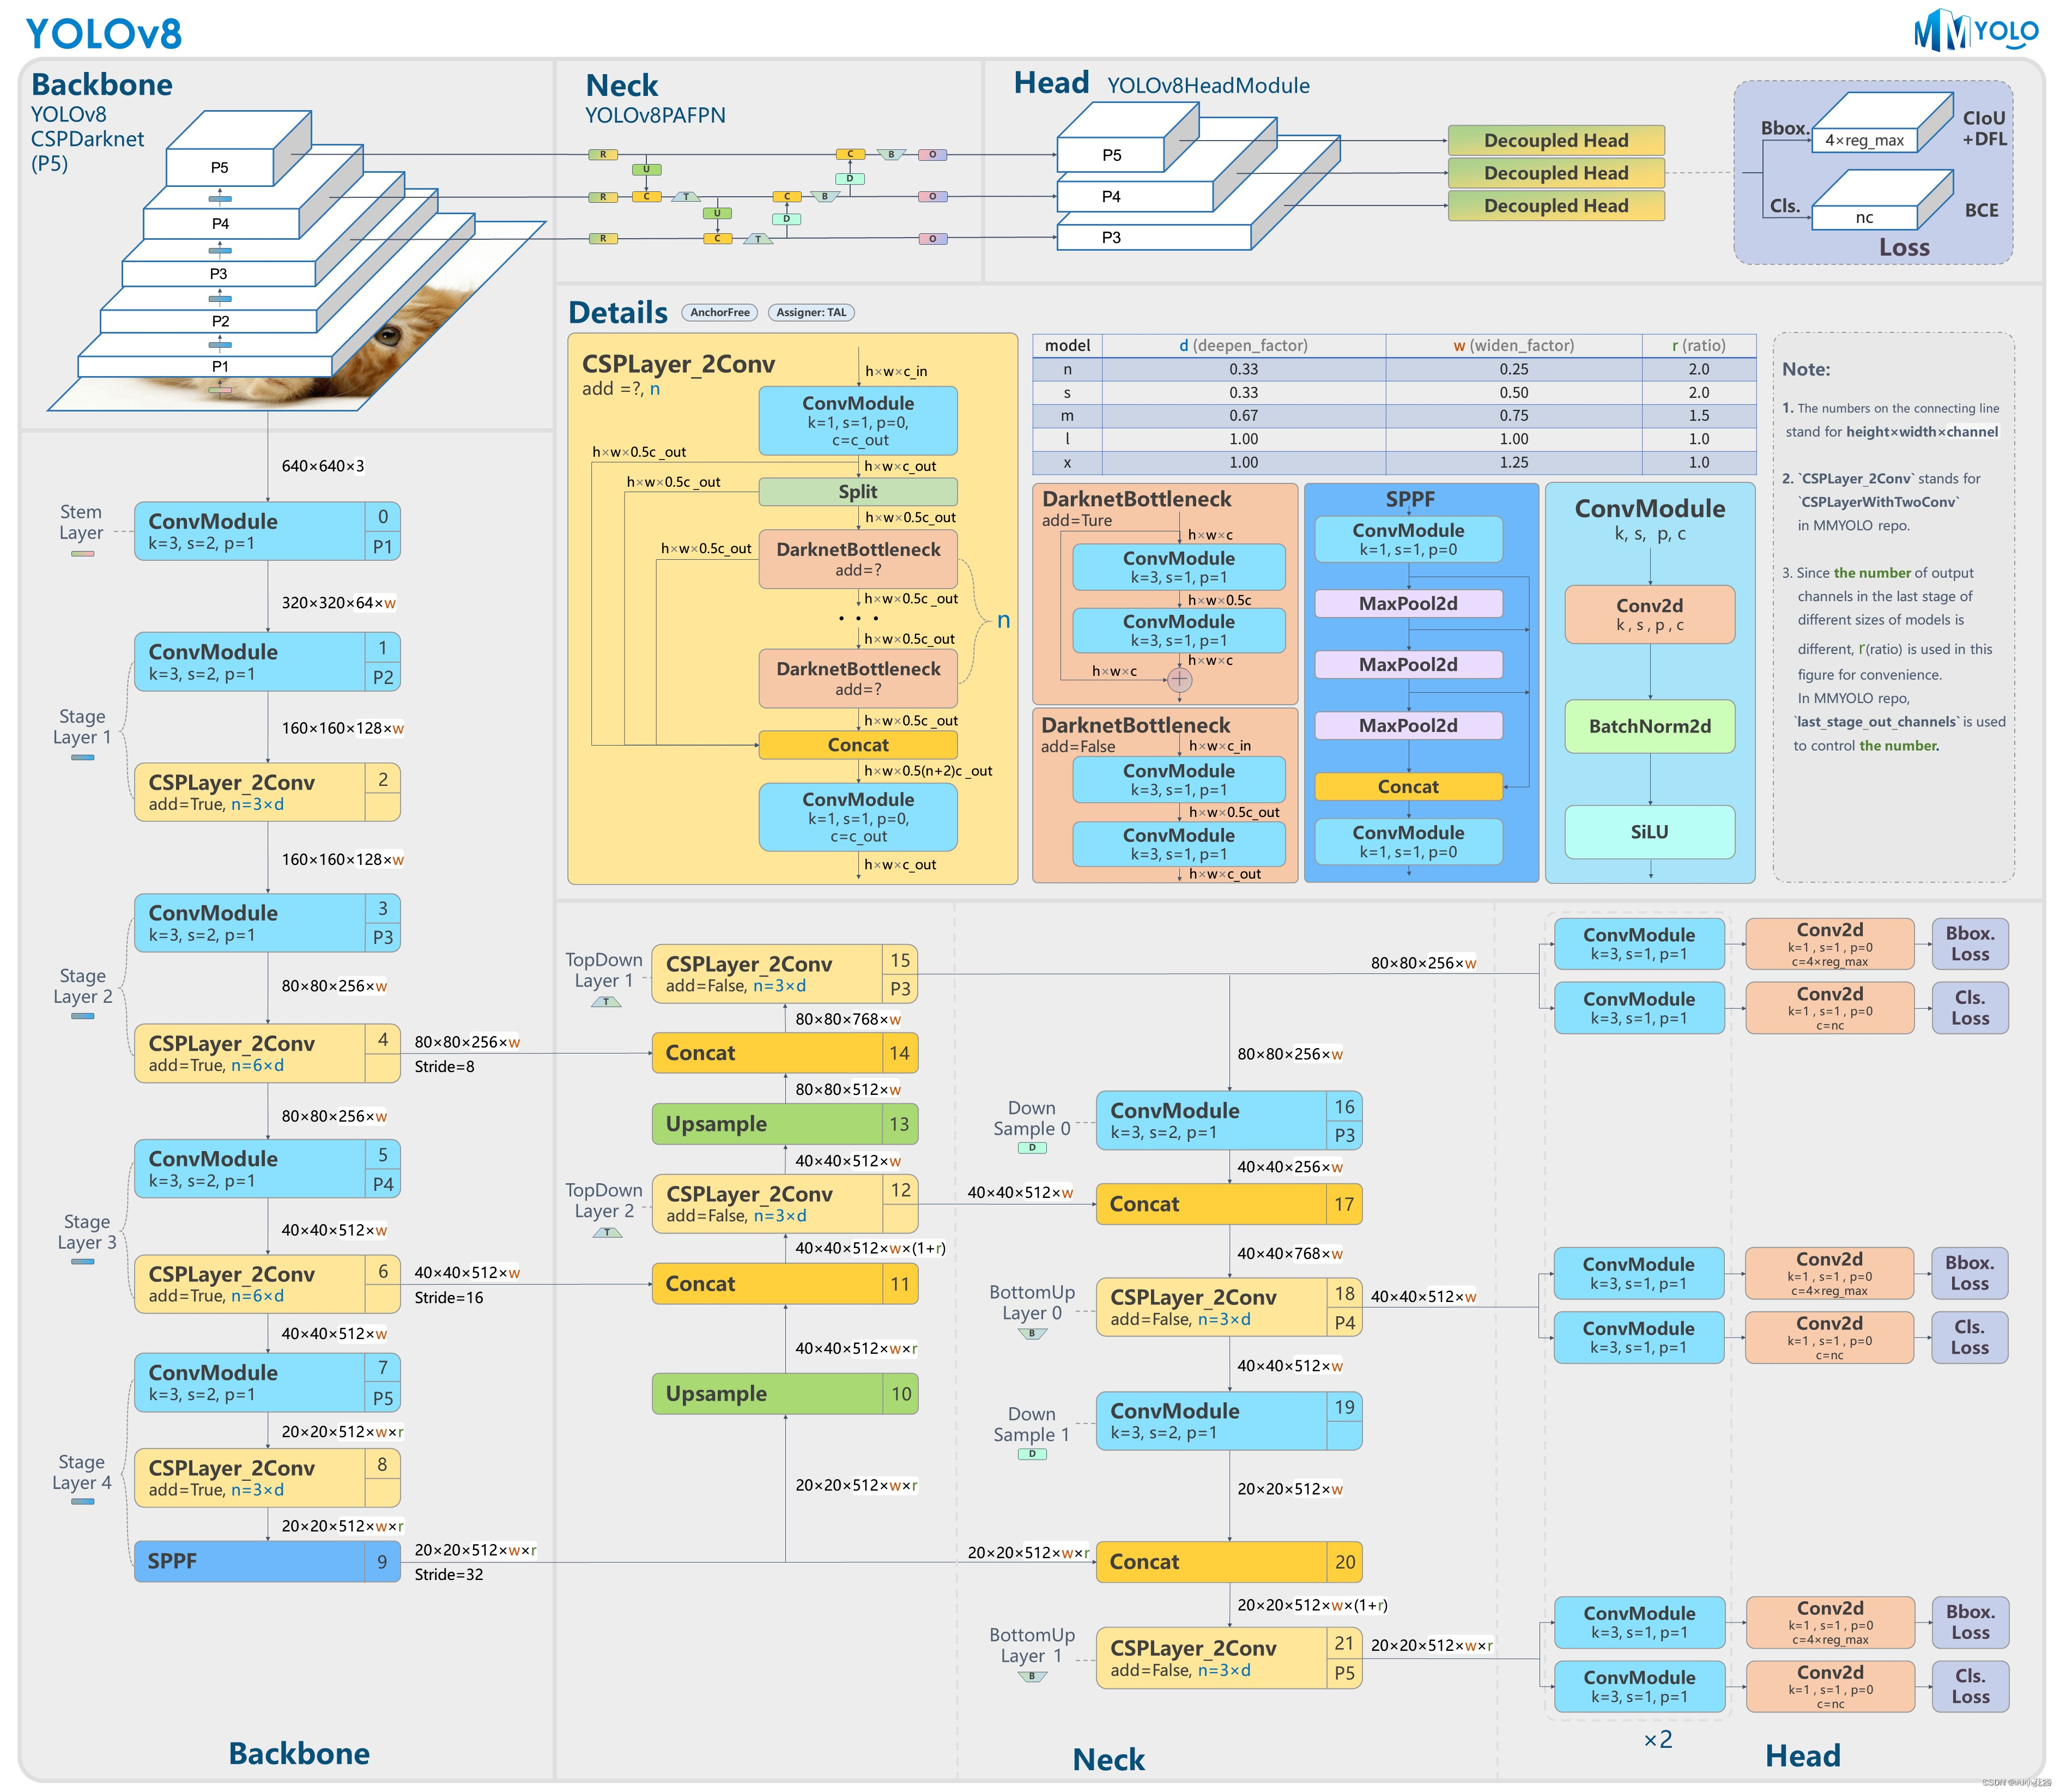
什么是YOLOv8?
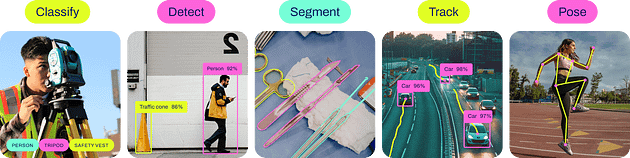
YOLOv8,即You Only Look Once version 8,是由UItralytics開發的圖像處理框架,YOLOv8可以執行目標檢測和跟蹤、實例分割、圖像分類和姿態估計任務。
YOLOv8的用法
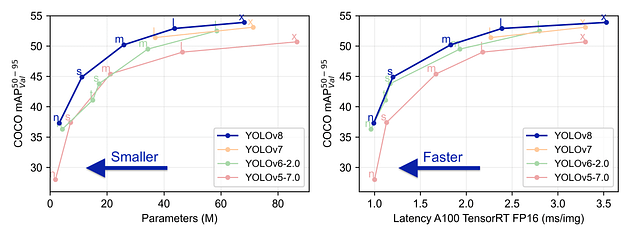
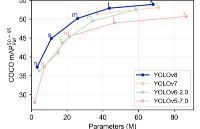
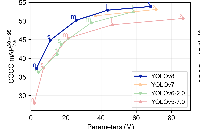
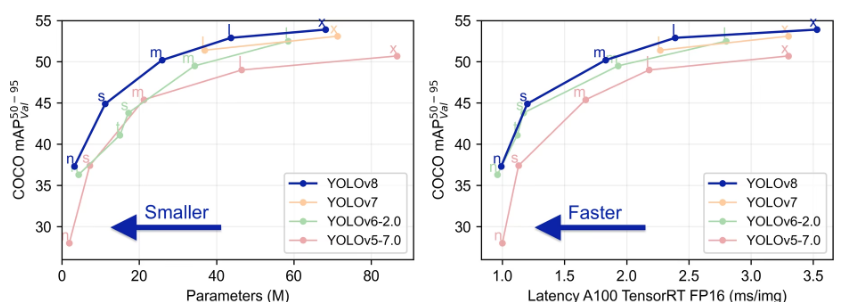
YOLOv8與先前版本的性能比較
使用YOLOv8進行目標跟蹤
有很多方法可以使用YOLOv8進行目標跟蹤。我喜歡Python腳本方法,因為我可以有更多的控制權,使用此方法需要執行以下幾個步驟,您還可以從Ultralytics的文檔中查看此鏈接。
1. 創建虛擬環境
python -m venv yologui
2. 激活虛擬環境
yologuiScriptsactivate
3. 安裝YOLOv8的依賴項
pip install -r https://raw.githubusercontent.com/ultralytics/ultralytics/main/requirements.txt
4. 安裝YOLOv8
pip install ultralytics
5. 創建一個yolo腳本
# https://docs.ultralytics.com/modes/track/#python-examples
import cv2
from ultralytics import YOLO


# Load the YOLOv8 model
model = YOLO('yolov8n.pt')


# Open the camera
cap = cv2.VideoCapture(0)


# Loop through the video frames
while cap.isOpened():
    # Read a frame from the video
    success, frame = cap.read()


    if success:
        # Run YOLOv8 tracking on the frame, persisting tracks between frames
        results = model.track(frame, persist=True)
        # Visualize the results on the frame
        annotated_frame = results[0].plot()
        # Display the annotated frame
        cv2.imshow("YOLOv8 Tracking", annotated_frame)
        # Break the loop if 'q' is pressed
        if cv2.waitKey(1) & 0xFF == ord("q"):
            break
    else:
        # Break the loop if the end of the video is reached
        break


# Release the video capture object and close the display window
cap.release()
cv2.destroyAllWindows()
執行腳本,您應該可以得到由YOLOv8進行的目標跟蹤:
python yolo.py
這是結果,當滿意時按“Q”退出。
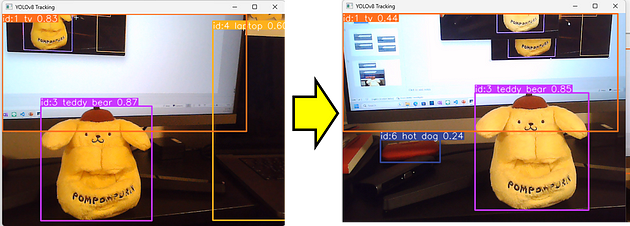
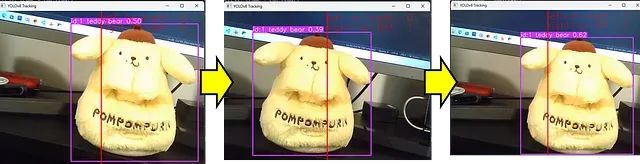
目標追蹤結果
您可以看到我們的腳本可以記住左側圖片中的泰迪熊與右側圖片中的泰迪熊是相同的。實際上,他是一只狗....
添加目標跟蹤的計數邏輯
目標跟蹤為我們提供了比目標檢測更多的選項,其中之一是我們可以使用它來計算進入或離開框架中某個區域或線的獨特目標的數量。
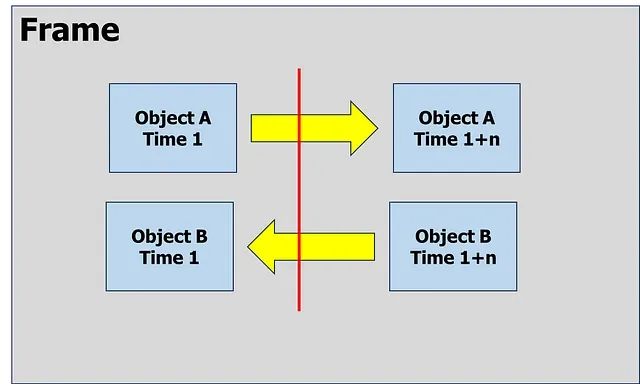
跟蹤物體A和B的運動
要計算通過我們的線左右經過的物體數量,我們需要從我們的目標跟蹤腳本中提取目標的id和位置。Ultralytics的模型已經為我們提供了該屬性,通過使用以下命令來處理跟蹤結果。
# Using Model
results= model.track(frame, persist=True)


# Extrack result
result = results[0].cpu().boxes
detect_id = result.id.tolist() if result.id != None else []
detect_xyxy = result.xyxy.tolist() if result.xyxy != None else []
frame_counting_buffer = dict(zip(detect_id, detect_xyxy))
因此,我們可以獲取每個目標的位置,接下來是進行一些計算,以了解目標是從右到左還是從左到右經過。在這種情況下,我只關注目標的中心和X軸。以下是在X軸上進行目標計數的完整腳本。
# https://docs.ultralytics.com/modes/track/#python-examples
import cv2
from ultralytics import YOLO


# Load the YOLOv8 model
model = YOLO('yolov8n.pt')


# Counting config
line_position = 50
text_size = 30
text_x_position = 50
text_y_position = 0


# Open the camera
cap = cv2.VideoCapture(0)


# Get Camera Parameter
width  = cap.get(cv2.CAP_PROP_FRAME_WIDTH)
height = cap.get(cv2.CAP_PROP_FRAME_HEIGHT)


# Counting prep
x_line= line_position*width/100
pt1 = (int(x_line), 0)
pt2 = (int(x_line), int(height))
counting_buffer = {}
counting_result = {'left-to-right' : 0, 'right-to-left' : 0}


# Loop through the video frames
while cap.isOpened():
    # Read a frame from the video
    success, frame = cap.read()
    if success:
        # Run YOLOv8 tracking on the frame, persisting tracks between frames
        results = model.track(frame, persist=True, verbose=False)


        # Visualize the results on the frame
        annotated_frame = results[0].plot()


        # Get Data for counting
        result = results[0].cpu().boxes
        detect_id = result.id.tolist() if result.id != None else []
        detect_xyxy = result.xyxy.tolist() if result.xyxy != None else []
        frame_counting_buffer = dict(zip(detect_id, detect_xyxy))
        # Process
        for i in frame_counting_buffer :
            # Prep count buffer
            counting_buffer[i] = counting_buffer.get(i,[])
            if len(counting_buffer[i]) >= 2 : counting_buffer[i] = counting_buffer[i][-1:]
            # Append avg x axis to buffer
            avg_x = (frame_counting_buffer[i][0] + frame_counting_buffer[i][2])/2
            counting_buffer[i].append(avg_x)
            # Count logic
            if len(counting_buffer[i]) >= 2 :
                if (counting_buffer[i][0] > x_line) & (counting_buffer[i][1] < x_line) :
                    counting_result['right-to-left'] += 1
                elif (counting_buffer[i][0] < x_line) & (counting_buffer[i][1] > x_line) :
                    counting_result['left-to-right'] += 1


        # Create Line
        cv2.line(annotated_frame, pt1= pt1, pt2= pt2 , color= (0,0,255), thickness= 2)
        # Put Counting to picture
        text_position = text_y_position
        for i in counting_result :
            text_position += text_size
            info_text = f"{i} : {counting_result[i]}"
            annotated_frame = cv2.putText(annotated_frame
                                          , info_text
                                          , (int(width*text_x_position/100), text_position)
                                          , cv2.FONT_HERSHEY_SIMPLEX
                                          , 1, (0,0,255), 1, cv2.LINE_AA)


        # Display the annotated frame
        cv2.imshow("YOLOv8 Tracking", annotated_frame)


        # Break the loop if 'q' is pressed
        if cv2.waitKey(1) & 0xFF == ord("q"):
            break
    else:
        # Break the loop if the end of the video is reached
        break


# Release the video capture object and close the display window
cap.release()
cv2.destroyAllWindows()
然后,我們將得到一個如圖所示的目標計數腳本,當滿意時按Q。
什么是PySimpleGUI?
PySimpleGUI是一個用于制作GUI的Python庫,具有跨平臺性且非常簡單易用。
從PySimpleGUI的頁面獲取圖片
GUI的框架
創建GUI時,有一些比編碼更重要的東西,即設計階段。我們在編碼之前應該有一些草圖設計。在這種情況下,我畫了一個目標計數GUI的初步設計,就像這張圖片一樣。
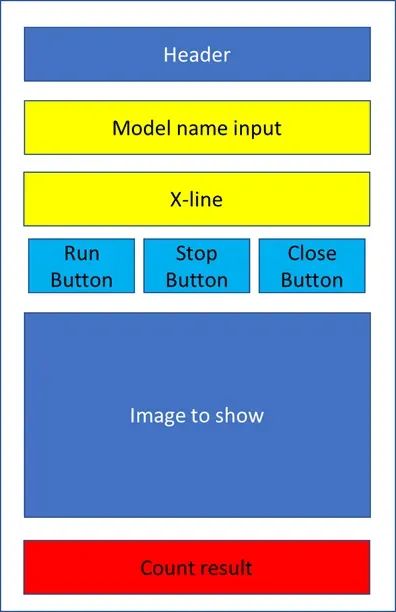
GUI初步設計
設計階段后,接下來就是編碼:
1. 安裝PySimpleGUI。
pip install pysimplegui
2. 創建一個GUI腳本
# https://www.pysimplegui.org/en/latest/#jump-start
import PySimpleGUI as sg


# Create Layouy of the GUI
layout = [
            [sg.Text('GUI Object Counting with Yolo V8')],
            [sg.Text('Enter Model Name', size= (15)), sg.InputText(key='model_name')],
            [sg.Text('X-line for Counting', size= (15)), sg.InputText(key= 'line_position')],
            [sg.Button('Run'), sg.Button('Stop'), sg.Button('Close')],
            [sg.Text('PICTURE')],
            [sg.Text('Left-to-Right', size= (15), key='out1'), sg.Text("0", key='out1-v')],
            [sg.Text('Right-to-Left', size= (15), key='out2'), sg.Text("0", key='out2-v')]
            ]


# Create the Window
window = sg.Window('GUIYoloV8-Counting', layout)
# Event Loop to process "events"
while True:
    event, values = window.read()
    # When press Run
    if event == 'Run' :
        print(values)
    # When close window or press Close
    if event in (sg.WIN_CLOSED, 'Close'): break


# Close window
window.close()
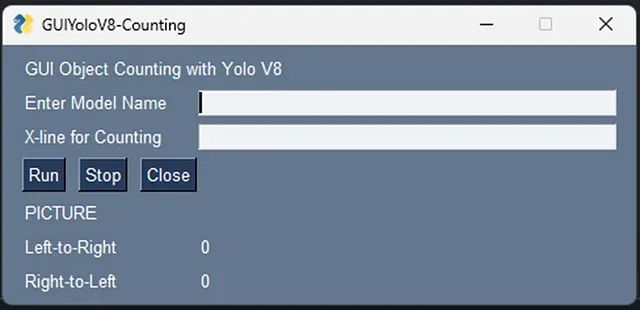
正如您所見,PySimpleGUI的腳本非常簡單。之后,我們所要做的就是運行此GUI腳本。
python gui.py
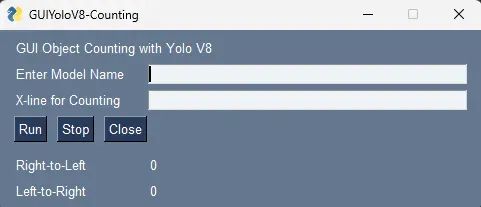
之后,您應該會得到一個像圖中這樣的簡單GUI,嘗試玩耍并在滿意時關閉。
合并
在我們有了目標計數和GUI框架之后,是時候將它們合并到一起了。我們可以將兩個腳本合并成一個名為main.py的新腳本,如下所示:
# https://www.pysimplegui.org/en/latest/#jump-start
import PySimpleGUI as sg
import cv2
# https://docs.ultralytics.com/modes/track/#python-examples
from ultralytics import YOLO


# Create Layouy of the GUI
layout = [
            [sg.Text('GUI Object Counting with Yolo V8')],
            [sg.Text('Enter Model Name', size= (15)), sg.InputText(key='model_name')],
            [sg.Text('X-line for Counting', size= (15)), sg.InputText(key= 'line_position')],
            [sg.Button('Run'), sg.Button('Stop'), sg.Button('Close')],
            [sg.Image(filename='', key='image')],
            [sg.Text('Right-to-Left', size= (15), key='out1'), sg.Text("0", key='right-to-left')],
            [sg.Text('Left-to-Right', size= (15), key='out2'), sg.Text("0", key='left-to-right')]
            ]


# Create the Window
window = sg.Window('GUIYoloV8-Counting', layout)
run_model, verbose = False, False
# Event Loop to process "events"
while True:
    event, values = window.read(timeout=0)
    # When press Run
    if event == 'Run' :
        # Load the YOLOv8 model
        model = YOLO(values['model_name'])
        # Counting config
        line_position = 50
        text_size = 30
        text_x_position = 50
        text_y_position = 0
        # Open the camera
        cap = cv2.VideoCapture(0)
        # Get Camera Parameter
        width  = cap.get(cv2.CAP_PROP_FRAME_WIDTH)
        height = cap.get(cv2.CAP_PROP_FRAME_HEIGHT)
        # Counting prep
        x_line= line_position*width/100
        pt1 = (int(x_line), 0)
        pt2 = (int(x_line), int(height))
        counting_buffer = {}
        counting_result = {'left-to-right' : 0, 'right-to-left' : 0}
        # Run Signal
        run_model = True
    # When close window or press Close
    elif event in ('Stop', sg.WIN_CLOSED, 'Close'):
        if run_model :
            run_model = False # Stop running
            cap.release() # Release video
            if event != sg.WIN_CLOSED : window['image'].update(filename='') # Destroy picture
        # When close window or press Close
        if event in (sg.WIN_CLOSED, 'Close'): break
    # Run Model
    if run_model :
        # Read a frame from the video
        success, frame = cap.read()
        if success:
            # Run YOLOv8 tracking on the frame, persisting tracks between frames
            results = model.track(frame
                                  , persist=True
                                  , verbose=False
                                  )


            # Visualize the results on the frame
            annotated_frame = results[0].plot()


            # Get Data for counting
            result = results[0].cpu().boxes
            detect_id = result.id.tolist() if result.id != None else []
            detect_xyxy = result.xyxy.tolist() if result.xyxy != None else []
            frame_counting_buffer = dict(zip(detect_id, detect_xyxy))
            # Process
            for i in frame_counting_buffer :
                # Prep count buffer
                counting_buffer[i] = counting_buffer.get(i,[])
                if len(counting_buffer[i]) >= 2 : counting_buffer[i] = counting_buffer[i][-1:]
                # Append avg x axis to buffer
                avg_x = (frame_counting_buffer[i][0] + frame_counting_buffer[i][2])/2
                counting_buffer[i].append(avg_x)
                # Count logic
                if len(counting_buffer[i]) >= 2 :
                    if (counting_buffer[i][0] > x_line) & (counting_buffer[i][1] < x_line) :
                        counting_result['right-to-left'] += 1
                    elif (counting_buffer[i][0] < x_line) & (counting_buffer[i][1] > x_line) :
                        counting_result['left-to-right'] += 1
            # Create Line
            cv2.line(annotated_frame, pt1= pt1, pt2= pt2 , color= (0,0,255), thickness= 2)
            # Put Counting to picture
            text_position = text_y_position
            for i in counting_result :
                text_position += text_size
                info_text = f"{i} : {counting_result[i]}"
                annotated_frame = cv2.putText(  annotated_frame
                                            , info_text
                                            , (int(width*text_x_position/100)
                                            , text_position)
                                            , cv2.FONT_HERSHEY_SIMPLEX
                                            , 1
                                            , (0,0,255)
                                            , 1
                                            , cv2.LINE_AA)
            # Show Image
            imgbytes = cv2.imencode('.png', annotated_frame)[1].tobytes()
            window['image'].update(data=imgbytes)
            window['right-to-left'].update(str(counting_result['right-to-left']))
            window['left-to-right'].update(str(counting_result['left-to-right']))
        else:
            # Break the loop if not read
            cap.release()
            run_model = False

# Close window
window.close()
然后,我們可以運行主腳本。
python main.py
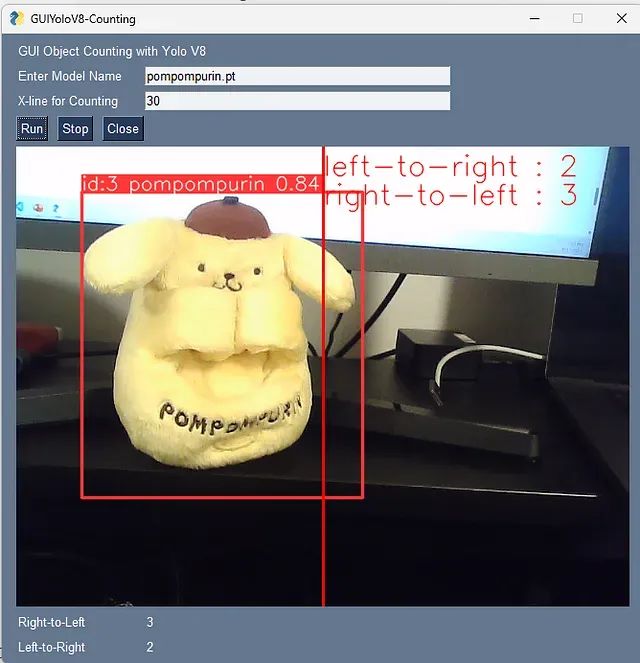
然后,我們就可以得到以下圖片所示的目標計數GUI。這一次,我將使用一個定制模型來識別我從Ultralytics HUB創建的Pompompurin。
初始階段
按下“RUN”后,我的新模型知道它現在是一只狗... 接下來,為了讓我們的用戶更輕松地使用,我們可以創建一個包含以下代碼的“cmd”文件。
python main.py
pause
現在,用戶可以通過打開cmd文件來使用我們的GUI/應用程序。
審核編輯:劉清
-
GUI
+關注
關注
3文章
697瀏覽量
43473 -
python
+關注
關注
57文章
4876瀏覽量
90045
原文標題:使用YOLOv8構建目標計數GUI
文章出處:【微信號:vision263com,微信公眾號:新機器視覺】歡迎添加關注!文章轉載請注明出處。
發布評論請先 登錄
labview調用yolov8/11目標檢測、分割、分類
在AI愛克斯開發板上用OpenVINO?加速YOLOv8目標檢測模型

YOLOv8版本升級支持小目標檢測與高分辨率圖像輸入
AI愛克斯開發板上使用OpenVINO加速YOLOv8目標檢測模型

目標檢測算法再升級!YOLOv8保姆級教程一鍵體驗
解鎖YOLOv8修改+注意力模塊訓練與部署流程
如何修改YOLOv8的源碼

基于YOLOv8的自定義醫學圖像分割
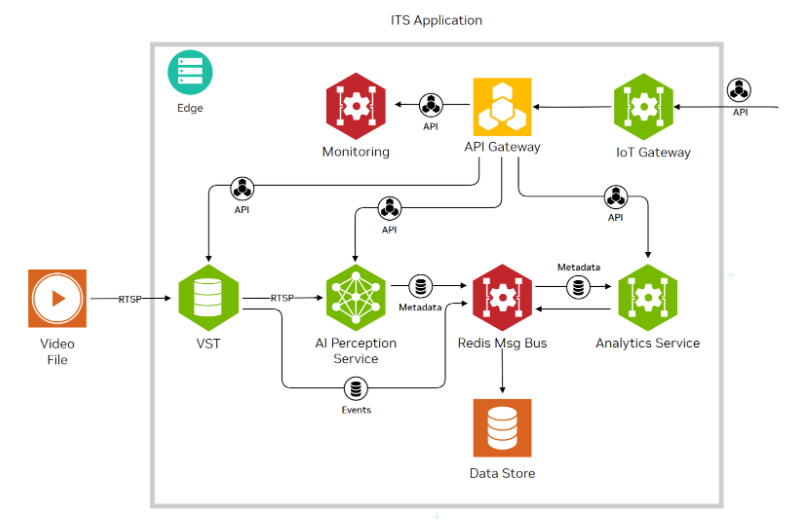
使用NVIDIA JetPack 6.0和YOLOv8構建智能交通應用
RV1126 yolov8訓練部署教程
使用ROCm?優化并部署YOLOv8模型


 工商網監
工商網監
評論