 HarmonyOS應用開發之Java UI框架

TableLayout使用表格的方式劃分子組件。
TableLayout的共有XML屬性繼承自:Component。
TableLayout的自有XML屬性見下表:
| 屬性名稱 | 中文描述 | 取值 | 取值說明 | 使用案例 |
|---|---|---|---|---|
| alignment_type | 對齊方式 | align_edges | 表示TableLayout內的組件按邊界對齊。 | ohos:alignment_type="align_edges" |
| align_contents | 表示TableLayout內的組件按邊距對齊。 | ohos:alignment_type="align_contents" | ||
| column_count | 列數 | integer類型 | 可以直接設置整型數值,也可以引用integer資源。 |
ohos:column_count="3" ohos:column_count="$integer:count" |
| row_count | 行數 | integer類型 | 可以直接設置整型數值,也可以引用integer資源。 |
ohos:row_count="2" ohos:row_count="$integer:count" |
| orientation | 排列方向 | horizontal | 表示水平方向布局。 | ohos:orientation="horizontal" |
| vertical | 表示垂直方向布局。 | ohos:orientation="vertical" |
在XML中創建TableLayout,示例代碼如下:
在graphic文件夾下創建Text的背景table_text_bg_element.xml,示例代碼如下:
ohos:radius="5vp"/>
在TableLayout布局中添加子組件。
xmlns:ohos="http://schemas.huawei.com/res/ohos"
    ohos:height="match_parent"
    ohos:width="match_parent"
    ohos:background_element="#87CEEB"
    ohos:padding="8vp">
    ohos:height="60vp"
        ohos:width="60vp"
        ohos:background_element="$graphic:table_text_bg_element"
        ohos:margin="8vp"
        ohos:text="1"
        ohos:text_alignment="center"
        ohos:text_size="20fp"/>
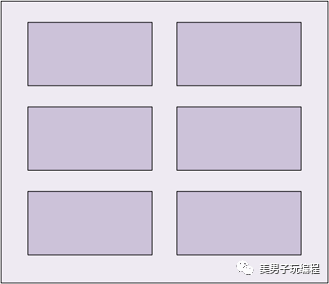
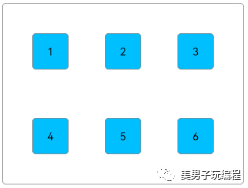
TableLayout默認一列多行。
設置行列數:
...
    ohos:row_count="2"
    ohos:column_count="2">
設置TableLayout的行為2,列為2效果。
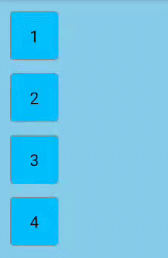
在XML中設置布局排列方向,以“vertical”為例:
...
    ohos:orientation="vertical">
    ...
設置布局排列方向為“vertical”的效果。
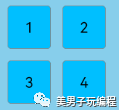
TableLayout提供兩種對齊方式,邊距對齊“align_contents”、邊界對齊“align_edges”,默認為邊距對齊“align_contents”。代碼如下:
xmlns:ohos="http://schemas.huawei.com/res/ohos"
    ohos:height="match_content"
    ohos:width="match_content"
    ohos:alignment_type="align_contents"
    ohos:background_element="$graphic:layout_borderline"
    ohos:column_count="3"
    ohos:padding="8vp">


    ohos:height="48vp"
        ohos:width="48vp"
        ohos:background_element="$graphic:table_text_bg_element"
        ohos:margin="8vp"
        ohos:padding="8vp"
        ohos:text="1"
        ohos:text_alignment="center"
        ohos:text_size="14fp"/>
邊距對齊效果:
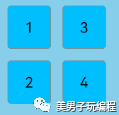
將TableLayout的對齊方式修改為邊界對齊。
...
ohos:alignment_type="align_edges">
    ...
邊界對齊效果:
引用graphic文件夾下的背景資源文件為layout_borderline.xml,示例代碼如下:
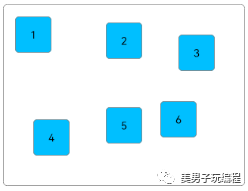
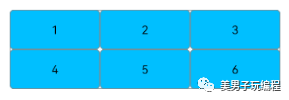
TableLayout合并單元格的效果可以通過設置子組件的行列屬性來實現。
設置子組件的行列屬性均為2的效果展示:
在XML中創建TableLayout,并添加子組件,代碼如下:
xmlns:ohos="http://schemas.huawei.com/res/ohos"
    ohos:height="match_content"
    ohos:width="match_content"
    ohos:alignment_type="align_edges"
    ohos:background_element="$graphic:layout_borderline"
    ohos:column_count="3"
    ohos:padding="8vp"
    ohos:row_count="3">


    ohos:id="$+id:text_one"
        ohos:height="48vp"
        ohos:width="48vp"
        ohos:background_element="$graphic:table_text_bg_element"
        ohos:margin="16vp"
        ohos:padding="8vp"
        ohos:text="1"
        ohos:text_alignment="center"
        ohos:text_size="14fp"/>
在Java代碼中設置子組件的行列屬性,代碼如下:
@Override
    protected void onStart(Intent intent) {
        ...
        Component component = findComponentById(ResourceTable.Id_text_one);
        TableLayout.LayoutConfig tlc = new TableLayout.LayoutConfig(vp2px(72), vp2px(72));
        tlc.columnSpec = TableLayout.specification(TableLayout.DEFAULT, 2);
        tlc.rowSpec = TableLayout.specification(TableLayout.DEFAULT, 2);
        component.setLayoutConfig(tlc);
    }


    private int vp2px(float vp) {
        return AttrHelper.vp2px(vp, getContext());
    }
在設置子組件的行列屬性時,TableLayout剩余的行數和列數必須大于等于該子組件所設置的行數和列數。
目前僅支持Java代碼設置TableLayout子組件的行列屬性。
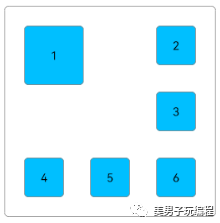
在創建子組件的行列屬性時,還可設置子組件的對齊方式,修改上述Java代碼如下:
@Override
    protected void onStart(Intent intent) {
        ...
        tlc.columnSpec = TableLayout.specification(TableLayout.DEFAULT, 2, TableLayout.Alignment.ALIGNMENT_FILL);
        tlc.rowSpec = TableLayout.specification(TableLayout.DEFAULT, 2, TableLayout.Alignment.ALIGNMENT_FILL);
        ...
    }
子組件的對齊方式設置為ALIGNMENT_FILL的效果:
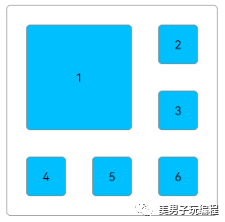
設置子組件的權重,代碼如下:
@Override
    protected void onStart(Intent intent) {
        ...
        TableLayout.LayoutConfig tlc = new TableLayout.LayoutConfig(0, vp2px(48));
        tlc.columnSpec = TableLayout.specification(TableLayout.DEFAULT, 1, 1.0f);
        tlc.rowSpec = TableLayout.specification(TableLayout.DEFAULT, 1);


        findComponentById(ResourceTable.Id_text_one).setLayoutConfig(tlc);
        findComponentById(ResourceTable.Id_text_two).setLayoutConfig(tlc);
        findComponentById(ResourceTable.Id_text_three).setLayoutConfig(tlc);
        findComponentById(ResourceTable.Id_text_four).setLayoutConfig(tlc);
        findComponentById(ResourceTable.Id_text_five).setLayoutConfig(tlc);
        findComponentById(ResourceTable.Id_text_six).setLayoutConfig(tlc);
    }
上述代碼將子組件的寬度權重設置為1.0,每行子組件會均分TableLayout的寬度,所以需要設置TableLayout為固定寬度或match_parent。
ohos:width="match_parent"
    ...>


    ohos:id="$+id:text_one"
        .../>
將子組件的寬度權重設置為1.0的效果展示:
審核編輯:湯梓紅
-
JAVA
+關注
關注
20文章
3001瀏覽量
116439 -
XML
+關注
關注
0文章
188瀏覽量
34536 -
框架
+關注
關注
0文章
404瀏覽量
18425 -
HarmonyOS
+關注
關注
80文章
2153瀏覽量
36053
原文標題:HarmonyOS學習路之開發篇—Java UI框架(Table Layout)
文章出處:【微信號:美男子玩編程,微信公眾號:美男子玩編程】歡迎添加關注!文章轉載請注明出處。
發布評論請先 登錄
【HarmonyOS HiSpark AI Camera試用連載 】鴻蒙JS UI介紹
請教鴻蒙應用開發JAVA UI 框架ProgressBar或者RoundProgressBar怎么實現滑動調節
基于HarmonyOS Java UI使用元數據綁定框架實現UI和數據源的綁定
基于HarmonyOS Java UI,使用元數據綁定框架,實現UI和數據源的綁定
HarmonyOS自動化測試框架—Hypium
4天帶你上手HarmonyOS ArkUI開發——《HarmonyOS ArkUI入門訓練營之健康生活實戰》
在HarmonyOS版本下如何基于JS UI框架來開發?
HarmonyOS JS應用開發需要關注哪些線程?官方解析來啦~
華為開發者HarmonyOS零基礎入門:HarmonyOS UI編程框架快速上手

華為開發者HarmonyOS零基礎入門:UI組件設計開發實踐


全面解讀HarmonyOS新一代UI框架


 工商網監
工商網監
評論