 怎樣通過藍牙僅使用Android手機為樹莓派配置Wi-Fi網絡

如果你已經使用Raspberry Pi一段時間了,你可能會遇到幾個您需要連接并重新連接Pi的Wi-Fi網絡的情況。這樣做可能需要您將Pi連接到顯示器,鍵盤和整個設備,或者使用其他設備直接在存儲卡上進行配置。
在本教程中,我想向您展示一種通過藍牙僅使用Android手機為Raspberry Pi配置Wi-Fi網絡的簡便方法。
使用此技術,您不再需要擔心在無頭Raspberry Pi上切換Wi-Fi網絡。
必備材料
首先,您需要:
Raspberry Pi 3
Raspbian加載到microSD
Android手機
APK文件和Python運行腳本
在Raspbian上安裝Bluez
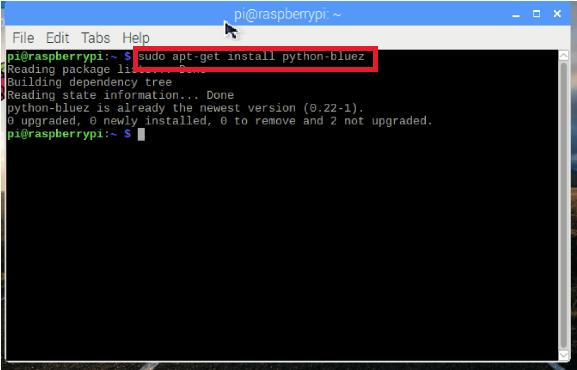
在Raspbian終端中逐步輸入以下命令,從安裝Bluez(Python藍牙庫)開始:
$ sudo apt-get install python-bluez
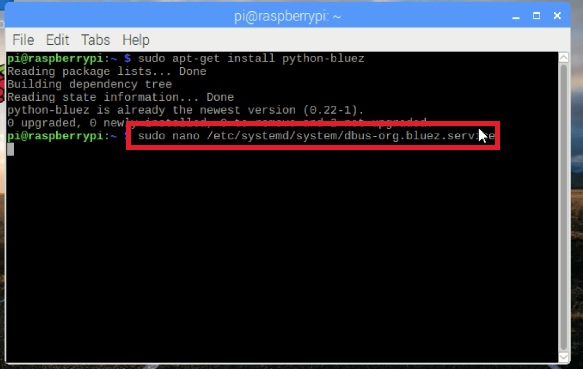
啟動藍牙守護程序兼容模式,編輯/etc/systemd/system/dbus-org.bluez.service ,輸入以下命令:
$ sudo nano /etc/systemd/system/dbus-org.bluez.service
并修改ExecStart參數
ExecStart =/usr/lib/bluetooth/bluetoothd -C

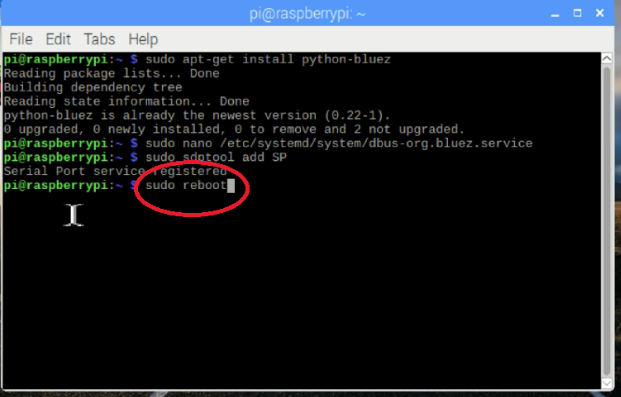
加載串口配置文件:

重新啟動你的Pi:
$ sudo reboot
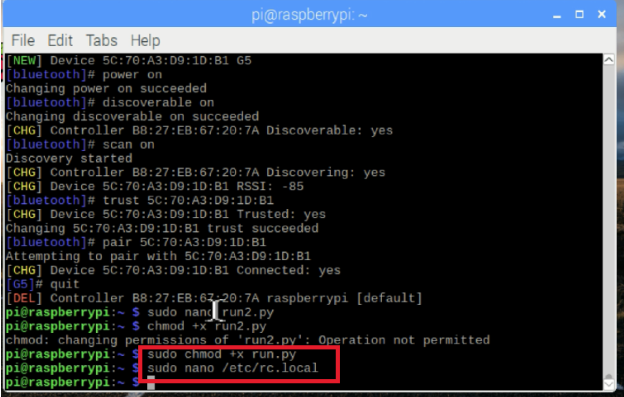
將Pi的藍牙與Android配對
重啟后,將Pi的藍牙與Android手機配對。
配對藍牙:
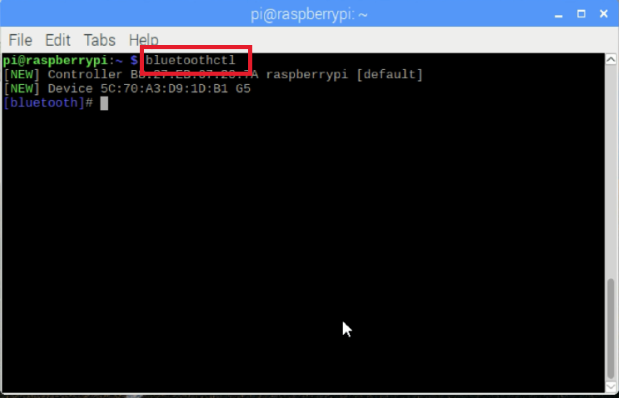
打開手機的藍牙,將手機與Raspberry Pi配對。接下來,在您的Pi上輸入:
$ bluetoothctl
power on
discoverable on
scan on
您的手機將顯示在可用設備列表中。記下您手機的地址。
信任
對
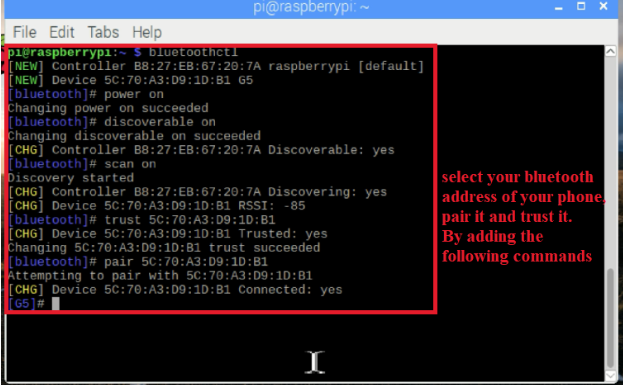
要退出藍牙ctl,請輸入退出命令:
退出
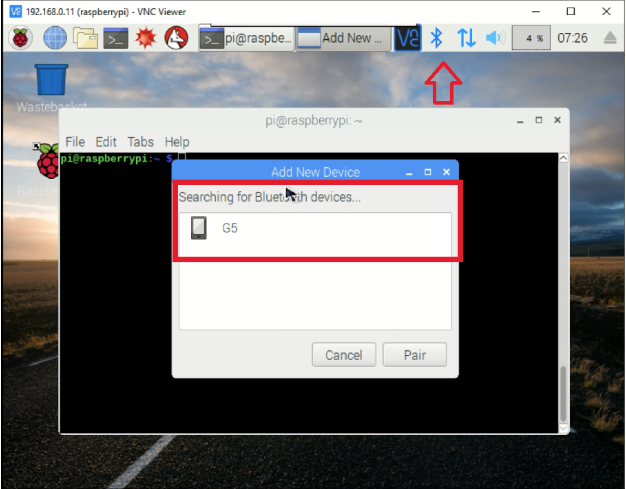
您也可以跳過以上設置如果您發現可以使用Raspbian的UI輕松設置藍牙。
在配對藍牙后,通過輸入nano命令并復制/粘貼源代碼,將Python腳本直接添加到Raspbian中:
$ sudo python run.py
你也可以在這里直接復制run.py文件。
接下來,您可以運行該腳本。但首先使腳本可執行:
$ chmod +x run.py
運行:
$ sudo 。/run.py
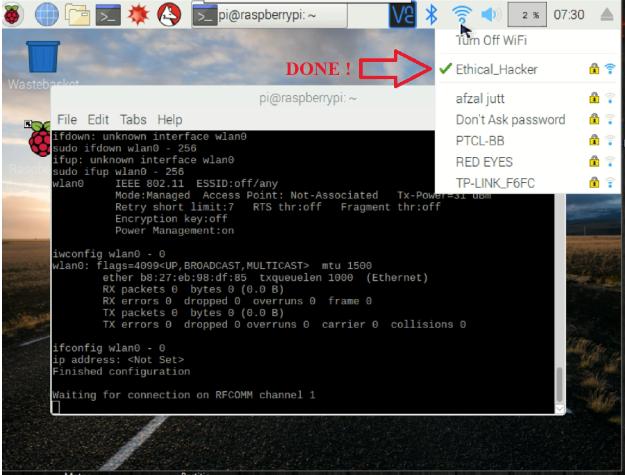
執行此操作后,現在需要打開Android應用程序。為此,請使用此處的.apk文件下載并安裝應用程序。
在藍牙配對設備中選擇Raspberry Pi。輸入SSID,PSK并點擊開始配置按鈕。在幾秒鐘內,您的Raspberry Pi的Wi-Fi應該連接,如下圖所示。


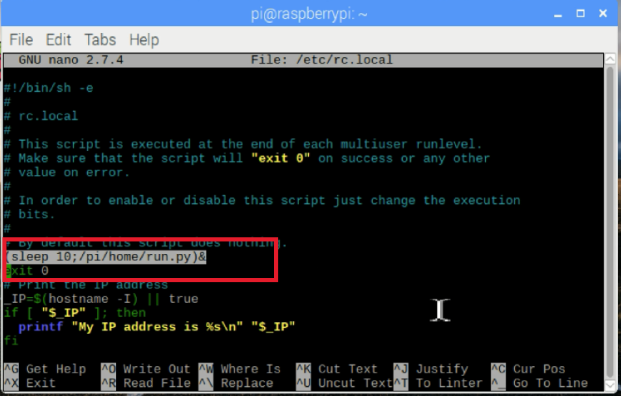
要在啟動時運行此腳本,請編輯/etc/rc.local 并添加:
(睡10;/path/to/script/。/run.py)&
源代碼(run.py)
#!/usr/bin/env python
import os
from bluetooth import *
from wifi import Cell, Scheme
import subprocess
import time
wpa_supplicant_conf = “/etc/wpa_supplicant/wpa_supplicant.conf”
sudo_mode = “sudo ”
def wifi_connect(ssid, psk):
# write wifi config to file
cmd = ‘wpa_passphrase {ssid} {psk} | sudo tee -a {conf} 》 /dev/null’.format(
ssid=str(ssid).replace(‘!’, ‘\!’),
psk=str(psk).replace(‘!’, ‘\!’),
conf=wpa_supplicant_conf
)
cmd_result = “”
cmd_result = os.system(cmd)
print cmd + “ - ” + str(cmd_result)
# reconfigure wifi
cmd = sudo_mode + ‘wpa_cli -i wlan0 reconfigure’
cmd_result = os.system(cmd)
print cmd + “ - ” + str(cmd_result)
time.sleep(10)
cmd = ‘iwconfig wlan0’
cmd_result = os.system(cmd)
print cmd + “ - ” + str(cmd_result)
cmd = ‘ifconfig wlan0’
cmd_result = os.system(cmd)
print cmd + “ - ” + str(cmd_result)
p = subprocess.Popen([‘hostname’, ‘-I’], stdout=subprocess.PIPE,
stderr=subprocess.PIPE)
out, err = p.communicate()
if out:
ip_address = out
else:
ip_address = “”
return ip_address
def ssid_discovered():
Cells = Cell.all(‘wlan0’)
wifi_info = ‘Found ssid : ’
for current in range(len(Cells)):
wifi_info += Cells[current].ssid + “ ”
wifi_info+=“!”
print wifi_info
return wifi_info
def handle_client(client_sock) :
# get ssid
client_sock.send(ssid_discovered())
print “Waiting for SSID.。.”
ssid = client_sock.recv(1024)
if ssid == ‘’ :
return
print “ssid received”
print ssid
# get psk
client_sock.send(“waiting-psk!”)
print “Waiting for PSK.。.”
psk = client_sock.recv(1024)
if psk == ‘’ :
return
print “psk received”
print psk
ip_address = wifi_connect(ssid, psk)
print “ip address: ” + ip_address
client_sock.send(“ip-address:” + ip_address + “!”)
return
try:
while True:
server_sock=BluetoothSocket( RFCOMM )
server_sock.bind((“”,PORT_ANY))
server_sock.listen(1)
port = server_sock.getsockname()[1]
uuid = “815425a5-bfac-47bf-9321-c5ff980b5e11”
advertise_service( server_sock, “RPi Wifi config”,
service_id = uuid,
service_classes = [ uuid, SERIAL_PORT_CLASS ],
profiles = [ SERIAL_PORT_PROFILE ])
print “Waiting for connection on RFCOMM channel %d” % port
client_sock, client_info = server_sock.accept()
print “Accepted connection from ”, client_info
handle_client(client_sock)
client_sock.close()
server_sock.close()
# finished config
print ‘Finished configuration ’
except (KeyboardInterrupt, SystemExit):
print ‘ Exiting ’
-
Android
+關注
關注
12文章
4026瀏覽量
133999 -
藍牙
+關注
關注
119文章
6313瀏覽量
178735 -
wi-fi
+關注
關注
15文章
2424瀏覽量
129567 -
樹莓派
+關注
關注
122文章
2078瀏覽量
110474
發布評論請先 登錄
技術資訊 I Wi-Fi 模塊設計

ESP32 Wi-Fi 控制 LED 燈的原理

Wi-Fi:無線連接的全球通用語
賦予白色家電新智能!增添Wi-Fi 6、低功耗藍牙和Matter連接

淺談Wi-Fi 6E與Wi-Fi 7的關鍵器件——BAW濾波器新技術
銳捷網絡:Wi-Fi 7加速演進,2025年進入快速爬坡期

Wi-Fi 8:開啟極高可靠性 (UHR) 連接的新紀元——2
DA16600MOD超低功耗Wi-Fi低功耗藍牙組合模塊數據手冊


 工商網監
工商網監
評論