 電子發燒友App


 創作
創作 發文章
發文章 發帖
發帖  提問
提問  發資料
發資料 發視頻
發視頻資料介紹
描述
介紹
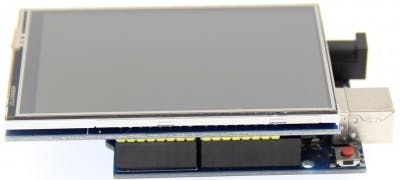
經過一段時間的分析,我在這里繼續用另一種方式來表示電位器的模擬值,這次我想體驗一個3.5“TFT LCD,我喜歡它的尺寸和可以表示的各種顏色。它是一個組件值得一些項目擁有。當然,這個文檔也是關于模擬值的傳奇的一部分。
圖表
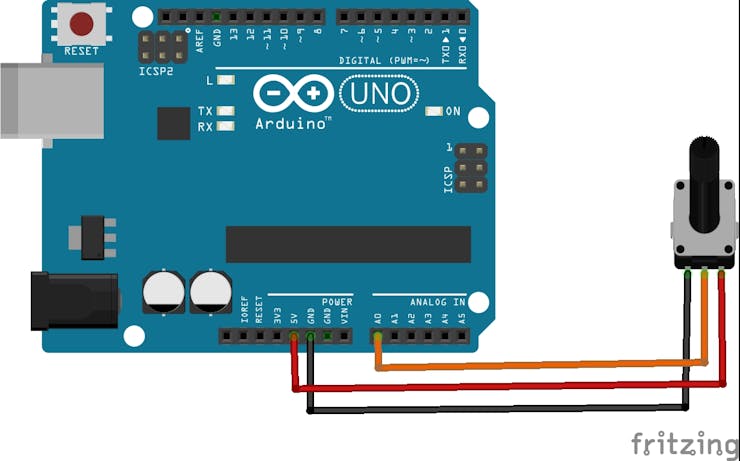
要開發這個項目,不需要復雜的連接或圖表,因為電位器必須連接到引腳 A0,然后按照圖像參考將屏幕安裝在 Arduino UNO 上。
?
圖片來自 LCDwiki
?
另一個重要的細節:必要的庫是LCDWIKI_GUI.h和LCDWIKI_KBV,我喜歡這些庫的地方在于易于設計引人注目的元素、文本和背景。
代碼的系統
我們包括必要的圖形庫以使用屏幕并表示必要的形式。
#include  //Core graphics library
#include  //Hardware-specific library
接下來我們為各自的庫構建屏幕。
LCDWIKI_KBV my_lcd(ILI9486,A3,A2,A1,A0,A4);
我們定義要使用的顏色。
#define  BLACK   0x0000
#define RED     0xF800
#define GREY 0x2104 // Dark grey 16 bit colour
#define GREEN 0x07E0
#define WHITE 0xFFFF
#define BLUE 0x001F
// Meter colour schemes
#define RED2RED 0
#define GREEN2GREEN 1
#define BLUE2BLUE 2
#define BLUE2RED 3
#define GREEN2RED 4
#define RED2GREEN 5
我們設置變量來控制時間并存儲模擬讀數的值。
uint32_t runTime = -99999; // time for next update
int reading = 0; // Value to be displayed
現在,在下面幾行設置代碼中,我們分別初始化屏幕、設置深色背景和設置屏幕旋轉方向。
void setup() {
  my_lcd.Init_LCD();
  my_lcd.Fill_Screen(0x0);
  my_lcd.Set_Rotation(1);
}
ringMeter 函數是代碼的核心,內部應用數學公式創建各種三角形,兩個頂點在內弧上,另一個頂點在外弧上,然后生成一個倒三角形。各種三角形的生成允許構建圓形條并逐漸將顏色應用于它。然后生成居中文本的表示,為此考慮了它所具有的圖形數量。
int ringMeter(int value, int vmin, int vmax, int x, int y, int r, byte scheme){
  // Minimum value of r is about 52 before value text intrudes on ring
  // drawing the text first is an option
  x += r; y += r;   // Calculate coords of centre of ring
  int w = r / 4;    // Width of outer ring is 1/4 of radius
  int angle = 150;  // Half the sweep angle of meter (300 degrees)
  int text_colour = 0; // To hold the text colour
  int v = map(value, vmin, vmax, -angle, angle); // Map the value to an angle v
  byte seg = 5; // Segments are 5 degrees wide = 60 segments for 300 degrees
  byte inc = 5; // Draw segments every 5 degrees, increase to 10 for segmented ring
  // Draw colour blocks every inc degrees

  for (int i = -angle; i < angle; i += inc) {
    // Choose colour from scheme
    int colour = 0;
    switch (scheme) {
      case 0: colour = RED; break; // Fixed colour
      case 1: colour = GREEN; break; // Fixed colour
      case 2: colour = BLUE; break; // Fixed colour
      case 3: colour = rainbow(map(i, -angle, angle, 0, 127)); break; // Full spectrum blue to red
      case 4: colour = rainbow(map(i, -angle, angle, 63, 127)); break; // Green to red (high temperature etc)
      case 5: colour = rainbow(map(i, -angle, angle, 127, 63)); break; // Red to green (low battery etc)
      default: colour = BLUE; break; // Fixed colour
    }

    // Calculate pair of coordinates for segment start
    float sx = cos((i - 90) * 0.0174532925);
    float sy = sin((i - 90) * 0.0174532925);
    uint16_t x0 = sx * (r - w) + x;
    uint16_t y0 = sy * (r - w) + y;
    uint16_t x1 = sx * r + x;
    uint16_t y1 = sy * r + y;

    // Calculate pair of coordinates for segment end
    float sx2 = cos((i + seg - 90) * 0.0174532925);
    float sy2 = sin((i + seg - 90) * 0.0174532925);
    int x2 = sx2 * (r - w) + x;
    int y2 = sy2 * (r - w) + y;
    int x3 = sx2 * r + x;
    int y3 = sy2 * r + y;
    if (i < v) { // Fill in coloured segments with 2 triangles
      my_lcd.Set_Draw_color(colour);
      my_lcd.Fill_Triangle(x0, y0, x1, y1, x2, y2);
      my_lcd.Fill_Triangle(x1, y1, x2, y2, x3, y3);
      text_colour = colour; // Save the last colour drawn
    }
    else // Fill in blank segments
    {
      my_lcd.Set_Draw_color(GREY);
      my_lcd.Fill_Triangle(x0, y0, x1, y1, x2, y2);
      my_lcd.Fill_Triangle(x1, y1, x2, y2, x3, y3);
    }
  }

  // Convert value to a string
  char buf[10];
  byte len = 4; if (value > 999) len = 5;
  dtostrf(value, len, 0, buf);
  my_lcd.Set_Draw_color(0, 0,0);
  my_lcd.Fill_Rectangle(x-60, y-15, x+60, y+20);

  // Set the text colour to default
  my_lcd.Set_Text_colour(WHITE);
  my_lcd.Set_Text_Back_colour(BLACK);
  my_lcd.Set_Text_Size(5);
  if (value>999){
    my_lcd.Print_String(String(value), x-60, y-15);
  } else if (value>99 && value<1000){
    my_lcd.Print_String(String(value), x-45, y-15);
  } else if (value>9 && value<100){
    my_lcd.Print_String(String(value), x-30, y-15);
  } else {
    my_lcd.Print_String(String(value), x-15, y-15);
  }
  return x + r;
}
彩虹功能允許您設置用于圓形條的顏色變化。
unsigned int rainbow(byte value){
  // Value is expected to be in range 0-127
  // The value is converted to a spectrum colour from 0 = blue through to 127 = red
  byte red = 0; // Red is the top 5 bits of a 16 bit colour value
  byte green = 0;// Green is the middle 6 bits
  byte blue = 0; // Blue is the bottom 5 bits
  byte quadrant = value / 32;
  if (quadrant == 0) {
    blue = 31;
    green = 2 * (value % 32);
    red = 0;
  }
  if (quadrant == 1) {
    blue = 31 - (value % 32);
    green = 63;
    red = 0;
  }
  if (quadrant == 2) {
    blue = 0;
    green = 63;
    red = value % 32;
  }
  if (quadrant == 3) {
    blue = 0;
    green = 63 - 2 * (value % 32);
    red = 31;
  }
  return (red << 11) + (green << 5) + blue;
}
在循環期間,您需要從電位器讀取模擬信號,然后調用 ringmeter 函數進行繪圖。
void loop() {
  if (millis() - runTime >= 100L) {
    runTime = millis();
    // Set the position, gap between meters, and inner radius of the meters
    int gap = 4, radius = 120, xpos = my_lcd.Get_Display_Width()/2-radius, ypos = my_lcd.Get_Display_Height()/2-radius;
    int value = analogRead(A5); // read of potentiometer value
    xpos = gap + ringMeter(value, 0, 1020, xpos, ypos, radius, GREEN2RED); // Draw analogue meter
  }
}
結論
所有與用戶交互的項目都允許欣賞與代碼的各種交互,尤其是這個項目讓我探索了 TFT 屏幕的使用、它的顏色甚至基本的圖形元素。3.5 英寸的屏幕非常漂亮且易于使用,一旦您從制造商那里獲得了技術信息,您仍然可以分享您使用此屏幕的體驗。
下載該資料的人也在下載
下載該資料的人還在閱讀
更多 >
- 廣州大彩VisualTFT組態控件教程(三)進度條控件 1次下載
- LcdProgressBarDouble LCD顯示器顯示兩個進度條
- ProgressView進度視圖的用法 2次下載
- 支持組件所有基本功能的圓形進度條 1次下載
- 將底層接口調用實現成鴻蒙接口的循環音樂進度條 3次下載
- 漸變的圓形進度條與輕量橫向進度條演示 3次下載
- 圓形進度條openharmony視圖安裝使用 1次下載
- 基于openharmony適配移植的圓形動態進度條演示 1次下載
- 串口屏Modbus教程3-儀表、滑塊及進度條控件V1.0
- 大彩串口屏控件教程15 - 圓形進度條控件應用
- 大彩串口屏控件教程3 - 串口屏進度條控件應用
- Linux基礎教程之linux wget下載進度條變成多行顯示如何解決 19次下載
- 優化數字電位器電路設計方案 13次下載
- 工程技術筆記—圓形進度條使用 0次下載
- C#教程之彈出模式窗口顯示進度條 7次下載
- 【AWTK使用經驗】如何設計立體電池進度條? 1.2k次閱讀
- 電位器的作用以及接線方式,電位器的應用場合、選用原則 1.2w次閱讀
- 電工知識--電位器及電位器的檢測 5.2k次閱讀
- 如何使用Github上的advcpmv來實現Linux中的cp和mv命令的進度條呢 2.5k次閱讀
- 雙聯電位器接線方法_雙聯電位器接線注意事項 2.6w次閱讀
- 十大bourns電位器推薦 1.3w次閱讀
- bourns電位器接線圖 1.4w次閱讀
- 變頻器接電位器怎么接_變頻器電位器接線圖_變頻器外接電位器接法 4.6w次閱讀
- 如何理解數字電位器 1w次閱讀
- 如何制作數字電位器_數字電位器制作方法 2.2w次閱讀
- 數字電位器工作原理詳解_數字電位器應用_數字電位器選型指南 6.2w次閱讀
- 數字電位器控制原理圖 3.7w次閱讀
- 數字電位器應用實例_數字電位器四大應用電路 4.9w次閱讀
- 數字電位器怎么選型_數字電位器選型指南 1w次閱讀
- 電位器的結構特點是什么? 2.6k次閱讀

 上傳資料賺積分
下載排行
本周
- 1SY50655 用于高輸入電壓應用的偽固定頻率SSR反激式穩壓器英文資料
- 1.01 MB | 3次下載 | 免費
- 2華潤微 CRTE280P06L2-G -60V Trench P-MOSFET 技術參數與應用解析
- 1.83 MB | 2次下載 | 免費
- 3PC0805全集成單相無刷直流電機可編程閉環驅動器英文資料
- 0.59 MB | 1次下載 | 免費
- 4英集芯 IP5419 支持數碼屏顯示的TWs耳機充電倉管理SoC技術手冊
- 5.56 MB | 1次下載 | 免費
- 5英集芯 IP5426V 雙通道輸出的 TWS 充電盒 SOC技術手冊
- 8.11 MB | 1次下載 | 免費
- 6變頻器維修資料大全
- 1.28 MB | 1次下載 | 4 積分
- 7SY52341 次級側同步整流英文手冊
- 0.94 MB | 1次下載 | 免費
- 8SY50213N 反激式穩壓器帶主側CV/CC控制技術手冊
- 1.16 MB | 次下載 | 免費
本月
- 1EMC PCB設計總結
- 0.33 MB | 11次下載 | 免費
- 2耗盡型MOS FET產品目錄選型表
- 0.14 MB | 4次下載 | 免費
- 3PD取電芯片 ECP5702規格書
- 0.88 MB | 4次下載 | 免費
- 4SY50655 用于高輸入電壓應用的偽固定頻率SSR反激式穩壓器英文資料
- 1.01 MB | 3次下載 | 免費
- 5九陽JYCP-21ZD-A主控板電路圖資料
- 2.33 MB | 2次下載 | 10 積分
- 6氮化鎵GaN FET/GaN HEMT 功率驅動電路選型表
- 0.10 MB | 2次下載 | 免費
- 7華潤微 CRTE280P06L2-G -60V Trench P-MOSFET 技術參數與應用解析
- 1.83 MB | 2次下載 | 免費
- 8PD取電芯片,可取5/9/12/15/20V電壓ECP5702數據手冊
- 0.88 MB | 1次下載 | 免費
總榜
- 1matlab軟件下載入口
- 未知 | 935137次下載 | 10 積分
- 2開源硬件-PMP21529.1-4 開關降壓/升壓雙向直流/直流轉換器 PCB layout 設計
- 1.48MB | 420064次下載 | 10 積分
- 3Altium DXP2002下載入口
- 未知 | 233095次下載 | 10 積分
- 4電路仿真軟件multisim 10.0免費下載
- 340992 | 191464次下載 | 10 積分
- 5十天學會AVR單片機與C語言視頻教程 下載
- 158M | 183360次下載 | 10 積分
- 6labview8.5下載
- 未知 | 81606次下載 | 10 積分
- 7Keil工具MDK-Arm免費下載
- 0.02 MB | 73832次下載 | 10 積分
- 8LabVIEW 8.6下載
- 未知 | 65991次下載 | 10 積分


 工商網監
工商網監
評論